IP
Enter a long URL to make Tiny!

Enable Or Disable The Windows 7 Administrator Account

The easiest way to enable or disable the Windows 7 build in administrator account is from the command line. Open a command prompt with administrator rights. This is done by right-clicking on the command prompt icon in the Windows 7 start menu and selecting Run As Administrator from the available options.To enable the Windows 7 administrator account: net user administrator /active:yes

To disable the Windows 7 administrator account: net user administrator /active:no

To change the password of the Windows 7 administrator account: Net user administrator password

An alternative would be to enable or disable the Windows 7 administrator account using the Local Security Policy option. You can open the Local Security Policy by launching secpol.msc from the run box.

You find the option under Local Policies-> Security Options. Just change the setting Accounts: Administrator account by double-clicking the entry.

How to install flash player without administrator privilege

  1. Download Adobe Flash Player or you can check flash version at Version test for Adobe Flash Player page.
  2. Download NPSWF32.zip (size 1.95 MB, version 10.0.32.18), unzip NPSWF32.dll and place it inside program\plugins inside in the browser installation directory (Exp: C:\Program Files\Opera\program\plugins).
[or]
  1. Download Universal Extractor binary archive (size 4.44 MB), extract contents and run UniExtract.exe.
  2. Drag & drop flash player installer inside Archive/Installer to extract, press OK and again press OK.
  3. Move NPSWF32.dll from MAINDIR directory inside Universal Extractor Destination directory to program\plugins inside in the browser installation directory.
Note : Got the solution from "opera.com"
More solutions
How to uninstall the Adobe Flash Player plug-in and ActiveX control
Error of flash player while playing pogo games.
Adobe flash no sound problem.

How to Reset Winsock

When you have network connectivity problem and you have done all the checking like LAN cable check, switch/router power-cycle and yet you are still unable to get an IP address from your DHCP server or It shows limited network connectivity. Then, you might need to reset your winsock.

Winsock is a Microsoft Windows DLL file that provides the interface to TCP/IP services, essentially allowing Windows to use Web browsers, FTP programs, and others.

Here’s how to reset your winsock in windows XP / 200(x)

1. Open the command prompt

2. Type in “netsh winsock reset” (without the quotes)

3. After resetting winsock, Restart your computer.

That’s it, you have successfully reset your winsock.

How to use the Windows Debugging Tools to analyze a crash dump (BSOD)

You can use Debugging Tools for Windows to debug drivers, applications, and services on systems that are running Windows NT 4.0, Windows 2000, Windows XP, Windows Server 2003, Windows Vista, or Windows Server 2008. You can also use Debugging Tools for Windows to debug the operating system itself. Versions of the Debugging Tools for Windows package are available for 32-bit x86, native Intel Itanium, and native x64 platforms.

The latest release of Debugging Tools for Windows is available for download (see the Using Debugging Tools for Windows section on this page). You can also install the package from the Windows Driver Kit (WDK), the Platform SDK, or a Customer Support Diagnostics CD.

Note: If you have a system with a 64-bit processor and you are debugging an application on it, you must use one of the native 64-bit packages.

Using Debugging Tools for Windows

Download Debugging Tools for Windows 64-bit Version

Download Debugging Tools for Windows 32-bit Version

Analyzed the mini dump file located at c:\windows\minidump\mini___.dmp
1. Download and installed the debugging tool.
2. Click the Start button, point to All Programs, and then click Windbg.
3. Click on File and select "Open Crash Dump..."
4. Search for minidump file (c:\windows\minidump\mini___.dmp)
5. After open the file, it will show you problem description. Either software or hardware.

Enabling Telnet Client in Windows Vista

To install the Telnet client on Windows Vista follow this procedure:
1. Click the Start button > Control Panel > Programs, and then click Turn Windows features on or off. If you are prompted for an administrator password or confirmation, type the password or provide confirmation.
2. In the Windows Features dialog box, select the Telnet Client check box.


Click OK. The installation process might take several minutes and when it completes you can begin using the Telnet client.

Some of the commands available in Telnet include:
Open or o - Establish a Telnet connection with a host computer or remote server. You can use the full command, open, or abbreviate it to just o. For example, o mail.kuku.co.il 25 will connect your computer to a computer named mail.kuku.co.il using port 25.

Close or c - Close an existing Telnet connection. It can be combined with a host name and port number.

Set - Set the terminal type for the connection, turn on local echo, set authentication to NTLM, set the escape character, and set up logging. To see which commands are available, type a question mark (?) and then press Enter.


Enable Telnet on Windows Server 2003

Enabling Telnet Client in Windows Server 2008

Ms Office 2007 Save Pdf or XPS is not working

Install MS Office 2007 then I have problem on Ms words 2007 when i Save As on format PDF or XPS cannot save in pdf format but in MS EXCEL 2007 i can use Save As pdf format. I try 

1. Uninstall Microsoft Save as PDF or XPS add-in for office 2007 then reinstall back using SaveAsPDFandXPS.exe where i download from Microsoft website

2. Repair the Ms Words 2007 but still same problem.

3. Updated to MS Office 2007 same problem

4. Update Adobe reader to version 9.1

5. Tryied Word in safe mode (start > run > type winword /a and hit enter)

6. Downloaded 2007 Microsoft Office Add-in: Microsoft Save as PDF or XPS

Still facing the same problem : 

7. Rename the fontsub.dll file in c:\windows\system32 folder as fontsub.old. 

8.Search fontsub.dll on c drive 

9. Copy the backup file (location is mentioned on the above screen shoot.) and past on the c:\windows\system32 folder.

Note: If you have the CD for the office, then insert the CD into the CD/DVD drive and copy the fontsub.dll file and past on the c:\windows\system32 folder.

10. After that close all the office applications and try to convert the file. 

'Unable To Start Driver For…' Errors During Start-up in Windows 2000 or XP

Issue:After a successful printer installation, an Unable To Start Driver For... error message displays while starting the computer. Specific versions of the error may include the following:
  • Unable To Start Driver For hphipm09.exe
  • Unable To Start Driver For hphipm10.exe
  • Unable To Start Driver For hphipm11.exe
  • Unable To Start Driver For hpzipm12.exe
The error message may display every time the computer is started, or only occasionally। After closing the error message, the printer may or may not print and allow access to the card reader properly.
Solution:The name of the HP program that is trying to start HPxIPMxx is "PML Driver". Make the choice to allow this program unrestricted access for all settings available.
Some security software may also have a separate feature that determines if the chosen program is allowed to start other programs. Choose to allow this as well. If any other HP programs are found on the list, also allow them unrestricted access. Some examples are (there may be some variation in the wording of these):
  • PML Driver
  • HP Device Object
  • HP Flight Recorder
  • HP Event Manager
After these changes are made, restart the computer to determine if the issue is resolved.
  1. Right-click My Computer on the main screen, or in the Start menu, then click Manage .
  2. Click the Plus (+) sign next to Services and Applications , if necessary, so that Services is visible.
  3. Double-click Services , then double-click PML Driver (or some variation thereof) in the list on the right side of the window.
  4. Change the Start Up Type entry to Disabled , then click Apply , and then OK .
  5. Restart the computer. The error should not occur this time.
  6. Repeat Steps 1-3, and then continue with step 7.
  7. Change the Start Up Type to Manual , then click Apply .
  8. Click the Start button just underneath Service Status (not the Start button on the main screen).

How do I delete the files in Content.IE5 folder?

If the scan finds an infection in "C:\Documents and Settings\Username\Local Settings\Temporary Internet Files\Content.IE5" folder, you may need to remove all files in Content.IE5 folder manually. The Content.IE5 folder contains folders with randomly-created folder names that consist of letters and numbers. This folder is not visible in the C:\Documents and Settings\Username\Local Settings\Temporary Internet Files directory. However, if you would like the Content.IE5 folder to be visible, do the procedure below.

To make the Content.IE5 folder to be visible in Temporary Internet Files directory Please note that it is not necessary to make the Content.IE5 folder to be visible in Temporary Internet Files directory when deleting files in the Content.IE5 folder.

1.Press Start and select Run.
2.Type cmd.
3.At the command prompt, type "dir /a "%Userprofile%\Local Settings\Temporary Internet Files\*.*"

To delete all files in Content.IE5 folder using Windows Explorer
1.Close your Internet browser.
2.Set the Windows Explorer to view the address bar. To do this:
1.Open My Documents
2.Click View > Toolbars and check the Address Bar option.
3.In the address bar, type the path below and press the Enter key from your keyboard.
C:\Documents and Settings\Username\Local Settings\Temporary Internet Files\Content.IE5

In Username, you may enter the name of the user who is currently logged on e.g. Jane or Jane Doe.
4.In "C:\Documents and Settings\Username\Local Settings\Temporary Internet Files\Content.IE5\", click each folder you want to delete and press the Delete key from your keyboard. Then, click Yes to confirm the deletion. Please note that you cannot delete index.dat.

To delete the files in Content.IE5 at the command prompt
1.Press Start and select Run.
2.Type cmd and click OK. The command prompt appears on screen.
3.At the command prompt type:
c: [ENTER]
cd\ [ENTER]
cd "%Userprofile%\Local Settings\Temporary Internet Files\Content.IE5\" [ENTER]

The last command will take you to
C:\Documents and Settings\Username\Local Settings\Temporary Internet Files\Content.IE5\

which is your current directory.
4.In your current directory, type dir /a to display all files and folders in the current and/or parent directory.
5.Then, type del name of folder.
6.A message appears such as
C:\Documents and Settings\Username\Local Settings\Temporary Internet Files\Content.IE5\name of folder>*, Are you sure (Y/N)?

Enter Y to confirm. Then, all files are deleted.
You may need to repeat steps 5 and 6 for each folder. Please note that you cannot delete index.dat.

Windows Security Center does not detect antivirus protection

Security Centre will report the following:Virus Protection NOT FOUND

Cause : These issues are caused by one or both of the following:
Windows Management Instrumentation (WMI) service not started or A corrupt WMI database

Solution : In the services control panel ensure that the Windows Management Instrumentation (WMI) service is started and is set to Automatic.

Solution 1 : If the service has been simply stopped and not failed to start due to corruption of the WMI database:
1।Click Start Run and type services.msc then click OK.
2.Right-click Windows Management Instrumentation service and select Properties.
3.Click the General tab.
4।Select Automatic as the Startup Type.
5.In the Service Status section, click Start,Click OK,Close the Service window.
If the service will not start then follow the advice in Solution 2.

Solution 2 : When the WMI database is corrupted and needs to be recreated:
1.Click Start Run and type services.msc then click OK.
2.Click OK if prompted with the following message:
Stop other Services
When windows management Instrumentation stops, these other services will stop.
Security Centre

Windows Firewall/Internet Connection Sharing (ICS)
Do you want to stop these services?

3.Right-click Windows Management Instrumentation service and select STOP.
4.Open Windows Explorer and navigate to the following location: %SystemRoot%\System32\Wbem\Repository
5.Select all files in the Repository folder, right-click and select Delete.
6.Reboot the Windows XP machine. After reboot the WMI service will start and the database will be recreated.

How to Disable System Restore in Windows ME, Windows XP, and Windows Vista

System Restore (restorept.api) is a new Windows XP feature that's similar to "Last Known Configuration." However, System Restore maintains multiple restore points instead of one last restore point. The user can manually create restore points, or System Restore can keep restore points during the following operations:

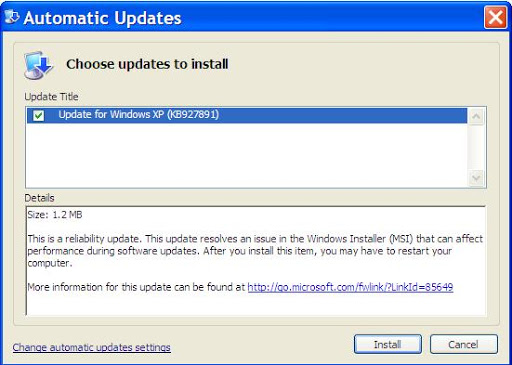
Installing new software, if the application uses a current installer that is System Restore-compliant, Using AutoUpdate, During a restore operation, During a Microsoft backup or recovery operation, Installing an unsigned driver, Automatically following 24 hours of inactivity.

By default, System Restore monitors all partitions. So, for example, if you delete an executable file, you can have the system state revert to a specific restore point to recreate or repair the executable file. When you revert to a restore point, however, you lose all changes since that point, except for changes to files in the My Documents folder and documents you've created with applications such as Microsoft Word and Microsoft Excel.

If you use System Restore and don't like the new system state, you can undo the process and restore the machine to the system state it had before you ran System Restore. Alternatively, you can run System Restore to change the system state to a different restore point.


One of the best features of Windows ME, XP, or Windows Vista is the System Restore option, however if a virus infects a computer with this operating system the virus may be accidentally backed up because of this feature. In order to completely remove a virus on these operating systems, you should disable System Restore before cleaning the system, then reenable it after the system is clean. Follow the instructions below to disable System Restore

Disabling System Restore on Windows ME

1. Click Start, Settings, and then click Control Panel.
2. Double-click the System icon. The System Properties dialog box appears.

NOTE: If the System icon is not visible, click "View all Control Panel options" to display it.

3. Click the Performance tab, and then click File System.
4. Click the Troubleshooting tab, and then check Disable System Restore.
5. Click OK. Click Yes, when you are prompted to restart Windows.

Once you have cleaned the virus or other problem from the computer, reenable System Restore by following these directions

To enable Windows Me System Restore:

1. Click Start, point to Settings, and then click Control Panel.
2. Double-click System, and then click the Performance tab.
3. Click File System, and then click the Troubleshooting tab.
4. Uncheck Disable System Restore.
5. Click OK. Click Yes, when you are prompted to restart Windows.


Disabling System Restore on Windows XP

IMPORTANT NOTES:
  • You must be logged in as an Administrator to do this. If you are not logged in as an Administrator, the System Restore tab will not be displayed.
  • Turning off System Restore will clear out all previous restore points.

To turn off Windows XP System Restore:

NOTE: These instructions assume that you are using the default Windows XP Start Menu and have not changed to the Classic Start menu. To re-enable the default menu, right-click Start, click Properties, click Start menu (not Classic) and then click OK.

1. Click Start.
2. Right-click the My Computer icon, and then click Properties.
3. Click the System Restore tab.
4. Check "Turn off System Restore" or "Turn off System Restore on all drives" as shown in this illustration:
5. Click Apply.
6. When turning off System Restore, the existing restore points will be deleted. Click Yes to do this.
7. Click OK.
8. Proceed with what you need to do; for example, virus removal. When you have finished, restart the computer and follow the instructions in the next section to turn on System Restore.

To turn on Windows XP System Restore:

1. Click Start.
2. Right-click My Computer, and then click Properties.
3. Click the System Restore tab.
4. Uncheck "Turn off System Restore" or "Turn off System Restore on all drives."
5. Click Apply, and then click OK.

Starting System Restore From a Command Prompt in Windows XP

1. Restart your computer or turn the computer on
2. Start tapping the F8 key. The Windows Advanced Options Menu appears. If you begin tapping the F8 key too soon, some computers display a "keyboard error" message. To resolve this, restart the computer and try again.
3. Select the "Safe Mode with Command Prompt
option" and press Enter
4. Log on to the computer with an administrator account
5. Type the following at the command prompt and press Enter

%systemroot%\system32\restore\rstrui.exe

6. Follow the onscreen instructions to restore your computer to an earlier time.

Re-enabling System Restore in Windows XP via the Group Policy Editor

In some cases, System Restore is disabled via the Group Policy Editor. In these cases, System Restore does not show up as a tab under My Computer Properties in Windows XP
. If it doesnt show up, the question becomes how do you turn it on in the first place. To re-enable System Restore via the Group Policy Editor, follow these directions:

1) Start the Group Policy Editor by clicking on Start, Run and typing gpedit.msc in the Run box and pressing Enter
2) In the left hand column, click on Computer Configuration, Administrative Templates, System, System Restore
3) In the right hand column, set Turn off System Restore and Turn off Configuration to Disable
4) Minimize the Group Policy Editor
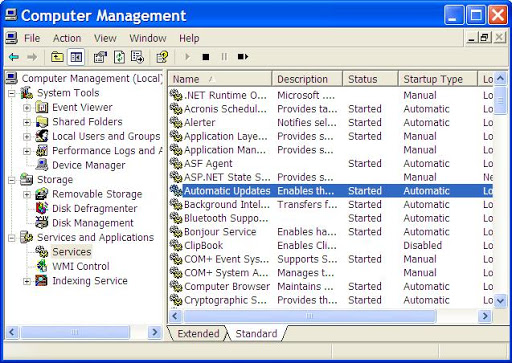
5) Right click on My Computer and Select Manage
6) In the right hand column, double click on Services and Applications, then Services
7) Find the System Restore Service and double-click to open
8) On the General tab set [Startup Type] to Automatic using the drop down list
9) Click the Start button to start the service
10) Close the Computer Management console
11) Maximize the Group Policy Editor and set Turn off System Restore and Turn off Configuration to Not Configured
12) Close Group Policy Editor and reboot the system.
13) Once the system is rebooted, Click on Start, Right-click on My Computer, click on Properties and the System Restore tab should appear again.

An alternative to the usual method of enabling and disabling Windows XP's System Restore feature is to use the registry. To use this alternative, perform the following steps: Start the registry editor (regedit.exe).

Go to HKEY_LOCAL_MACHINE\SOFTWARE\Microsoft\Windows NT\CurrentVersion\SystemRestore.
If a "DisableSR" value doesn't exist, go to the Edit menu, select New, DWORD value, and create the value. Set the value to 1 to disable System Restore or 0 to enable System Restore.

Go to HKEY_LOCAL_MACHINE\SYSTEM\CurrentControlSet\Services\sr to prevent the System Restore service from starting.

Double-click Start, and set the value to 4 to stop the service from starting or to 0 for normal startup. Close the registry editor.


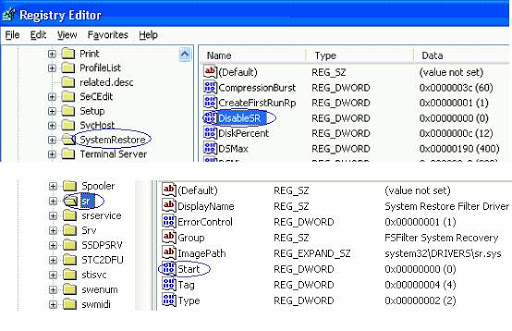
Disabling System Restore on Windows Vista

To turn off Windows Vista System Restore:
1. Click Start.
2. Right-click the Computer icon, and then click Properties.
3. Click on System Protection under the Tasks column on the left side
4. Click on Continue on the "User Account Control" window that pops up
5. Under the System Protection tab, find Available Disks
6. Uncheck the box for any drive you wish to disable system restore on
7. When turning off System Restore, the existing restore points will be deleted. Click "Turn System Restore Off" on the popup window to do this.
8. Click OK
9. When you have finished, restart the computer and follow the instructions in the next section to turn on System Restore.

To turn on Windows Vista System Restore:
1. Click Start.
2. Right-click the Computer icon, and then click Properties.
3. Click on System Protection under the Tasks column on the left side
4. Click on Continue on the "User Account Control" window that pops up
5. Under the System Protection tab, find Available Disks
6. Place a checkmark in the box for any drive you wish to enable System Restore on
7. Click OK

Low Disk Space Error Appears

By default, on a Windows XP system the following messages are displayed। This tweak will prevent the messages being displayed.
"You are running out of disk space on [drive]. To free space on this drive by deleting old or unnecessary files, click here."

1. When free disk space reaches 200 megabytes (MB), you receive the following message for 10 seconds, once per session:
2. When free disk space reaches 80 MB, you receive the following message for 30 seconds, every four hours, twice per session:
3. When free disk reaches 50 MB, you receive the following message for 30 seconds, every five minutes, until free space is above 50 MB:

To disable the pop up message follow this procedure:
1. [Start] [Run] [Regedit]
2. Registry Key: HKEY_CURRENT_USER\Software\Microsoft\Windows\CurrentVersion\Policies\Explorer
3. Data Type: REG_DWORD [Dword Value] // Value Name: NoLowDiskSpaceChecks
4. Modify/Create the Value Name [NoLowDiskSpaceChecks] according to the Value Data listed above.
5. Value Data: [0 = NoLowDiskSpaceChecks Disabled / 1 = NoLowDiskSpaceChecks Enabled]
6. Exit Registry and Reboot

Vista Shortcut Overlay Remover

You can download Vista Shortcut Overlay. This tools allows you to either way to modify or remove the shortcut overlay arrow in Windows 7 and Vista. Here is the screenshot of that utility:


The best way is to edit the REGISTRY!!!

Removing the shortcut arrow: Download blank_icon.zip and extract the file blank.ico to a folder of your choice. In this example, we use C:\Icons\blank.ico as the path to the icon file you downloaded. And then follow these steps:

  1. Click Start, type regedit.exe and press ENTER
  2. Navigate to the following branch:

HKEY_LOCAL_MACHINE \ SOFTWARE \ Microsoft \ Windows \ CurrentVersion \ explorer \ Shell Icons

  1. In the right pane, create a new String value (REG_SZ) named 29
  2. Double-click 29 and set its Value data as C:\Icons\blank.ico
  3. Close Regedit.exe and restart Windows

Note: If the Shell Icons branch does not exist already, you'll need to create it.

HP Solution Center (Scanner problems)

The problem seems to be HP imaging software won't work if you have Kodak or Adobe photo tools on your system (and maybe others).

My problem was when I use the HP Solution Center, and click "Scan a Document", I get an error window that says "HP-CUE" needs to close. When I click the "details" link, it says hpqkygrp.exe caused the problem when it called msvcr80.dll. Removing and reinstalling the HP software 6 times, and finally rebuilding XP, still didn't help.

I used Google to research "msvcr80.dll" problems, and noticed some similarities ... it is used by other photo/imaging applications. Here is what I discovered that fixed my HP Scanner problems.

1- Removed the entire HP suite drivers and all related HP programs (use HP's TOTAL removal tool on their CD under "\util\ccc\Uninstall.bat")
2- Removed Kodak photo programs
3- Removed Adobe Photoshop
(you may have to remove photo/imaging applications from other vendors, these are the only 2 I had loaded here)
4- Installed the HP C6280 suite
(more of the solution follows)
It now works perfectly. But once the HP software is installed, I couldn't reinstall either Kodak or Adobe photo software. Both use Install Shield and their installation would hang; Process Explorer (MS System Internals) showed that "ntvdm.dll" was hung(a subprocess of the installation). To fix this problem I found I had to temporarily stop the Services that HP starts.
5- Go into "Control Panel\Administrative Tools\Services"
6- Stop "HP Cue DeviceDiscovery" service
7- Stop "HP Network Devices Support" service
8- Stop "hpqcsx08" service
9- Installed Kodak and Photoshop
10- Restarted the above HP services

The HP Director Window Does Not Open in Windows XP

Get a free safety scan for your computer

Windows Live OneCare safety scanner helps tune up your computer.

Windows Live OneCare safety scanner is a new service that lets you scan your computer to help protect, clean, and keep it running at its best. The service is free and available directly from the Internet . You can revisit the Windows Live OneCare safety scanner for subsequent tune ups as often as you like.

How to use the Windows Live OneCare safety scanner

Visit the Windows Live OneCare safety scanner, click Full Service Scan, and follow the directions on the screen.

The Windows Live OneCare safety scanner is downloaded and installed on your computer the first time you do a scan. The scanner will inspect your computer and then give you results and recommendations when the scan is complete.


To check for updates, you can do another scan whenever you like. These updates will include new versions of the scanner and new virus recognition information (also known as virus definitions) from Microsoft.

If you prefer a customized service, click one of the following icons.

Protection

Protection. Helps check for and remove viruses.


Clean up

Clean up. Helps get rid of the junk on your hard disk.


Tune up

Tune up. Helps improve your computer's overall performance.

Other features of the Windows Live OneCare safety scanner

In addition to the free security scans, Windows Live OneCare safety scanner also provides:

Straightforward information about online threats.

The ability to search the Microsoft Virus Encyclopedia.

Answers to questions about the health and safety of your computer.

Tools to help protect, optimize, and enhance the safety of your computer.

A registry cleaner to help remove invalid or obsolete registry items on your computer.

Group Policy Editor

[Note: Group Policy Editor is only available in XP Professional]

I suspect that moments after the first copy of Windows was fired up on a desktop way back in 19-whatever, someone was already thinking about how it could be changed. An entire industry has grown around the desire to tweak and personalize the user interface. The advent of the registry made tweaking not only more possible, but also dangerous. One of the least touted but most useful tools for tweaking is found in XP Professional; The Group Policy Editor.

Note : Group Policy Editor is a very powerful tool.Improper use may turn your computer into a paperweight.On the bright side, paperweights don’t need feeding or a litter box.

Warning admonitions aside, to fire up the GPE, click [Start] [Run] and type [gpedit।msc] in the data input line. If all is well. you’ll see the GPE as shown below.

Items to note are the left pane which gives you access to the Local Computer Policy for both Computer Configuration and User Configuration. The right panel follows normal explorer protocols, displaying the folder views. At the bottom of the right pane are tabs for [Extended] and [Standard] views.

Drilling down to the [Desktop] folder in the left pane displays the options in [Standard] view in the right pane which may be altered. There are two methods to arrive at the screen where the actual modifications to the individual settings are accomplished. Click on the [Extended] tab in the right pane and the screen shown below will open with an explanation of the individual setting you have highlighted. For this illustration I have highlighted [Remove Recycle Bin Icon from Desktop]. To display the properties sheet where the actual changes to the setting are made, click the [Properties] link in the upper left hand side of the right pane.
Immediate access to the property sheet from [Standard] view is available by double clicking on the property you wish to change in the right pane.

The [Extended] view shown above lists the operating system minimum requirements to facilitate the intended change। Along with a description of what the change will accomplish, there may be notes which give further info such as if a reboot is required to make the change effective.

If you had double clicked the item you wanted to change rather than click the [Extended] tab on the previous screen, this is what would have opened. Whatever method of arrival you choose, this is where the change is made and finalized. If you didn’t click the [Extended] tab to see the explanation, use the [Explain] tab above to see a description of the change you are considering. (See screenshot below)

Three choices are available for your selection
Not Configured: No change to the current setting.
Enabled: The setting will be applied to users of this computer group.
Disabled: The setting is not applied to users of this computer group.


Could not create the work file. Check the temp environment

Due to a number of reasons the variables under registry key HKEY_CURRENT_USER\Software\Microsoft\Windows\Current Version\Explorer\User Shell Folders\Cache gets changed to incorrect values and you start getting this weird message whenever you use any Microsoft office application.

"Outlook could not create the work file. Check the TEMP environment variable"
"Word could not create the work file. Check the TEMP environment variable"

a. Start->Run-> enter "regedit" and hit 'enter' to run the program to edit Registry variables. Go to folder ->

b. Check the variable values- All the variable should have values starting "%USERPROFILE%\". Any variable which is not having this starting point is probably corrupted. In my case, all the corrupted variables had a corresponding "Backup_VariableName". Example: my "cache" variable had a corrupt value while there was a variable called "backup_cache" with correct values

c. Change the value of all the corrupted variables to correct values. Example change value of "cache" variable to "%USERPROFILE%\Local Settings\Temporary Internet Files" and so forth. Close all the Ms Office Programs and re-start. The problem should be fixed now.

Process Explorer


Download process explorer
Simple and Easy to understand GUI, Detailed info and statistics of processes, Can be used to debug software, can track unauthorized or hidden processes, Freeware.

The Process Explorer from Microsoft (yes, you read that right) has been available on their website for ages. It shows you information about which handles (instance of a program) and DLLs' processes have been opened and are loaded or running in the memory. In a nut shell, it's kinda a next level of the Task Manager.

Process Explorer gives you detailed information of a process; that includes its icon, command-line, full image path, memory statistics, user account, security attributes and more geeky mumbo jumbo. If required you can see the DLLs that a process has loaded or check what OS resource it uses.

A search feature allows you to track down a process right down to the last resource it is using (a file, registry key, etc) or you may also opt to view only a list of processes that have a DLL loaded.

Features

We used the Process Explorer v10.21 and will talk in detail about the same. Let's move ahead to geekier stuff and see what features are provided by the application.

- Service permissions viewing and editing
- Workaround for .NET runtime handle leak
- Many new I/O columns and process properties
- System and per-process I/O bytes history graphs
- I/O history minigraph
- Signed driver for 64-bit Vista for x64 processors
- Memory commit history minigraph
- Optional I/O history tray icon
- Windows 64-bit for Itanium support

Some features are pertaining to Vista. They are,

- Vista integrity level and virtualized columns and process properties
- Vista process cycle counters in process properties and as column

The System Information icon gives you details about the total number of handles, threads, physical and kernel memory, paging and statistics on CPU and I/O as well as the Commit Charge.

Apart from these features, Power Explorer gives you a lot of room for customization as well.


You can configure symbols, highlighting of selected processes, organize columns, update speeds and a lot more.

XP Tricks&Tips

001. Remove MSN Instant Messenger Program
Some of us just don't like to use this IM program. I myself have looked in the Add/Remove Program panel and can't find any way to remove it there. I found out how to do it with a little research. Just go to Start->Run and type in rundll32 setupapi,InstallHinfSection BLC.Remove 128 %SystemRoot%\INF\msmsgs.inf and hit ENTER. Do a copy and paste to avoid typographical errors.

002. Remove Internet Explorer Completely - All version of Windows
Microsoft said that removing IE may make Windows unstable because it has key components that makes Windows function properly. Well, there is a way to remove it completely. Go to this site and get IEradicator. Many people have used it before and removed IE with no problems afterwards.

003. Shutdown Windows Faster
All versions of Windows have the same problem. It usually takes a little longer to shutdown when you have the Exit Sound enabled. To disable this go to Start->Settings->Control Panel->Sounds and Audio Devices->Sounds. Scroll down and look for Exit Windows . Click on it once and then under Sounds, choose None. You should see faster shutdown times.

004. Clean out files in Prefetch Folder
There are files located in the Prefetch folder (C:\Windows\Prefetch ) that you may safely delete. These files are usually left there by other programs that were using. You can either manually delete them or use this batch file that I created to do it. All you need to do is unzip the file called prefetch.bat into your Desktop and then double click on it. You will see the command prompt come up shortly and disappear. That's it.

005. Remove temporary files from Temp Folder
You may have noticed that .tmp files appear in the Temp folder ( C:\Windows\Temp). You may delete these files. Since these files might be accessed by another program, it's a good idea to delete these when you don't have any programs open. It's best to do this right after you login to ensure that no programs are using it. If you don't want to bother going into that folder every time to delete it, you can download xp_downloads.zip which contains a file called del_temp.bat . Just extract that file and double click on it to run it.

006. Add programs/folders to SendTo menu
When you right click on a file/folder and choose SendTo, you will get a list of programs/folders to send it to. Let's just say that you want to add or delete one of your own programs/folders. This could be accomplished very easily. Just navigate to C:\Documents and Settings\your_username\SendTo. In this folder you may add or delete any program/folder shortcuts. All you need to do is right click on the program you want to add, and drag and drop (choose Create Shortcuts Here) it into the SendTo folder.

007. Make XP stop displaying zipped files as folders
In XP, zipped folders could be viewed just by opening up the file. If you have a third party zip program that you want to use instead of the built in one by XP, you can stop XP from displaying the zipped files as folders. This may also be useful for those who are on a slow PC and don't want to open zip files using XP's built in zip program.

To disable this in XP, go to Start->Run and type in regsvr32 /u zipfldr.dll. You may just copy and paste the command into the Run menu. If you want to undo it, just type in regsvr32 zipfldr.dll. Zip away.

008. How to Create a Password Reset Disk
Windows XP allows you to create a password reset disk, just in case you forget the password and can't login. This is only for computers that are not on a domain. Those that are on a domain may or may not work the same way.

Go to Start->Control Panel->User Accounts and click on your username. Under Related Tasks on the left pane, click Prevent a forgotten password . A wizard will show up. Click next and then insert a floppy disk into your floppy drive and choose to save the reset disk on the floppy.

Enter your current password and then click Next and Finish. The floppy will now contain your encrypted password. If you forget your password, you can just use the Password Reset Wizard to create a new one. Just make sure to create another reset disk once you changed your password. So if you forgot your password and changed it to a new one, create another reset disk by repeating the above procedure again.

009. Set User Logon Hours
You can restrict a certain user to only use the computer at a certain time interval. Let's say you have a username called Bill and you want Bill to access the computer only from 9AM - 9PM from Monday through Friday. You can do this by going to Start->Run and type in net user Bill /time:M-F,9am-9pm. For 24-hour time, you can replace the time with 09:00-21:00
instead. This will only allow the user to login during those hours on those days.

010. Disable XP Messenger Service
Disable the messenger service built into Windows XP to prevent ads or other popups from coming up when using Outlook (and maybe even Outlook Express). Anyway, just disable it for better performance. To disable it, right click on My Computer->Manage->Services and Applications->Services and right click on Messenger and choose Stop. This will stop the service. There may be cases when the Messenger Service is required for some programs to run properly, so if that's the case, I would set it to Manual instead of Stop .

011. Customize SendTo Menu - All versions of Windows
Have you ever wanted to use some other program to open up a certain file but had to go through My Computer->Program Files and then click on the program's folder and then the program itself. You can open a file with any programs you have with ease by adding them to the SendTo menu. You know, when you right click on a file and choose Send To. To do this, go to Start->Run and type in sendto to open up the SendTo folder. Now go to My Computer->C: Drive->Program Files and open up any of the program folders you want. Then right click on the individual programs and drag it to the SendTo folder and choose Create Shortcuts Here. Do that for each program you want to be listed there. The next time you right click on a file and choose Send To, you should see those programs listed there.

012. Disable Personalized Menus
Some XP users might not like the personalized menus that XP has. One example of this feature is the highlighting of newly installed programs in the Start Menu. Some users might find this annoying. To turn this feature off right click on the Start Button->Properties->Start Menu tab->Customize->Advance tab->uncheck Highlight newly installed programs. Click OK. Now when new programs are installed they shouldn't be highlighted.

013. Using XP System Restore
One important feature in XP is System Restore. This makes a backup of your data. To create the restore points go to Start->All Programs->Accessories->System Tools->System Restore. Click Create a restore point and click Next. Type in a description for the restore point and click Create. You're all set. If your system fails for some reason you may use the restore point by hitting the F8 key repeatedly during boot time until a menu comes up. Choose Last known good configuration. This will restore everything to the last time when everything was working ok. It's using the most recent restore point that you created. If you can get into Windows XP, you can go to Start->All Programs->Accessories->System Tools->System Restore.

014. Clear System Restore Points
System restore points can take up a huge amount of space due to the many restore points created. You can delete all these restore points by right clicking on My Computer->Properties->System Restore and check Turn off System Restore on all drives. Then make sure to create them again manually for each drive using the method above (Using XP System Restore). That will get rid of the older restore points and leave you with the new and updated one.

015. Disable/Remove Hibernation Mode
The hibernation file which allows a user to use hibernation mode takes up a lot of space. If you use this feature you are allocating/creating space so that when you come back everything (programs and folders) are still open. If you don't use it that much then there's not much sense keeping it. So you may remove it. Go to Start->Control Panel->Power Options->Hibernate tab and uncheck Enable hibernation. That should remove the actual hibernation file. You may double check by doing a Search (F3 key) and search for hiberfil.sys in the C: drive. It shouldn't be found, but if it is, you may safely delete it.

016. Disable Indexing Service
Speed up XP by turning off the Indexing Service for your hard drive. This feature is used to make your searching needs faster, but it's affecting the overall performance so it's best to turn it off. Go to My Computer and right click on the drive that you want the feature to be disabled. Choose Properties and uncheck the box where it says Allow Indexing Service to index this disk for fast file searching. When a box come up choose to Apply to all folders and subfolders.

017. Rename Multiple Files
This is something new in Windows XP - renaming multiple files. Let's say you have a huge photo collection and want to name them in sequential order. You can do this very easily. Just select all the photos you want to rename (you may use the ctrl key and click on individual files if desired). Then hit the F2 key and type in the name of the file. Hit Enter. It should all rename. So if you entered VacationPhoto, you will have VacationPhoto (1), VacationPhoto (2), VacationPhoto (3), etc.

018. Reinstall Windows XP Without Repeating Online Activation
This has probably happened to most of us already. We have XP installed already and when we reinstall it, we are asked to go online and activate it again. You can avoid doing that by backing up a very small file that has the activation information. Before you do this, keep in mind that your hardware should be the same as before when you activated in order for this to definitely work. Go to C:\Windows\System32 and look for wpa.dbl. Copy that file to a floppy. After you finished reinstalling XP, just rename the current wpa.dbl file in C:\Windows\System32 to something like wpa.old.


How to turn on automatic logon in Windows XP

1.

Click Start, click Run, type regedit, and then click OK.

2.

Locate the following registry key:

HKEY_LOCAL_MACHINE\SOFTWARE\Microsoft\WindowsNT\CurrentVersion\Winlogon

3.

Using your account name and password, double-click the DefaultUserName entry, type your user name, and then click OK .

4.

Double-click the DefaultPassword entry, type your password under the value data box, and then click OK.

If there is no DefaultPassword value, create the value. To do this, follow these steps:

a.

In Registry Editor, click Edit , click New, and then click String Value .

b.

Type DefaultPassword as the value name, and then press ENTER.

c.

Double-click the newly created key, and then type your password in the Value Data box.

If no DefaultPassword string is specified, Windows XP automatically changes the value of the AutoAdminLogon registry key from 1 (true) to 0 (false) to turn off the AutoAdminLogon feature.

5.

Double-click the AutoAdminLogon entry, type 1 in the Value Data box, and then click OK.

If there is no AutoAdminLogon entry, create the entry. To do this, follow these steps:

a.

In Registry Editor, click Edit , click New, and then click String Value .

b.

Type AutoAdminLogon as the value name, and then press ENTER.

c.

Double-click the newly created key, and then type 1 in the Value Data box.

6.

Quit Registry Editor.

7.

Click Start , click Restart, and then click OK .

After your computer restarts and Windows XP starts, you can log on automatically.

If you want to bypass the automatic logon to log on as a different user, hold down the SHIFT key after you log off or after Windows XP restarts. Note that this procedure applies only to the first logon. To enforce this setting for future logoffs, the administrator must set the following registry key:

HKEY_LOCAL_MACHINE\SOFTWARE\Microsoft\WindowsNT\CurrentVersion\Winlogon

Value:ForceAutoLogon
Type: REG_SZ
Data: 1

You can also use turn on automatic logon without editing the registry in Microsoft Windows XP Home Edition and in Microsoft Windows XP Professional on a computer that is not joined to a domain. To do this, follow these steps:

1.

Click Start , and then click Run.

2.

In the Open box, type control userpasswords2, and then click OK.

Note When users try to display help information in the User Accounts window in Windows XP Home Edition, the help information is not displayed. Additionally, users receive the following error message:

Cannot find the Drive :\Windows\System32\users.hlp Help file. Check to see that the file exists on your hard disk drive. If it does not exist, you must reinstall it.

3.

Clear the "Users must enter a user name and password to use this computer" check box, and then click Apply.

4.

In the Automatically Log On window, type the password in the Password box, and then retype the password in the Confirm Password box.

5.

Click OK to close the Automatically Log On window, and then click OK to close the User Accounts window.

Microsoft posts two major Vista fix packs for download

Microsoft posted the final versions of the two Vista fix packs for download.

The Vista performance fix pack, KB 938979, (both 32- and 64-bit versions) is downloadable here.

The reliability fix pack, KB 938194, (32- and 64-bit flavors), can be downloaded here.

The two fix packs include a number of the updates that Microsoft is expected to deliver in the first full-fledged Windows Vista Service Pack (SP) 1 release, a public beta of which is expected real soon now. SP1 is expected to include a number of security, performance and reliability fixes that Microsoft has been delivering since it shipped Vista, all in one single package.

Delete print jobs jamming print queue in Win2k, Windows NT

The printer spooler service, SPOOLSS.EXE (SPOOLSV in Windows 2000), manages jobs sent to printers connected to Windows NT and Windows 2000 machines. (If you're printing to a remote or networked printer, the Spooler service on the machine which the remote printer is attached to will handle the job.)

On occasion, a print job may refuse to work correctly and may jam up the print queue. Worse, it may be impossible to delete the print job through conventional means, i.e., by right-clicking on the job and selecting Cancel, or by selecting Cancel All Documents from the Printer menu. If this happens, it usually means the job itself is corrupt and must be deleted manually.

If you're trying to delete a specific stuck print job, take note of the job's approximate time and date. Then do the following:

  1. Close all open Printers folders.
  2. Stop the Spooler service. In Windows 2000, this is done through the Services icon in Administrative Tools (found in the Control Panel); in Windows NT 4.0, it's done through the Services icon in the Control Panel. You can also stop the Spooler by typing NET STOP SPOOLER at a command prompt. If you're using TCP/IP Printing Services, you'll need to stop that service as well.
  3. Open the %Winroot%System32SpoolPrinters directory (same in both operating systems). Make sure Explorer is set to view hidden and system files.
  4. Delete all *.SPL and *.SHD files in that directory that match the time/date stamp of the job you're trying to kill. If you're trying to purge everything, delete all files with those extensions.
  5. Close the Printers folder and restart the stopped services. You can restart the Spooler from the command line by typing NET START SPOOLER.

If you have too many "dead" spool files in the directory, you may also get this error whenever you try to print:

An application error has occurred and an application error log is being generated.
SPOOLSS.EXE (SPOOLSV.EXE in Win2K)
Exception: access violation (0xc0000005), Address:

This indicates that the directory may be overloaded with printer spooler files and needs to be cleaned. Also check into the system's TEMP directories and remove any *.TMP files. These can also be an obstacle; some printer drivers use the TEMP directory for rasterization of print jobs.

How do I fix this high CPU usage svchost virus or whatever it is?

Svchost, or more correctly "Service Host" is a program that is designed to run other programs and "hosts" many of the system services in Windows XP. Several copies of Svchost run more than one service, which is why when you kill an instance of svchost several things on your machine might stop working.

So why is one of the Svchosts taking all your CPU?

And what can you do about it?

The bug appears to be related to the Windows Update service - the service that you're supposed to keep running at all times so that updates will be automatically downloaded to your machine.

A quick way to tell if this is happening to you is to download Process Explorer and right click on the svchost instance that's taking 100% of your CPU and then click on the Services tab:


You can see that this copy of svchost on my machine is running not only The Windows Update service, but is actually running 29 services all totalled. So if you were to kill this instance of svchost you'd be killing all of those services and many features and functionality of your system would fail.

One Temporary Solution

One approach to this problem is to stop and then disable the Windows Automatic Update service. If you have it open in Process Explorer, as shown above, with Automatic Updates selected in the list then just click the Stop button. If your CPU usage then drops to more normal levels, you've identified the problem.

To prevent the Automatic Update service from starting again, right click on My Computer and click on Manage . Expand Services and Applications, and then underneath that click on Services. In the resulting list on the right, locate Automatic Updates :

Right click on Automatic Updates and click on Properties. Change the Startup type to Disabled:

(You can also click Stop here if you didn't stop the service earlier.)

Click OK and Automatic Update service should be disabled.

IMPORTANT: since you won't be getting updates automatically, you should now plan on visiting the Windows Update web site periodically to make sure you keep your Windows up to date. As we'll see shortly, this will also become important to resolve this problem "for real

A Permanent Solution?

There isn't a permanent solution. Not yet anyway.

There are rumors that Microsoft actually has a fix, but that you need to call up and ask for it rather than getting it through normal channels. It is not convinced that this fix is actually for this specific problem that so many people are experiencing.

There are also rumors that Microsoft will be making the actual fix available in a future automatic update. Ironic, since it's automatic update that you may have turned off in order to work around the problem. That's why recommend making certain you regularly visit Windows Update and take the latest fixes to keep your system up to date, not only for this issue but for any other issues that may crop up over time.

Also, remember, once the problem is fixed be sure to re-enable the Automatic Updates feature. It remains an important part of keeping your system safe and up to date.

Update!

23-May-2007

This automatic update waiting to be installed on my machine this morning:


This is the update that's been frequently referenced as a resolution for this problem.

The interim fix involves applying two patches, in order:

First download and install the fix from KB 927891.

Second download and install this update to the Windows Update Client.

Internet Explorer Backup

BackRex Internet Explorer Backup is a backup and restore tool for Internet Explorer. It allows you to backup favorites, history, proxy settings, fonts, dialup accounts, autocomplete passwords and cookies.

BackRex Internet Explorer Backup can help you to move all your Internet Explorer settings from one computer to another, even if it has a different version of Windows and/or Internet Explorer installed (for example from Internet Explorer 7.0 to Internet Explorer 8.0 or vice versa).

With Scheduled Backup feature you can backup all your data on a regular basis - daily, weekly or monthly.

What exactly is backed up?

Below is the list of data and settings saved and restored by BackRex Internet Explorer Backup:

Download free version

Internet Explorer
Favorites
Proxy & connection settings
Security zones
User customizations
Cookies
History
Dialup accounts
Form Autocomplete entries


BackRex Internet Explorer Backup screenshots 1.0

Using Command lines for outlook

To use switches, at the Start menu, Run command type:

Outlook /switch

Occasionally you'll need to use the full path to Outlook, so the command line looks like:

"C:\Program Files\Microsoft Office\Office11\Outlook.exe " /switch

Notes:Before using a command line switch, you need to close Outlook and verify it's closed in Task Manager's Processes tab.

Paths that include spaces between words must be enclosed in quotation marks (") and are case sensitive. You'll need the full path if you create desktop shortcuts.

If you use Vista, you can type the command line in the Start Search field on the Start menu or type Run to open the Run dialog. The Windows key+R will also open the Run dialog in both Windows XP and Vista.

Switches

/a

Creates an item with the specified file as an attachment.

Usage:

Outlook /a "C:\My Documents\labels.doc"

If no item type is specified, IPM.Note form is assumed. This switch cannot be used with message classes that aren't based on Outlook.

/altvba otmfilename

Opens the VBA program specified in otmfilename, rather than %appdata%\Microsoft\Outlook\VbaProject.OTM. Use this switch when you need to run macros not in your VBAProject file.

/autorun macroname

Opens Outlook and immediately runs the macro specified in macroname.

/c messageclass

Creates a new item of the specified message class, works for any valid MAPI form.

Examples:

* /c ipm.activity creates a Journal entry
* /c ipm.appointment creates an appointment
* /c ipm.contact creates a contact
* /c ipm.note creates an e-mail message
* /c ipm.stickynote creates a note
* /c ipm.task creates a task

/checkclient

Prompts for the default manager of e-mail, news, and contacts.

/cleanclientrules

Starts Outlook and deletes client-based rules. Used by non-Exchange account users.

/cleandmrecords

Deletes the logging records saved when a manager or a delegate declines a meeting. Used by Exchange Server accounts.

/cleanfinders

Removes Search Folders from the Microsoft Exchange server store.

/cleanfreebusy

Clears and regenerates free/busy information. This switch can only be used when you are able to connect to your Microsoft Exchange server.

/cleanprofile

Removes invalid profile keys and recreates default registry keys where applicable.

/cleanpst

Launches Outlook with a clean Personal Folders file (.pst)

/cleanreminders

Clears and regenerates reminders.

/cleanrules

Starts Outlook and deletes client- and server-based rules.

/cleanschedplus

Deletes all Schedule+ data (free/busy, permissions, and .cal file) from the server and enables the free/busy information from the Outlook Calendar to be used and viewed by all Schedule+ 1.0 users.

/cleanserverrules

Starts Outlook and deletes server-based rules. Used only with Exchange server accounts.

/cleansniff

Overrides the programmatic lockout that determines which of your computers (when running Outlook simultaneously) processes meeting items. The lockout process helps prevent duplicate reminder messages. This switch clears the lockout on the computer it is used, enabling Outlook to process meeting items.

/cleansubscriptions

Deletes the subscription messages and properties for subscription features. Used with SharePoint alerts.

/cleanviews

Restores default views. Use with care as all custom views you created are lost.

/designer

Starts Outlook without figuring out if Outlook should be the default client in the first run.

/embedding

Opens the specified message file (.msg) as an OLE embedding. Also used without command-line parameters for standard OLE co-create.

/explorer

Opens the new window in "explorer" mode (link bar on).

/f msgfilename

Opens the specified message file (.msg) or Microsoft Office saved search (.oss).

/firstrun

Starts Outlook as if it were run for the first time.

/folder

Opens a new window in "folder" mode (Navigation Pane off).

/hol holfilename

Opens the specified .hol file.

/ical icsfilename

Opens the specified .ics file.

/importprf prffilename

Launches Outlook and opens/imports the defined MAPI profile (*.prf). If Outlook is already open, queues the profile to be imported on the next clean launch.

/l olkfilename

Opens the specified .olk file.

/launchtraininghelp assetid

Opens a Help window with the Help topic specified in assetid.

/m emailname

Provides a way for the user to add an e-mail name to the item. Use either the full address or let alias resolve. Only works in conjunction with the /c command-line parameter.

Usage:

Outlook.exe /c ipm.note /m test@poremsky.com

Outlook.exe /c ipm.note /m dianep

/nocustomize

Starts Outlook without loading outcmd.dat (customized toolbars). With older versions of Outlook the *.fav file doesn't load.

/noextensions

Starts Outlook with extensions turned off, but listed in the Add-In Manager.

/nopollmail

Starts Outlook without checking mail at startup.

/nopreview

Starts Outlook with the Reading Pane off and removes the option from the View menu.

/p msgfilename

Prints the specified message (.msg). Does not work with HTML.

/profile profilename

Loads the specified profile. If your profile name contains a space, enclose the profile name in quotation marks.

/profiles

Opens the Choose Profile dialog box regardless of the Options setting on the Tools menu.

/recycle

Starts Outlook using an existing Outlook window, if one exists. Can be used in combination with /explorer or /folder. The Outlook shortcut in the Quick Launch bar uses the /recycle switch.

/resetfoldernames

Resets default folder names (such as Inbox or Sent Items) to default names in the current Office user interface language.

For example, if you first connect to your mailbox Outlook using a Russian user interface, the Russian default folder names cannot be renamed. To change the default folder names to another language such as Japanese or English, you can use this switch to reset the default folder names after changing the user interface language or installing a different language version of Outlook.

/resetfolders

Restores missing folders for the default delivery location.

/resetnavpane

Clears and regenerates the Navigation Pane for the current profile. Removes all Shortcuts and Favorite Folders. Has the same effect as deleting profilename.xml in your user directory.

/rpcdiag

Opens Outlook and displays the remote procedure call (RPC) connection status dialog.

/s filename

Loads the specified shortcuts file (.fav). Use to load *.fav files created in older versions of Outlook.

/safe

Starts Outlook without extensions, Reading Pane, or toolbar customization.

/safe:1

Starts Outlook with the Reading Pane off. New to Outlook 2003.

/safe:2

Starts Outlook without checking mail at startup. New to Outlook 2003.

/safe:3

Starts Outlook with extensions turned off, but listed in the Add-In Manager.

/safe:4

Starts Outlook without loading Outcmd.dat (customized toolbars) and *.fav file.

/select foldername

Starts Outlook and opens the specified folder in a new window.

Usage:

"C:\Program Files\Microsoft Office\Office11\Outlook.exe" /select outlook:calendar

outlook /select "outlook:Inbox\Old Messages"

/sniff

Starts Outlook and forces a detection of new meeting requests in the Inbox, and then adds them to the calendar.

/t oftfilename

Opens the specified .oft file.

/v vcffilename

Opens the specified .vcf file.

/vcal vcsfilename

Opens the specified .vcs file.

/x xnkfilename

Opens the specified .xnk file.
    Additional Information | | | |

   #Odisha.Club @everything is here!
   Registry Edits for Windows XP
   How to remove .net software and installation
   Computer Screenshot sites : gur.in ! screenshots.leeindy.com
   Home | Contact Us| RSS | About US | Mail Us | Bookmark this page

Copyright © 2015 ranjanmantri.blogspot.com. All Rights Reserved.