
- Click Start, Run and type Regedit.exe
- Navigate to the following key:HKEY_LOCAL_MACHINE\SOFTWARE\Microsoft\Windows\CurrentVersion\Explorer\MyComputer\NameSpace\{FC9FB64A-1EB2-4CCF-AF5E-1A497A9B5C2D}
- On the File menu, click Export.
- In the Save in box, select a location where you want to save the Registration Entries (.reg)
- In the File name box, type a file name, and then click Save.
- Select the {FC9FB64A-1EB2-4CCF-AF5E-1A497A9B5C2D} key and delete it.
- Close Regedit.exe
How to remove "My Sharing Folders" from My Computer?
Text appear blurry in Internet Explorer 7
This is because the ClearType feature is enabled by default in Internet Explorer 7. Enabling ClearType may result in blurry display in CRT monitors. Here is how you turn off ClearType:
- In Internet Explorer, click the Tools button, and then click Internet Options.
- Click the Advanced tab, scroll to the Multimedia section, clear the following option:
Always use Clear Type for HTML
- Click OK.
If your fonts are not displaying as clear as you'd like, you can try optimizing ClearType for your monitor. Go to the Microsoft Typography ClearType website, and then follow the instructions for tuning ClearType.
Note : Posted by Ramesh Srinivasan at winhelponline.com.
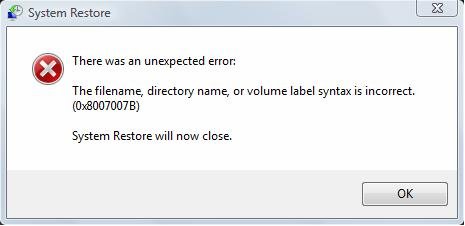
Fix for System Restore Error 0×8007007B in Windows Vista
When you start the System Restore utility in Windows Vista, the following error message may be displayed. The same error might occur when running Windows CompletePC Backup.
 1 Click the Pearl. The Start Menu will appear.
2 Type sysdm.cpl in the search box and press.The User Account Control window will prompt for permission to run the program.
3 Click Continue.The System Properties window appears.
4 Click the System Protection tab.
5 Under Automatic restore points, uncheck any invalid or duplicate location.
6 You may see two C: drives in the listing with the same Volume label. Deselect the checkbox for the duplicate volume, and enable the checkbox for the correct drive (the one with Windows logo). 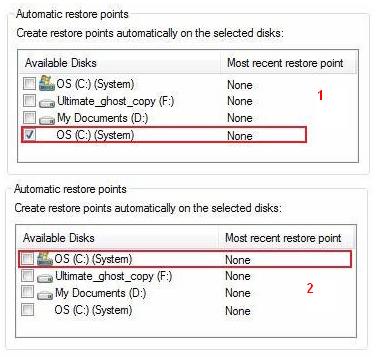
7 Click on Apply and click Ok.
1 Click the Pearl. The Start Menu will appear.2 Type sysdm.cpl in the search box and press
3 Click Continue.The System Properties window appears.
4 Click the System Protection tab.
5 Under Automatic restore points, uncheck any invalid or duplicate location.
6 You may see two C: drives in the listing with the same Volume label. Deselect the checkbox for the duplicate volume, and enable the checkbox for the correct drive (the one with Windows logo).
Unable to write any data in external drive
You will get the error message as "The disk is write-protected."
A common security concern at organizations is allowing users to plug in a usb flash drive, because they could so easily copy corporate data.
Since Windows XP SP2, you can disable writing to USB devices altogether using a simple registry hack. Here it is:
1. Click Start, type Regedit.exe and press {ENTER}
2. Navigate to the following location : HKEY_LOCAL_MACHINE\SYSTEM\CurrentControlSet\Control\StorageDevicePolicies
3. Double-click WriteProtect, If you see the DWORD value set to 1, change it to 0.
Once you modified the registry, you will have to reboot for the changes to take effect. One should also note that if you are using this trick, you should make sure that the users are not administrators on the computer, because they could easily change this setting back.
Note : This works on Windows Vista as well.
BlockThisSite Menu Extension for Internet Explorer
Did you accidentally land on a bad site when browsing the Web? While it’s advisable to close bad websites immediately, you can quickly block that particular site before closing it so that you don’t visit that site in future. This can be done using the BlockThisSite Internet Explorer Menu Extension that I’ve created. The extension works by automatically adding an entry to the HOSTS file for each site you block.
Add "Block This Site" to the Right-Click Menu in IE
Windows XP
1. Download BlockThisSite_XP.zip, unzip the contents to a folder.
2. Double-click BlockThisSite.reg to run it.
3. Move the file BlockThisSite.htm to the C:\Windows\Web directory.
Windows Vista
1. Download BlockThisSite_Vista.zip, unzip the contents to a folder.
2. Double-click BlockThisSite.reg to run it.
3. Move the file BlockThisSite.htm to the C:\Windows\Web directory.
4. Move the file BlockThisSite.vbs to the C:\Windows directory.
Usage
To block the current website, all you need to do is right-click on the webpage and click Block This Site. (In Windows Vista you’ll see the UAC elevation prompt at this time. Click Continue in the UAC dialog.)

The website is now blocked using the HOSTS file.

To test if the "block" really works, open a new instance of Internet Explorer and try to visit the blocked site. You should see the Internet Explorer cannot display the webpage error when you do so.
Removal
To remove the extension, run the file Undo.reg. Then manually delete the files BlockThisSite.htm and BlockThisSite.vbs (Vista) from the C:\Windows\Web and C:\Windows directories respectively.
Note: The extension may fail to work if you don’t have write access to the HOSTS file, or if the HOSTS file is locked by a security suite installed in the system.
Note : I have got this article from winhelponline.com web site. For more information please visit http://www.winhelponline.com.
File Association Fixes for Windows 7
Instructions
To fix the association for a particular file type:
1. Download the corresponding fix from the above table. (Use Right-click – Save as option in your browser to download the fixes.)
2. Unzip the file and extract the .REG file to Desktop.
3. Right-click the REG file and choose Merge. Alternately, you can open the Registry Editor and then using the Import option from the File menu, to merge the REG file contents.
| AVI | ICO | REG |
| BAT | IMG | SCR |
| BMP | INF | TIF/TIFF |
| CHM | JPE/JPEG/JPG | TXT |
| CMD | JS | VBS |
| COM | LNK | WMA |
| EXE | MP3 | WMV |
| GIF | MPE/MPEG/MPG | XML |
| HTM/HTML | MSC | ZIP |
| Directory | Drive | Folder |
Note : These fixes are applicable for Windows® 7 systems only. Note that you need to be an administrator to apply these fixes.
Note : I have got this article from winhelponline.com web site. For more information please visit http://www.winhelponline.com. For Windows Vista, visit the File association fixes for Windows Vista page.
Installing Windows XP Using A USB Flash Drive
If you want to install Windows XP, but your notebook (or PC) has no CDROM, you should install Windows XP using USB Flash disk/Flash Drive/Thumb drive...
just follow this guide :

step 1:
Buy an USB Flash Drive (at least 2GB).
When you do this tutorial, please make sure your computer/laptop/PC has a CD-ROM (or DVD).
so, now you have 2 computers, with CD-ROM support and without CD-ROM support (e.g Acer Aspire One, Asus EEE-PC).
step 2:
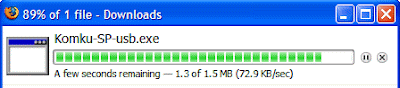
Download this software pack (Komku-SP-usb.exe - Download) 1.47MB
UPDATE 1 :
Anonymous said…
your download at mediafire keeps timing out, any other hosts available?
Mirror Depositfiles
Mirror Rapidshare
Mirror Easy-Share
Mirror Megaupload
this software pack contains 3 application :
-BootSect.exe (Boot Sector Manipulation Tool)
-PeToUSB (http://GoCoding.Com)
-usb_prep8 (Prepares Windows XP Setup LocalSource for Copy to USB-Drive)
step 3:
Double click Komku-SP-usb.exe
a window will appear... and click Install

step 4:
Insert your USB Flash Drive.
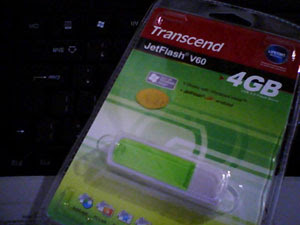
When I made this tutorial, I was using 4GB Transcend USB FlashDrive...
Locate folder C:\Komku\PeToUSB\
double click PeToUSB.exe
a window will appear like this...
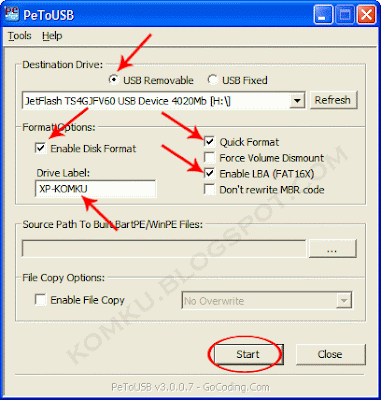
Destination Drive : select USB Removable
check on Enable Disk Format
check on Quick Format
check on Enable LBA (FAT 16x)
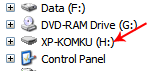
Drive Label : XP-KOMKU (or whatever you want)
then click Start
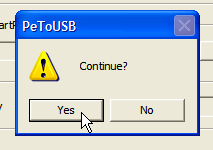 Click Yes to continue....
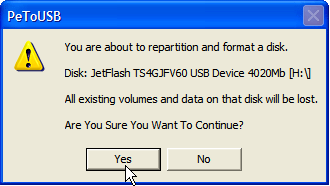
"You are about to repartition and format a disk. Disk: .... All existing volumes and data on that disk will be lost. Are You Sure You Want To Continue?"
click Yes

Wait a few seconds...
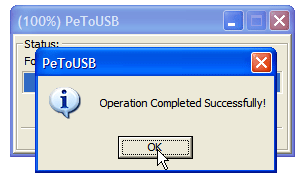
Click OK, and you can close PeToUSB window.
step 5:
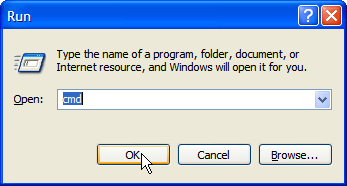
Open Command Prompt ...
Click Start > Run > type cmd > click OK
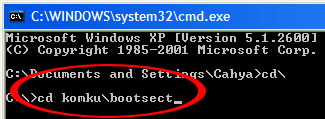
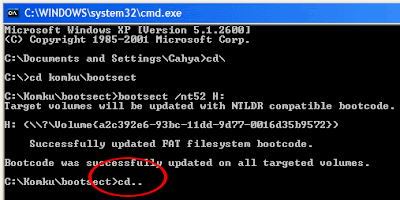
On Command Prompt window, go to directory C:\Komku\bootsect\
how to do this?
first type this cd\ and press Enter
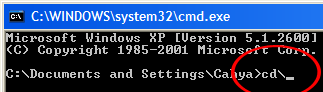
then type cd komku\bootsect and press Enter
the result...

Don't close Command Prompt window, and go to step 6...
step 6:
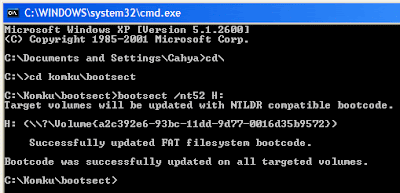
on command prompt window, type bootsect /nt52 H:
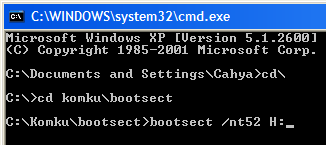
H: is drive letter for my USB Flash Drive, it may be different with yours...
 and press Enter
the result... "Successfully updated filesystem bootcode. Bootcode was succesfully updated on all targeted volumes."
don't close Command Prompt window, and go to step 7...
step 7:
now type this cd.. and press Enter
then type cd usb_prep8 and press Enter
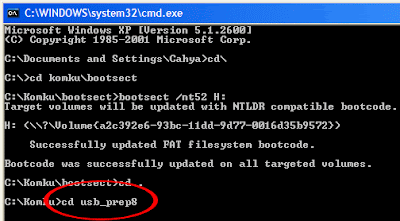
type usb_prep8 again... and pres Enter
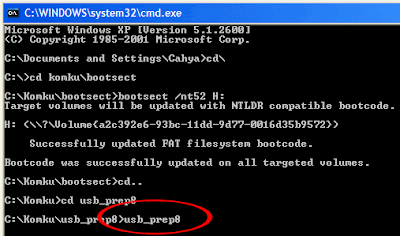
step 8:
Your command prompt window will look like this
Press any key to continue...
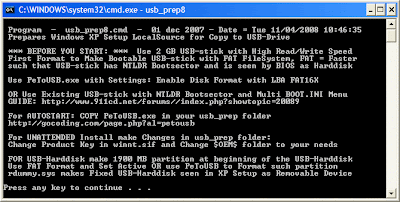
usb_prep8 welcome screen will appear
now, insert your original Windows XP CD, or Windows XP with sata ahci driver to your CD/DVD ROM
and back to Command Prompt window
type 1 then press Enter...
"Browse For Folder" window will appear, select your CD/DVD drive and click OK
the result... "XP Setup Source Path" changed to G:\ (yours may be different)
now for point 2, if letter T is currently assigned to a drive in your computer, you must change it.... if not, leave it as it is
how to change it?
type 2 and press Enter...
 "Enter Available Virtual DriveLetter"
for example you doesn't have drive S
so you type S and press Enter
back to usb_prep8 welcome screen...
now type 3 and press Enter...
 "Please give Target USB-Drive Letter e.g type U" Enter Target USB-Drive Letter:
because my Flash drive letter is H
so, type H and press Enter...
after back to usb_prep8 welcome screen...
now type 4 and press Enter to make new temporary image with XP LocalSource and copy it to USB Flash Drive
please wait a few seconds..
"WARNING, ALL DATA ON NON-REMOVABLE DISK DRIVE T: WILL BE LOST! Proceed with Format (Y/N)?"
type Y and press Enter
please wait....
when format virtual disk complete, press any key to continue...

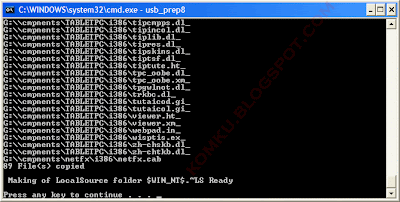
please wait... making of LocalSource folder is in progress...
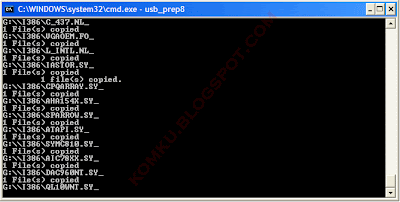
when "Making of LocalSource folder $WIN_NT$.~LS Ready"
Press any key to continue...
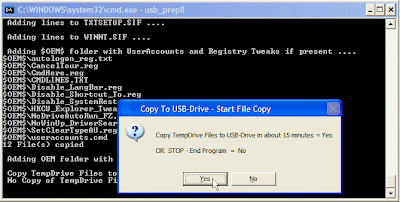
"Copy TempDrive Files to USB-Drive in about 15 minutes = Yes OR STOP = End Program = No"
Click Yes, and wait...
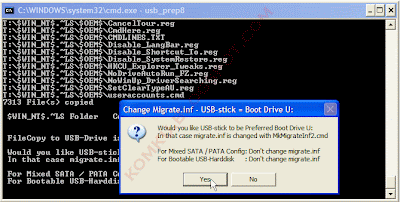
"Would you like USB-stick to be preferred Boot Drive U: bla... bla..."
Click Yes
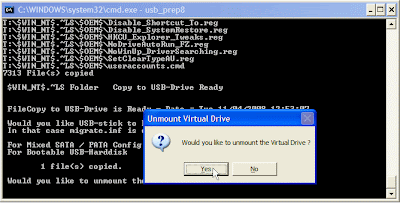
"Would you like to unmount the Virtual Drive ?"
Click Yes, wait a few seconds, and press any key....
press any key again to close usb_prep8...
Now, your USB Flash Drive is ready...
step 9:
Now, insert your USB Flash Drive/Flash Disk/Thumb Drive to your notebook (e.g Acer Aspire One)
go to BIOS and make USB HDD (or USB ZIP in some other machine) as primary boot device....
then boot form your USB Flash Drive....
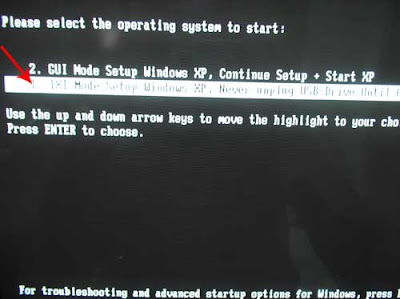
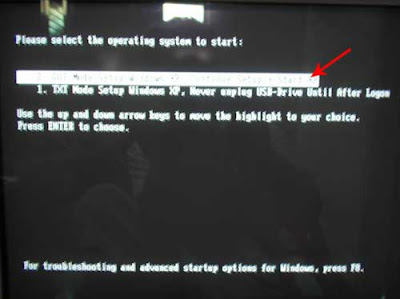
and select "TXT Mode Setup Windows XP, Never unplug USB-Drive Until After Logon"
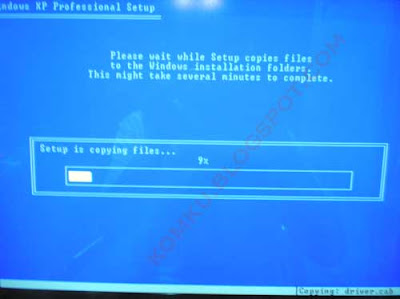
After Hard Disk detected, delete all partition, create single partition... and install Windows XP on that partition...
and wait...
once text mode setup is complete, computer will restart....
this time select "GUI Mode setup Windows XP, Continue Setup + Start XP"
Continue Windows XP setup.... and Done!
Windows XP Installed....
Remember, you can use this tutorial to install Windows XP on all other computers.. not just Aspire One and Asus EEE-PC....
 good luck!
Note : I have got this article from komku.blogspot.com web site, posted by Cahya. For more information please visit http://komku.blogspot.com.
just follow this guide :
step 1:
Buy an USB Flash Drive (at least 2GB).
When you do this tutorial, please make sure your computer/laptop/PC has a CD-ROM (or DVD).
so, now you have 2 computers, with CD-ROM support and without CD-ROM support (e.g Acer Aspire One, Asus EEE-PC).
step 2:
Download this software pack (Komku-SP-usb.exe - Download) 1.47MB
UPDATE 1 :
Anonymous said…
your download at mediafire keeps timing out, any other hosts available?
Mirror Depositfiles
Mirror Rapidshare
Mirror Easy-Share
Mirror Megaupload

this software pack contains 3 application :
-BootSect.exe (Boot Sector Manipulation Tool)
-PeToUSB (http://GoCoding.Com)
-usb_prep8 (Prepares Windows XP Setup LocalSource for Copy to USB-Drive)
step 3:
Double click Komku-SP-usb.exe

a window will appear... and click Install

step 4:
Insert your USB Flash Drive.
When I made this tutorial, I was using 4GB Transcend USB FlashDrive...

Locate folder C:\Komku\PeToUSB\
double click PeToUSB.exe

a window will appear like this...

Destination Drive : select USB Removable
check on Enable Disk Format
check on Quick Format
check on Enable LBA (FAT 16x)
Drive Label : XP-KOMKU (or whatever you want)
then click Start
 Click Yes to continue....
"You are about to repartition and format a disk. Disk: .... All existing volumes and data on that disk will be lost. Are You Sure You Want To Continue?"
click Yes

Wait a few seconds...

Click OK, and you can close PeToUSB window.
step 5:
Open Command Prompt ...
Click Start > Run > type cmd > click OK

On Command Prompt window, go to directory C:\Komku\bootsect\
how to do this?
first type this cd\ and press Enter

then type cd komku\bootsect and press Enter

the result...

Don't close Command Prompt window, and go to step 6...
step 6:
on command prompt window, type bootsect /nt52 H:

H: is drive letter for my USB Flash Drive, it may be different with yours...
 and press Enter
the result... "Successfully updated filesystem bootcode. Bootcode was succesfully updated on all targeted volumes."

don't close Command Prompt window, and go to step 7...
step 7:
now type this cd.. and press Enter

then type cd usb_prep8 and press Enter

type usb_prep8 again... and pres Enter

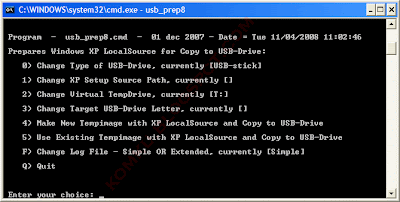
step 8:
Your command prompt window will look like this

Press any key to continue...
usb_prep8 welcome screen will appear

Prepares Windows XP LocalSource for Copy to USB-Drive:
0) Change Type of USB-Drive, currently [USB-stick]
1) Change XP Setup Source Path, currently []
2) Change Virtual TempDrive, currently [T:]
3) Change Target USB-Drive Letter, currently []
4) Make New Tempimage with XP LocalSource and Copy to USB-Drive
5) Use Existing Tempimage with XP LocalSource and Copy to USB-Drive
F) Change Log File - Simple OR Extended, currently [Simple]
Q) Quit
Enter your choice:_
now, insert your original Windows XP CD, or Windows XP with sata ahci driver to your CD/DVD ROM
and back to Command Prompt window
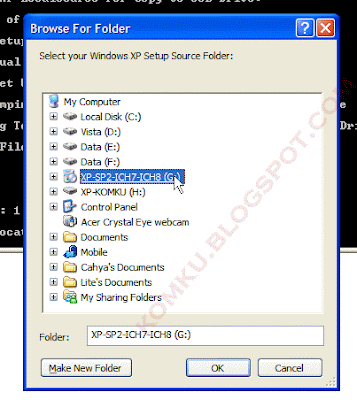
type 1 then press Enter...
"Browse For Folder" window will appear, select your CD/DVD drive and click OK

the result... "XP Setup Source Path" changed to G:\ (yours may be different)

now for point 2, if letter T is currently assigned to a drive in your computer, you must change it.... if not, leave it as it is
how to change it?
type 2 and press Enter...
 "Enter Available Virtual DriveLetter"
for example you doesn't have drive S
so you type S and press Enter
back to usb_prep8 welcome screen...
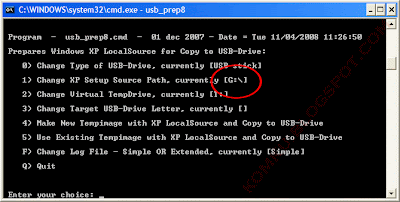
now type 3 and press Enter...
 "Please give Target USB-Drive Letter e.g type U" Enter Target USB-Drive Letter:
because my Flash drive letter is H
so, type H and press Enter...after back to usb_prep8 welcome screen...
now type 4 and press Enter to make new temporary image with XP LocalSource and copy it to USB Flash Drive
please wait a few seconds..

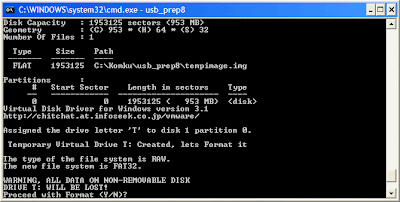
"WARNING, ALL DATA ON NON-REMOVABLE DISK DRIVE T: WILL BE LOST! Proceed with Format (Y/N)?"
type Y and press Enter
please wait....
when format virtual disk complete, press any key to continue...

please wait... making of LocalSource folder is in progress...

when "Making of LocalSource folder $WIN_NT$.~LS Ready"
Press any key to continue...

"Copy TempDrive Files to USB-Drive in about 15 minutes = Yes OR STOP = End Program = No"
Click Yes, and wait...

"Would you like USB-stick to be preferred Boot Drive U: bla... bla..."
Click Yes

"Would you like to unmount the Virtual Drive ?"
Click Yes, wait a few seconds, and press any key....
press any key again to close usb_prep8...

Now, your USB Flash Drive is ready...
step 9:
Now, insert your USB Flash Drive/Flash Disk/Thumb Drive to your notebook (e.g Acer Aspire One)
go to BIOS and make USB HDD (or USB ZIP in some other machine) as primary boot device....
then boot form your USB Flash Drive....
and select "TXT Mode Setup Windows XP, Never unplug USB-Drive Until After Logon"

After Hard Disk detected, delete all partition, create single partition... and install Windows XP on that partition...
and wait...

once text mode setup is complete, computer will restart....
this time select "GUI Mode setup Windows XP, Continue Setup + Start XP"

Continue Windows XP setup.... and Done!
Windows XP Installed....

Remember, you can use this tutorial to install Windows XP on all other computers.. not just Aspire One and Asus EEE-PC....
good luck!Note : I have got this article from komku.blogspot.com web site, posted by Cahya. For more information please visit http://komku.blogspot.com.
How to use System Restore to restore Windows XP to a previous state
Note : To perform System Restore, you must be logged on to Windows as an administrator. To use System Restore to restore Windows XP to a previous state, follow these steps:
- Log on to Windows as Administrator.
- Click Start button
 , clicking All Programs, clicking Accessories, clicking System Tools, and then clicking System Restore.
  If you are prompted for an administrator password or confirmation, type the password or provide confirmation.
 - On the Welcome to System Restore page, click Restore my computer to an earlier time (if it is not already selected), and then click Next.
- On the Select a Restore Point page, click the most recent system restore point in the On this list, click a restore point list, and then click Next.
Note : A System Restore message may appear that lists configuration changes that System Restore will make. Click OK. - On the Confirm Restore Point Selection page, click Next. System Restore restores the previous Windows XP configuration, and then restarts the computer.
- Log on to the computer as Administrator. The System Restore Restoration Complete page is displayed.
- Click OK.
- Log on to Windows as Administrator.
- Click Start button , clicking All Programs, clicking Accessories, clicking System Tools, and then clicking System Restore. If you are prompted for an administrator password or confirmation, type the password or provide confirmation.
- On the Welcome to System Restore page, click Undo my last restoration, and then click Next.
Note : A System Restore message may appear that lists configuration changes that System Restore will make. Click OK. - On the Confirm Restoration Undo page, click Next. System Restore restores the original Windows XP configuration, and then restarts the computer.
- Log on to the computer as Administrator. The System Restore Undo Complete page appears.
- Click OK. You can now run System Restore again from a different restore point.
Subscribe to:
Posts (Atom)
