
If the scan finds an infection in "C:\Documents and Settings\Username\Local Settings\Temporary Internet Files\Content.IE5" folder, you may need to remove all files in Content.IE5 folder manually. The Content.IE5 folder contains folders with randomly-created folder names that consist of letters and numbers. This folder is not visible in the C:\Documents and Settings\Username\Local Settings\Temporary Internet Files directory. However, if you would like the Content.IE5 folder to be visible, do the procedure below.
To make the Content.IE5 folder to be visible in Temporary Internet Files directory Please note that it is not necessary to make the Content.IE5 folder to be visible in Temporary Internet Files directory when deleting files in the Content.IE5 folder.
1.Press Start and select Run.
2.Type cmd.
3.At the command prompt, type "dir /a "%Userprofile%\Local Settings\Temporary Internet Files\*.*"
To delete all files in Content.IE5 folder using Windows Explorer
1.Close your Internet browser.
2.Set the Windows Explorer to view the address bar. To do this:
1.Open My Documents
2.Click View > Toolbars and check the Address Bar option.
3.In the address bar, type the path below and press the Enter key from your keyboard.
C:\Documents and Settings\Username\Local Settings\Temporary Internet Files\Content.IE5
In Username, you may enter the name of the user who is currently logged on e.g. Jane or Jane Doe.
4.In "C:\Documents and Settings\Username\Local Settings\Temporary Internet Files\Content.IE5\", click each folder you want to delete and press the Delete key from your keyboard. Then, click Yes to confirm the deletion. Please note that you cannot delete index.dat.
To delete the files in Content.IE5 at the command prompt
1.Press Start and select Run.
2.Type cmd and click OK. The command prompt appears on screen.
3.At the command prompt type:
c: [ENTER]
cd\ [ENTER]
cd "%Userprofile%\Local Settings\Temporary Internet Files\Content.IE5\" [ENTER]
The last command will take you to
C:\Documents and Settings\Username\Local Settings\Temporary Internet Files\Content.IE5\
which is your current directory.
4.In your current directory, type dir /a to display all files and folders in the current and/or parent directory.
5.Then, type del name of folder.
6.A message appears such as
C:\Documents and Settings\Username\Local Settings\Temporary Internet Files\Content.IE5\name of folder>*, Are you sure (Y/N)?
Enter Y to confirm. Then, all files are deleted.
You may need to repeat steps 5 and 6 for each folder. Please note that you cannot delete index.dat.

Windows Security Center does not detect antivirus protection
Security Centre will report the following:Virus Protection NOT FOUND
Cause : These issues are caused by one or both of the following:
Windows Management Instrumentation (WMI) service not started or A corrupt WMI database
Solution : In the services control panel ensure that the Windows Management Instrumentation (WMI) service is started and is set to Automatic.
Solution 1 : If the service has been simply stopped and not failed to start due to corruption of the WMI database:
1।Click Start Run and type services.msc then click OK.
2.Right-click Windows Management Instrumentation service and select Properties.
3.Click the General tab.
4।Select Automatic as the Startup Type.
5.In the Service Status section, click Start,Click OK,Close the Service window.
If the service will not start then follow the advice in Solution 2.
Solution 2 : When the WMI database is corrupted and needs to be recreated:
1.Click Start Run and type services.msc then click OK.
2.Click OK if prompted with the following message:
Stop other Services
When windows management Instrumentation stops, these other services will stop.
Security Centre
Windows Firewall/Internet Connection Sharing (ICS)
Do you want to stop these services?
3.Right-click Windows Management Instrumentation service and select STOP.
4.Open Windows Explorer and navigate to the following location: %SystemRoot%\System32\Wbem\Repository
5.Select all files in the Repository folder, right-click and select Delete.
6.Reboot the Windows XP machine. After reboot the WMI service will start and the database will be recreated.
How to Disable System Restore in Windows ME, Windows XP, and Windows Vista
System Restore (restorept.api) is a new Windows XP feature that's similar to "Last Known Configuration." However, System Restore maintains multiple restore points instead of one last restore point. The user can manually create restore points, or System Restore can keep restore points during the following operations:
Installing new software, if the application uses a current installer that is System Restore-compliant, Using AutoUpdate, During a restore operation, During a Microsoft backup or recovery operation, Installing an unsigned driver, Automatically following 24 hours of inactivity.
By default, System Restore monitors all partitions. So, for example, if you delete an executable file, you can have the system state revert to a specific restore point to recreate or repair the executable file. When you revert to a restore point, however, you lose all changes since that point, except for changes to files in the My Documents folder and documents you've created with applications such as Microsoft Word and Microsoft Excel.
If you use System Restore and don't like the new system state, you can undo the process and restore the machine to the system state it had before you ran System Restore. Alternatively, you can run System Restore to change the system state to a different restore point.
One of the best features of Windows ME, XP, or Windows Vista is the System Restore option, however if a virus infects a computer with this operating system the virus may be accidentally backed up because of this feature. In order to completely remove a virus on these operating systems, you should disable System Restore before cleaning the system, then reenable it after the system is clean. Follow the instructions below to disable System Restore
Disabling System Restore on Windows ME
1. Click Start, Settings, and then click Control Panel.
2. Double-click the System icon. The System Properties dialog box appears.
NOTE: If the System icon is not visible, click "View all Control Panel options" to display it.
3. Click the Performance tab, and then click File System.
4. Click the Troubleshooting tab, and then check Disable System Restore.
5. Click OK. Click Yes, when you are prompted to restart Windows.
Once you have cleaned the virus or other problem from the computer, reenable System Restore by following these directions
To enable Windows Me System Restore:
1. Click Start, point to Settings, and then click Control Panel.
2. Double-click System, and then click the Performance tab.
3. Click File System, and then click the Troubleshooting tab.
4. Uncheck Disable System Restore.
5. Click OK. Click Yes, when you are prompted to restart Windows.
Disabling System Restore on Windows XP
IMPORTANT NOTES:
To turn off Windows XP System Restore:
NOTE: These instructions assume that you are using the default Windows XP Start Menu and have not changed to the Classic Start menu. To re-enable the default menu, right-click Start, click Properties, click Start menu (not Classic) and then click OK.
1. Click Start.
2. Right-click the My Computer icon, and then click Properties.
3. Click the System Restore tab.
4. Check "Turn off System Restore" or "Turn off System Restore on all drives" as shown in this illustration:
5. Click Apply.
6. When turning off System Restore, the existing restore points will be deleted. Click Yes to do this.
7. Click OK.
8. Proceed with what you need to do; for example, virus removal. When you have finished, restart the computer and follow the instructions in the next section to turn on System Restore.
To turn on Windows XP System Restore:
1. Click Start.
2. Right-click My Computer, and then click Properties.
3. Click the System Restore tab.
4. Uncheck "Turn off System Restore" or "Turn off System Restore on all drives."
5. Click Apply, and then click OK.
Starting System Restore From a Command Prompt in Windows XP
1. Restart your computer or turn the computer on
2. Start tapping the F8 key. The Windows Advanced Options Menu appears. If you begin tapping the F8 key too soon, some computers display a "keyboard error" message. To resolve this, restart the computer and try again.
3. Select the "Safe Mode with Command Prompt
option" and press Enter
4. Log on to the computer with an administrator account
5. Type the following at the command prompt and press Enter
%systemroot%\system32\restore\rstrui.exe
6. Follow the onscreen instructions to restore your computer to an earlier time.
Re-enabling System Restore in Windows XP via the Group Policy Editor
In some cases, System Restore is disabled via the Group Policy Editor. In these cases, System Restore does not show up as a tab under My Computer Properties in Windows XP
. If it doesnt show up, the question becomes how do you turn it on in the first place. To re-enable System Restore via the Group Policy Editor, follow these directions:
1) Start the Group Policy Editor by clicking on Start, Run and typing gpedit.msc in the Run box and pressing Enter
2) In the left hand column, click on Computer Configuration, Administrative Templates, System, System Restore
3) In the right hand column, set Turn off System Restore and Turn off Configuration to Disable
4) Minimize the Group Policy Editor
5) Right click on My Computer and Select Manage
6) In the right hand column, double click on Services and Applications, then Services
7) Find the System Restore Service and double-click to open
8) On the General tab set [Startup Type] to Automatic using the drop down list
9) Click the Start button to start the service
10) Close the Computer Management console
11) Maximize the Group Policy Editor and set Turn off System Restore and Turn off Configuration to Not Configured
12) Close Group Policy Editor and reboot the system.
13) Once the system is rebooted, Click on Start, Right-click on My Computer, click on Properties and the System Restore tab should appear again.
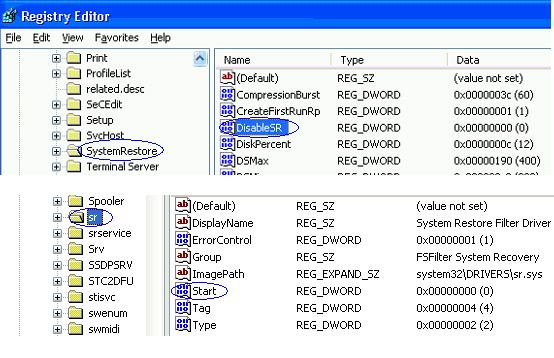
An alternative to the usual method of enabling and disabling Windows XP's System Restore feature is to use the registry. To use this alternative, perform the following steps: Start the registry editor (regedit.exe).
Go to HKEY_LOCAL_MACHINE\SOFTWARE\Microsoft\Windows NT\CurrentVersion\SystemRestore.
If a "DisableSR" value doesn't exist, go to the Edit menu, select New, DWORD value, and create the value. Set the value to 1 to disable System Restore or 0 to enable System Restore.
Go to HKEY_LOCAL_MACHINE\SYSTEM\CurrentControlSet\Services\sr to prevent the System Restore service from starting.
Double-click Start, and set the value to 4 to stop the service from starting or to 0 for normal startup. Close the registry editor.
Disabling System Restore on Windows Vista
To turn off Windows Vista System Restore:
1. Click Start.
2. Right-click the Computer icon, and then click Properties.
3. Click on System Protection under the Tasks column on the left side
4. Click on Continue on the "User Account Control" window that pops up
5. Under the System Protection tab, find Available Disks
6. Uncheck the box for any drive you wish to disable system restore on
7. When turning off System Restore, the existing restore points will be deleted. Click "Turn System Restore Off" on the popup window to do this.
8. Click OK
9. When you have finished, restart the computer and follow the instructions in the next section to turn on System Restore.
To turn on Windows Vista System Restore:
1. Click Start.
2. Right-click the Computer icon, and then click Properties.
3. Click on System Protection under the Tasks column on the left side
4. Click on Continue on the "User Account Control" window that pops up
5. Under the System Protection tab, find Available Disks
6. Place a checkmark in the box for any drive you wish to enable System Restore on
7. Click OK
Installing new software, if the application uses a current installer that is System Restore-compliant, Using AutoUpdate, During a restore operation, During a Microsoft backup or recovery operation, Installing an unsigned driver, Automatically following 24 hours of inactivity.
By default, System Restore monitors all partitions. So, for example, if you delete an executable file, you can have the system state revert to a specific restore point to recreate or repair the executable file. When you revert to a restore point, however, you lose all changes since that point, except for changes to files in the My Documents folder and documents you've created with applications such as Microsoft Word and Microsoft Excel.
If you use System Restore and don't like the new system state, you can undo the process and restore the machine to the system state it had before you ran System Restore. Alternatively, you can run System Restore to change the system state to a different restore point.
One of the best features of Windows ME, XP, or Windows Vista is the System Restore option, however if a virus infects a computer with this operating system the virus may be accidentally backed up because of this feature. In order to completely remove a virus on these operating systems, you should disable System Restore before cleaning the system, then reenable it after the system is clean. Follow the instructions below to disable System Restore
Disabling System Restore on Windows ME
1. Click Start, Settings, and then click Control Panel.
2. Double-click the System icon. The System Properties dialog box appears.
NOTE: If the System icon is not visible, click "View all Control Panel options" to display it.
3. Click the Performance tab, and then click File System.
4. Click the Troubleshooting tab, and then check Disable System Restore.
5. Click OK. Click Yes, when you are prompted to restart Windows.
Once you have cleaned the virus or other problem from the computer, reenable System Restore by following these directions
To enable Windows Me System Restore:
1. Click Start, point to Settings, and then click Control Panel.
2. Double-click System, and then click the Performance tab.
3. Click File System, and then click the Troubleshooting tab.
4. Uncheck Disable System Restore.
5. Click OK. Click Yes, when you are prompted to restart Windows.
Disabling System Restore on Windows XP
IMPORTANT NOTES:
- You must be logged in as an Administrator to do this. If you are not logged in as an Administrator, the System Restore tab will not be displayed.
- Turning off System Restore will clear out all previous restore points.
To turn off Windows XP System Restore:
NOTE: These instructions assume that you are using the default Windows XP Start Menu and have not changed to the Classic Start menu. To re-enable the default menu, right-click Start, click Properties, click Start menu (not Classic) and then click OK.
1. Click Start.
2. Right-click the My Computer icon, and then click Properties.
3. Click the System Restore tab.
4. Check "Turn off System Restore" or "Turn off System Restore on all drives" as shown in this illustration:
5. Click Apply.
6. When turning off System Restore, the existing restore points will be deleted. Click Yes to do this.
7. Click OK.
8. Proceed with what you need to do; for example, virus removal. When you have finished, restart the computer and follow the instructions in the next section to turn on System Restore.
To turn on Windows XP System Restore:
1. Click Start.
2. Right-click My Computer, and then click Properties.
3. Click the System Restore tab.
4. Uncheck "Turn off System Restore" or "Turn off System Restore on all drives."
5. Click Apply, and then click OK.
Starting System Restore From a Command Prompt in Windows XP
1. Restart your computer or turn the computer on
2. Start tapping the F8 key. The Windows Advanced Options Menu appears. If you begin tapping the F8 key too soon, some computers display a "keyboard error" message. To resolve this, restart the computer and try again.
3. Select the "Safe Mode with Command Prompt
option" and press Enter
4. Log on to the computer with an administrator account
5. Type the following at the command prompt and press Enter
%systemroot%\system32\restore\rstrui.exe
6. Follow the onscreen instructions to restore your computer to an earlier time.
Re-enabling System Restore in Windows XP via the Group Policy Editor
In some cases, System Restore is disabled via the Group Policy Editor. In these cases, System Restore does not show up as a tab under My Computer Properties in Windows XP
. If it doesnt show up, the question becomes how do you turn it on in the first place. To re-enable System Restore via the Group Policy Editor, follow these directions:
1) Start the Group Policy Editor by clicking on Start, Run and typing gpedit.msc in the Run box and pressing Enter
2) In the left hand column, click on Computer Configuration, Administrative Templates, System, System Restore
3) In the right hand column, set Turn off System Restore and Turn off Configuration to Disable
4) Minimize the Group Policy Editor
5) Right click on My Computer and Select Manage
6) In the right hand column, double click on Services and Applications, then Services
7) Find the System Restore Service and double-click to open
8) On the General tab set [Startup Type] to Automatic using the drop down list
9) Click the Start button to start the service
10) Close the Computer Management console
11) Maximize the Group Policy Editor and set Turn off System Restore and Turn off Configuration to Not Configured
12) Close Group Policy Editor and reboot the system.
13) Once the system is rebooted, Click on Start, Right-click on My Computer, click on Properties and the System Restore tab should appear again.
An alternative to the usual method of enabling and disabling Windows XP's System Restore feature is to use the registry. To use this alternative, perform the following steps: Start the registry editor (regedit.exe).
Go to HKEY_LOCAL_MACHINE\SOFTWARE\Microsoft\Windows NT\CurrentVersion\SystemRestore.
If a "DisableSR" value doesn't exist, go to the Edit menu, select New, DWORD value, and create the value. Set the value to 1 to disable System Restore or 0 to enable System Restore.
Go to HKEY_LOCAL_MACHINE\SYSTEM\CurrentControlSet\Services\sr to prevent the System Restore service from starting.
Double-click Start, and set the value to 4 to stop the service from starting or to 0 for normal startup. Close the registry editor.
Disabling System Restore on Windows Vista
To turn off Windows Vista System Restore:
1. Click Start.
2. Right-click the Computer icon, and then click Properties.
3. Click on System Protection under the Tasks column on the left side
4. Click on Continue on the "User Account Control" window that pops up
5. Under the System Protection tab, find Available Disks
6. Uncheck the box for any drive you wish to disable system restore on
7. When turning off System Restore, the existing restore points will be deleted. Click "Turn System Restore Off" on the popup window to do this.
8. Click OK
9. When you have finished, restart the computer and follow the instructions in the next section to turn on System Restore.
To turn on Windows Vista System Restore:
1. Click Start.
2. Right-click the Computer icon, and then click Properties.
3. Click on System Protection under the Tasks column on the left side
4. Click on Continue on the "User Account Control" window that pops up
5. Under the System Protection tab, find Available Disks
6. Place a checkmark in the box for any drive you wish to enable System Restore on
7. Click OK
Low Disk Space Error Appears
By default, on a Windows XP system the following messages are displayed। This tweak will prevent the messages being displayed.
"You are running out of disk space on [drive]. To free space on this drive by deleting old or unnecessary files, click here."
1. When free disk space reaches 200 megabytes (MB), you receive the following message for 10 seconds, once per session:
2. When free disk space reaches 80 MB, you receive the following message for 30 seconds, every four hours, twice per session:
3. When free disk reaches 50 MB, you receive the following message for 30 seconds, every five minutes, until free space is above 50 MB:
To disable the pop up message follow this procedure:
1. [Start] [Run] [Regedit]
2. Registry Key: HKEY_CURRENT_USER\Software\Microsoft\Windows\CurrentVersion\Policies\Explorer
3. Data Type: REG_DWORD [Dword Value] // Value Name: NoLowDiskSpaceChecks
4. Modify/Create the Value Name [NoLowDiskSpaceChecks] according to the Value Data listed above.
5. Value Data: [0 = NoLowDiskSpaceChecks Disabled / 1 = NoLowDiskSpaceChecks Enabled]
6. Exit Registry and Reboot
Vista Shortcut Overlay Remover
You can download Vista Shortcut Overlay. This tools allows you to either way to modify or remove the shortcut overlay arrow in Windows 7 and Vista. Here is the screenshot of that utility:

The best way is to edit the REGISTRY!!!
The best way is to edit the REGISTRY!!!
Removing the shortcut arrow: Download blank_icon.zip and extract the file blank.ico to a folder of your choice. In this example, we use C:\Icons\blank.ico as the path to the icon file you downloaded. And then follow these steps:
- Click Start, type regedit.exe and press ENTER
- Navigate to the following branch:
HKEY_LOCAL_MACHINE \ SOFTWARE \ Microsoft \ Windows \ CurrentVersion \ explorer \ Shell Icons
- In the right pane, create a new String value (REG_SZ) named 29
- Double-click 29 and set its Value data as C:\Icons\blank.ico
- Close Regedit.exe and restart Windows
Note: If the Shell Icons branch does not exist already, you'll need to create it.
HP Solution Center (Scanner problems)
The problem seems to be HP imaging software won't work if you have Kodak or Adobe photo tools on your system (and maybe others).
My problem was when I use the HP Solution Center, and click "Scan a Document", I get an error window that says "HP-CUE" needs to close. When I click the "details" link, it says hpqkygrp.exe caused the problem when it called msvcr80.dll. Removing and reinstalling the HP software 6 times, and finally rebuilding XP, still didn't help.
I used Google to research "msvcr80.dll" problems, and noticed some similarities ... it is used by other photo/imaging applications. Here is what I discovered that fixed my HP Scanner problems.
1- Removed the entire HP suite drivers and all related HP programs (use HP's TOTAL removal tool on their CD under "\util\ccc\Uninstall.bat")
2- Removed Kodak photo programs
3- Removed Adobe Photoshop
(you may have to remove photo/imaging applications from other vendors, these are the only 2 I had loaded here)
4- Installed the HP C6280 suite
(more of the solution follows)
It now works perfectly. But once the HP software is installed, I couldn't reinstall either Kodak or Adobe photo software. Both use Install Shield and their installation would hang; Process Explorer (MS System Internals) showed that "ntvdm.dll" was hung(a subprocess of the installation). To fix this problem I found I had to temporarily stop the Services that HP starts.
5- Go into "Control Panel\Administrative Tools\Services"
6- Stop "HP Cue DeviceDiscovery" service
7- Stop "HP Network Devices Support" service
8- Stop "hpqcsx08" service
9- Installed Kodak and Photoshop
10- Restarted the above HP services
The HP Director Window Does Not Open in Windows XP
Get a free safety scan for your computer
Windows Live OneCare safety scanner helps tune up your computer.
Windows Live OneCare safety scanner is a new service that lets you scan your computer to help protect, clean, and keep it running at its best. The service is free and available directly from the Internet . You can revisit the Windows Live OneCare safety scanner for subsequent tune ups as often as you like.
Windows Live OneCare safety scanner is a new service that lets you scan your computer to help protect, clean, and keep it running at its best. The service is free and available directly from the Internet . You can revisit the Windows Live OneCare safety scanner for subsequent tune ups as often as you like.
How to use the Windows Live OneCare safety scanner
Visit the Windows Live OneCare safety scanner, click Full Service Scan, and follow the directions on the screen.

The Windows Live OneCare safety scanner is downloaded and installed on your computer the first time you do a scan. The scanner will inspect your computer and then give you results and recommendations when the scan is complete.
To check for updates, you can do another scan whenever you like. These updates will include new versions of the scanner and new virus recognition information (also known as virus definitions) from Microsoft.
If you prefer a customized service, click one of the following icons.
Protection. Helps check for and remove viruses.
Clean up. Helps get rid of the junk on your hard disk.
Tune up. Helps improve your computer's overall performance.
Other features of the Windows Live OneCare safety scanner
In addition to the free security scans, Windows Live OneCare safety scanner also provides:
| • | Straightforward information about online threats. |
| • | The ability to search the Microsoft Virus Encyclopedia. |
| • | Answers to questions about the health and safety of your computer. |
| • | Tools to help protect, optimize, and enhance the safety of your computer. |
| • | A registry cleaner to help remove invalid or obsolete registry items on your computer. |
Group Policy Editor
[Note: Group Policy Editor is only available in XP Professional]
I suspect that moments after the first copy of Windows was fired up on a desktop way back in 19-whatever, someone was already thinking about how it could be changed. An entire industry has grown around the desire to tweak and personalize the user interface. The advent of the registry made tweaking not only more possible, but also dangerous. One of the least touted but most useful tools for tweaking is found in XP Professional; The Group Policy Editor.
Note : Group Policy Editor is a very powerful tool.Improper use may turn your computer into a paperweight.On the bright side, paperweights don’t need feeding or a litter box.Warning admonitions aside, to fire up the GPE, click [Start] [Run] and type [gpedit।msc] in the data input line. If all is well. you’ll see the GPE as shown below.

Items to note are the left pane which gives you access to the Local Computer Policy for both Computer Configuration and User Configuration. The right panel follows normal explorer protocols, displaying the folder views. At the bottom of the right pane are tabs for [Extended] and [Standard] views.

Drilling down to the [Desktop] folder in the left pane displays the options in [Standard] view in the right pane which may be altered. There are two methods to arrive at the screen where the actual modifications to the individual settings are accomplished. Click on the [Extended] tab in the right pane and the screen shown below will open with an explanation of the individual setting you have highlighted. For this illustration I have highlighted [Remove Recycle Bin Icon from Desktop]. To display the properties sheet where the actual changes to the setting are made, click the [Properties] link in the upper left hand side of the right pane.
Immediate access to the property sheet from [Standard] view is available by double clicking on the property you wish to change in the right pane.

The [Extended] view shown above lists the operating system minimum requirements to facilitate the intended change। Along with a description of what the change will accomplish, there may be notes which give further info such as if a reboot is required to make the change effective.

If you had double clicked the item you wanted to change rather than click the [Extended] tab on the previous screen, this is what would have opened. Whatever method of arrival you choose, this is where the change is made and finalized. If you didn’t click the [Extended] tab to see the explanation, use the [Explain] tab above to see a description of the change you are considering. (See screenshot below)
Three choices are available for your selection
Not Configured: No change to the current setting.
Enabled: The setting will be applied to users of this computer group.
Disabled: The setting is not applied to users of this computer group.
Subscribe to:
Posts (Atom)
