IP
Enter a long URL to make Tiny!

Disabling the Right Click ON & IN the Taskbar.!

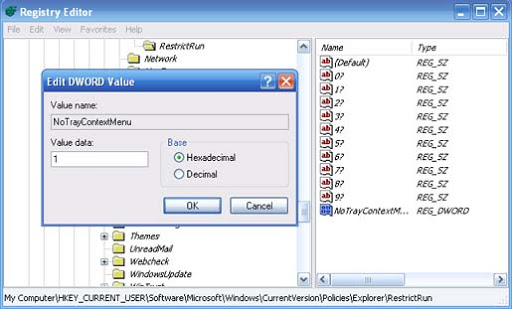
Disabling the Right Click on the Taskbar.!


1. Start Regedit Through Run Command
Click Start=> Select Run Command=> Type Regedit=> Click OK
2. Go to HKEY_CURRENT_USER \ Software \ Microsoft \ Windows \ CurrentVersion \ Policies \ Explorer
3. Add a DWORD and give it a name of NoTrayContextMenu
4. Make DWORD value as 1
5. Restart the System. Then the taskbar will be restricted.

------------------------------------------------------------------------------

Disabling The Right Click In Desktop.!

Today one computer being used by many users in an office or in a house. Each and every user of the computer changes the desktop, Wallpapers and settings etc.., Always it irritates us. To avoid this and to set only one wallpaper for all users we have to restrict the users from accessing the desktop properties. So we can use our favorite wallpapers and themes as our choice. Follow the below steps to restrict the users from accessing the desktop properties

1. Start Regedit Through Run Command
Click Start=> Select Run Command=> Type Regedit=> Click OK
2. Go to HKEY_CURRENT_USER \ Software \ Microsoft \ Windows \ CurrentVersion \ Policies \ Explorer
3. Add a DWORD and give it a name of NoViewContextMenu
4. Make DWORD value as 1
5. Restart the System. Then the desktop will be restricted.

IE 7 opening to Run Once page with error on it.


1. Closed all opened Internet Explorer windows.
2.Open" Run" and past the below command and hit enter once
REG ADD "HKCU\Software\Microsoft\Internet Explorer\Main" /V "RunOnceComplete" /T REG_DWORD /D 1 /F
3.Again open" Run" and past the below command and hit enter once
REG ADD "HKCU\Software\Microsoft\Internet Explorer\Main" /V "RunOnceHasShown" /T REG_DWORD /D 1 /F


To reset Internet Explorer automatically
2.In the File Download dialog box, click Run, and then follow the steps in the wizard.
3.In the Reset Internet Explorer Settings dialog box, click Reset.
4.When Internet Explorer finishes applying default settings, click Close, and then click Close again.

Hyperlinks Not Working in Outlook Express/ outlook

Outlook Express is included with Windows XP, so many people use it for e-mail correspondence or even as a news reader. If you receive e-mails with hyperlinks in Outlook Express, they are shown in blue by default and underlined. Clicking a hyperlink in an e-mail in Outlook Express will open up your default internet browser and show the location the link is pointing to.

You might run into an Outlook Express problem where the hyperlinks in the e-mail messages do not work anymore. If you click the link in the e-mail message nothing happens. This is not an Outlook Express error, but can be a configuration problem related to files types in the Windows Explorer.

To solve this error, try these steps:

  1. Open up the Control Panel.
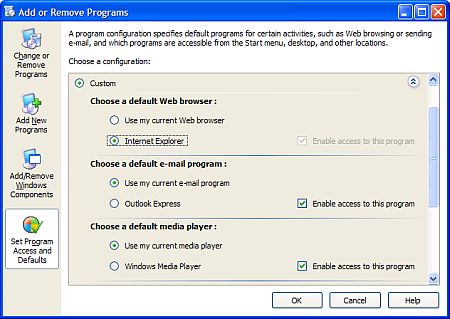
  2. Select Add or Remove Programs.
  3. Now select the Set Program Access and Defaults in the left-hand side of the window.
  4. Next, select Custom and then select Internet Explorer as the default web browser.
  5. Click OK.
  6. If this does not help, continue with:

  7. Open up the Windows Explorer.
  8. In the Tools menu, select Folder Options…
  9. In the Folder Options dialog box, select the File Types tab.
  10. In the Registered file types list, look up the ExtensionURL’.
  11. In the Details for ‘URL’ extension group, make sure that ‘Opens with:’ is followed by your default browser, e.g. ‘Internet Explorer’. If not, click the Change button and select the internet application in the Open With dialog box.
  12. If this does not fix the problem, continue with:

  13. Click the Advanced button.
  14. In the Edit File Type dialog box that appears, select the open entry under Actions:
  15. Next, check if your settings match the ones in the screenshot below। If not, change them accordingly.
  1. Click OK twice and then click Close.

After this, you should now be able to open the hyperlinks from e-mails in Outlook Express again.

If this still does not work, you can try to repeat the steps above but replace the settings with the following screenshot.

rundll32.exe ieframe.dll,OpenURL %l
"%1",,-1,0,,,,
IExplorer
WW_OpenURL

One of these two settings should fix the Outlook Express error of not showing hyperlinks for sure.

oped Internet Explorer - then click on Tools --> Internet options -->
In this options window -> click on Programs tab.
next to Email --> select microsoft office outlook and in the same options window you find a check box --> Internet explorer Default browser.
click on Apply button - > close all applications.
Open IE and outlook -- you may get prompt "do you want default browser as IE" click on YES.

---------------------------------------------------------------------------------------------

When you use Microsoft Outlook to view message attachments in Citrix Metaframe as a published program, you may receive the following error message when you open the .htm or .html attachment:

"The system cannot find the file specified."
Microsoft Internet Explorer opens to the default home page.

You must use Registry Editor (Regedt32.exe) to change the way .htm and .html files are handled. To do this:

  1. Click Start and then click Run.
  2. In the Open box, type regedit, and then click OK.
  3. Navigate to the ddeexec registry subkey under the following registry key:
    HKEY_CLASSES_ROOT\htmlfile\shell\opennew
  4. Click the ddeexec registry subkey and then delete it.
  5. Navigate to the command registry subkey under the following registry key:
    HKEY_CLASSES_ROOT\htmlfile\shell\opennew
  6. Double click the Default value in the right hand pane.
  7. Add a "%1" to the end of the string so that it looks like the following:
    "C:\Program Files\Internet Explorer\iexplore.exe" %1
  8. Click OK.
  9. Close the Registry Editor.
  10. restart the computer

Error "Registry Editing has been disabled by your administrator"

Method 1: Using the REG.EXE console tool

1. Click Start, Run and type this command:

You should be able to launch Tweak UI, as well as the Registry Editor.

Method 2: Using the Group Policy Editor (Windows XP Professional only)

  • Click Start, Run and type gpedit.msc and press ENTER
  • Go to the following location:

User Configuration | Administrative Templates | System

  • Double-click Disable registry editing tools and set it to Not Configured
  • Exit the Group Policy Editor

Note: If the setting already reads Not Configured, set it to Enabled, and click Apply. Then revert it back to Not Configured. This ensures that the DisableRegistryTools registry value is removed successfully.

OR

Start -> Run -> type the below command and press entre

REG add HKCU\Software\Microsoft\Windows\CurrentVersion\Policies\System /v DisableRegistryTools /t REG_DWORD /d 0 /f

No longer access the CD drive or the DVD drive

Step 1: Open Registry Editor

Start Registry Editor.
Run=> type "regedit"=> press enter

Step 2: Delete the UpperFilters registry entry

  1. In Registry Editor, expand My Computer, and then expand HKEY_LOCAL_MACHINE.
  2. Expand SYSTEM, and then expand CurrentControlSet.
  3. Expand Control, and then expand Class.
  4. Under Class, click {4D36E965-E325-11CE-BFC1-08002BE10318}.
  5. In the details pane of Registry Editor, on the right side, click UpperFilters.

    Note You may also see an UpperFilters.bak registry entry. You do not have to remove that entry. Click UpperFilters only.
    • If you see the UpperFilters registry entry in the details pane of Registry Editor, go to step 6.
    • If you do not see the UpperFilters registry entry, you still might have to remove the LowerFilters registry entry. To do this, go to "Step 3: Delete the LowerFilters registry entry."
  6. On the Edit menu, click Delete.
  7. Click Yes when you receive the following message:
    Are you sure you want to delete this value?
The UpperFilters registry entry is removed.

Step 3: Delete the LowerFilters registry entry

  1. In the details pane of Registry Editor, on the right side, click LowerFilters.

    Note You might see a LowerFilters.bak registry entry. You do not have to remove that entry. Click LowerFilters only.

    If you do not see the LowerFilters registry entry, unfortunately this content is unable to help you any more. Go to the "Next Steps" section for information about how you can find more solutions or more help on the Microsoft Web site.
  2. On the Edit menu, click Delete.
  3. Click Yes when you receive the following message:
    Are you sure you want to delete this value?
    The LowerFilters registry entry is removed.
  4. Exit Registry Editor.

Download MicrosoftFixit OR MicrosoftFixit tool

Step 4: Restart your computer

Restart your computer। After you have done this, try to access the CD or DVD drive. If you can access the CD or DVD drive, and if you do not receive an error message, the problem is resolved. You can reinstall your CD or DVD writing or recording software.

cannot open the User Accounts item in Control Panel

Follow these steps:
  1. Click Start, click Run, type cmd, and then click OK.
  2. At the command prompt, type the following commands, press ENTER after each command, and then click OK when a message says that the registration is successful:
    • Regsvr32 jscript.dll
    • Regsvr32 nusrmgr.cpl
    • Regsvr32 /i mshtml.dll
    • Regsvr32 themeui.dll
    • Regsvr32 Vbscript.dll
  3. Make sure that you can open the User Accounts item in Control Panel.

Some applications in Add/Remove Programs list are missing Change and Remove buttons ?

When you open Add/Remove Programs applet and click an application entry, you may notice that the Change, Remove (or Change/Remove) buttons may be missing, thus leaving only the application name entry there (Fig 1). Here is a method to make Windows show the Remove, Change (or the Change/Remove button together) buttons in the listing. (Fig 3)

RESOLUTION

  • Click Start, Run and type REGEDIT. This starts the Registry Editor. Navigate to:

HKEY_LOCAL_MACHINE
\SOFTWARE
\Microsoft
\Windows
\CurrentVersion
\Uninstall
\

here is Adobe Acrobat 5.0 - Taken as an example

  • In the right-pane, do the following:

Double-click NoRemove (REG_DWORD) and set it to 0
Double-click NoModify (REG_DWORD) and set it to 0

If NoRemove is set to 1, the Remove button will be unavailable
If NoModify is set to 1, the Change button will be unavailable

Visual aid for the Registry editing procedure:

Restart your computer. After you have done this, final result is you'll get the Change and Remove buttons back (Or, the Change/Remove button together)

Windows Live Photo Gallery stops responding or will not start

Follow the steps for your operating system:
  • Windows Vista
    1. Close Windows Live Photo Gallery.
    2. Click Start
      Collapse this imageExpand this image
      , type %userprofile%\AppData\Local\Microsoft\Windows Live Photo Gallery in the Start Search box, and then press ENTER.
    3. Right-click Pictures.pd4, and then select Rename.
    4. Change the name of file to OLD_Pictures.pd4.
    5. Start Windows Live Photo Gallery.
    Note Windows Live Photo Gallery will re-create the database based on the metadata and information that is stored in your media files. Any metadata that is not written back to a media file will be lost. For example, the metadata could be lost because a media file was locked or read-only.
  • Windows XP
    1. Close Windows Live Photo Gallery
    2. Click Start, click Run, type %userprofile%\Local Settings\Application Data\Microsoft\Windows Live Photo Gallery, and then click OK.
    3. Right-click Pictures.pd4, and select Rename.
    4. Change the name of file to OLD_Pictures.pd4.
    5. Start Windows Live Photo Gallery.

An error is preventing this Slide Show from playing - solution

For some reason the screen saver Photos in Windows Vista stopped working.

I think this is related to Nvidia's driver because it started after upgrading but I have not able to confirm this because when I installed the old driver the problem persisted.

It says "an error is preventing this slideshow from playing"


The solution is: In vista tried to run a command prompt as an administrator (right-click on it and
click "Open as Administrator") then enter the following command line:
"net localgroup "Administrators" "NT Authority\Local Service" /add"

I am 100% sure that issue will be resolve.

If not follow the below link

http://support.microsoft.com/kb/944221

How to uninstall the Adobe Flash Player plug-in and ActiveX control

Due to recent enhancements to the Adobe Flash Player installers, you can now remove the player only by using the Adobe Flash Player uninstaller. To remove Flash Player, simply download and run the appropriate uninstaller for your system using the steps below.

  1. Download the Adobe Flash Player uninstaller:
  2. Save the file to your system, choosing a location where you can find it (for example, your desktop). Macintosh users may need to open or unstuff the .hqx file.
  3. Quit ALL running applications, including all Internet Explorer or other browser windows, AOL Instant Messenger, Yahoo Messenger, MSN Messenger, or other Messengers. Check the Windows system tray carefully to make certain no applications are still in memory which might possibly use Flash Player.
  4. Run the uninstaller. This will remove Adobe Flash Player from all browsers on the system.

Note: The uninstaller cannot remove files currently in use.

Uninstall your McAfee consumer products using Add/Remove Programs in the Windows Control Panel

Windows 2000/XP

1. Click Start, Settings, Control Panel.
2. Double-click Add or Remove Programs.
3. Select the McAfee SecurityCenter product.
4. Click Remove and follow the steps provided.

Windows Vista

1. Click Start, Search, type Programs and Features, and click Go.
2. Double-click Programs and Features.
3. Select the McAfee SecurityCenter product.
4. Click Uninstall and follow the steps provided.

Step 2 - Download and run MCPR.exe

1. Download the removal tool
2. Click Save and save the file to a folder on your computer.
3. Navigate to the folder where the file was saved.
4. Make sure all McAfee windows are closed.
5. Double-click MCPR.exe to run the removal tool.

Note: Windows Vista users must right-click MCPR.exe and select Run as Administrator.


6. Restart your computer after receiving the message CleanUp Successful.

Your McAfee product will not be fully removed until the system is restarted.
-------------------------------------------------------------------------------------------------
If the message Cleanup Unsuccessful is displayed, follow the steps below to view and save your MCPR log files for analysis by Technical Support.
Saving troubleshooting logs

1. On the Cleanup Unsuccessful notification dialog, click View Logs.
2. Your troubleshooting logs will open in a Notepad window. Click File, Save As, and save the file to your Desktop. Name the file MCPR_date.txt (for example: MCPR_Jan10_08.txt).
3। Contact McAfee Technical Support and provide the log file to your technician for troubleshooting.

» McAfee Virtual Technician

Unable to uninstall Microsoft Office 2007 using the Add or Remove Programs feature


SUMMARY

This article describes how to uninstall the existing 2007 Microsoft Office system if you cannot uninstall it by using the Add or Remove Programs feature in Control Panel.

If customer wants to reinstall the 2007 Office system, we recommend that you first uninstall it by using the Add or Remove Programs feature in Control Panel. When this method is successful, the 2007 Office system is completely uninstalled. To verify if the 2007 Office product can be removed via Add or Remove Programs, follow these steps.

For Windows XP or Windows Server 2003:

1.

Click Start, and then click Control Panel.

2.

Double-click Add or Remove Programs.

3.

Click to select the 2007 Office system product from the application list, and then click Remove.

For Windows Vista:

1.

Click Start, and then click Control Panel.

2.

Click the Uninstall a program link in Control Panel in the Programs group.

3.

Click to select the product to be uninstalled from the listing of installed products, and then click Uninstall from the bar that displays the available tasks.

However, you may be unable to successfully uninstall the 2007 Office system by using this method. For example, you may experience issues with the Add or Remove Programs dialog box. Or, some 2007 Office components may not be uninstalled. In these cases, you may be unable to reinstall the 2007 Office system.

This article describes an alternative method that you can use to uninstall the existing 2007 Office system. After you use this alternative method, you can reinstall the 2007 Office system.

Note You should not use this alternative method instead of the recommended method. This is because the alternative method does not completely uninstall the 2007 Office system.

MORE INFORMATION

To uninstall the existing 2007 Office system if you cannot uninstall it by using the Add or Remove Programs feature, follow these steps:

1.

Remove any remaining Windows Installer packages of the 2007 Office system. To do this, follow these steps.

Note These steps require that your user account has Administrator permissions on the computer.

a.

Click Start, click Run, type installer, and then click OK.

This process opens the %windir%\Installer folder.

b.

On the View menu, click Details.

c.

On the View menu, click Choose Details.

d.

Click to select the Subject check box, type 340 in the Width of selected column (in pixels) box, and then click OK.

Note It may take several minutes for the subjects to appear next to each .msi file.

e.

For Windows XP or Windows 2003, on the View menu, point to Arrange icons by, and then click Subject.

For Windows Vista, on the View menu, point to Sort By, and then click Subject. In Windows Vista, a User Account Control dialog box may be displayed with the following warning:

An unidentified program wants access to your computer

Click Allow when you see this warning message.

f.

For each .msi file whose subject is 'Microsoft Office Product_Name 2007,' right-click the .msi file, and then click Uninstall.

Note Product_Name is a placeholder for the name of the 2007 Office product.

2.

Stop the Office Source Engine service. To do this, follow these steps:

a.

For Windows XP and Windows Server 2003, click Start, click Run, type services.msc, and then click OK.

For Windows Vista, click Start, click Start Search, type services.msc, and then press ENTER.

b.

In the Services window, determine whether the Office Source Engine service is running. If this service is running, right-click Office Source Engine, and then click Stop.

c.

Close the Services window.

3.

Remove any remaining 2007 Office installation files and folders. To do this, follow these steps:

a.

For Windows XP and Windows 2003, click Start, click Run, type %CommonProgramFiles%\Microsoft Shared, and then click OK.

For Windows Vista, click Start, click Start Search, type %CommonProgramFiles%\Microsoft Shared, and then press ENTER.

b.

If the following folders are present, delete them:

?

Office12

?

Source Engine

c.

For Windows XP and Windows 2003, click Start, click Run, type %ProgramFiles%\Microsoft Office, and then click OK.

For Windows Vista, click Start, click Start Search, type %ProgramFiles%\Microsoft Office, and then press ENTER.

Note On a computer that is running a 64-bit version of Windows XP, type %ProgramFiles(x86)%\Microsoft Office instead.

d.

Delete the Office12 folder.

e.

On the root folder of each hard disk drive, locate and then open the MSOCache folder. If you cannot see the MSOCache folder, follow these steps:

1.

Open Windows Explorer, and then click Folder Options on the Tools menu.

2.

Click the View tab.

3.

In the Advanced settings pane, click Show hidden files and folders under Hidden files and folders.

4.

Click to clear the Hide protected operating system files check box, and then click OK.

f.

Open the drive_letter:\MSOCache\All Users folder, and then delete every folder that has the following text in the folder name:

0FF1CE)-

Note This text contains a zero and a one for the letters 'O' and 'I.'

g.

For Windows XP and Windows 2003, click Start, click Run, type %appdata%\microsoft\templates, and then click OK.

For Windows Vista, click Start, click Start Search, type %appdata%\microsoft\templates, and then press ENTER.

h.

Delete the following files:

?

Normal.dotm

?

Normalemail.dotm

i.

For Windows XP and Windows 2003, click Start, click Run, type %appdata%\microsoft\document building blocks\Language_ID, and then click OK.

For Windows Vista, click Start, click Start Search, type %appdata%\microsoft\document building blocks\Language ID, and then press ENTER.

Notes

?

If you cannot open this folder because the folder does not exist, go to step 3k.

?

Language_ID is a placeholder for the four-digit number that represents the language of the 2007 Office system. For example, if you use the English version of the 2007 Office system, the Language_ID value is 1033. If the Language_ID is not known, type %appdata%\microsoft\document building blocks, and then open the subfolder in that location.

j.

Delete the Building blocks.dotx file.

k.

For Windows XP and Windows 2003, click Start, click Run, type %temp%, and then click OK.
For Windows Vista, click Start, click Start Search, type %temp%, and then press ENTER.

l.

On the Edit menu, click Select All.

m.

On the File menu, click Delete.

n.

For Windows XP and Windows 2003, click Start, click Run, type %AllUsersprofile%\Application Data\Microsoft\Office\Data, and then click OK.

For Windows Vista, click Start, click Start Search, type %AllUsersprofile%\Application Data\Microsoft\Office\Data, and then press ENTER.

o.

Delete only the Opa12.dat file.

4.

Remove the registry subkeys of the 2007 Office system. To do this, follow these steps.

Important This section, method, or task contains steps that tell how to modify the registry. However, serious problems might occur if you modify the registry incorrectly. Therefore, make sure that you follow these steps carefully. For added protection, back up the registry before you modify it.

a.

Locate and then delete the registry subkeys of the 2007 Office system if they are present. To do this, follow these steps:

1 .

For Windows XP and Windows 2003, click Start, click Run, type regedit, and then click OK.

For Windows Vista, click Start, click Start Search, type regedit, and then click OK.

2.

Click the following subkey:

HKEY_CURRENT_USER\Software\Microsoft\Office\12.0

3.

On the File menu, click Export, type DeletedKey01, and then click Save.

4.

On the Edit menu, click Delete, and then click Yes to confirm the deletion.

5.

For each registry subkey in the following list, repeat steps 4a(1) through 4a(4). Change the name of the exported key by one for each subkey.

For example, type DeletedKey02 for the second key, type DeletedKey03 for the third key, and so on.

Note In the following registry keys, the asterisk character (*) represents one or more characters in the subkey name.

?

HKEY_CURRENT_USER\Software\Microsoft\Office\12.0

?

HKEY_LOCAL_MACHINE\SOFTWARE\Microsoft\Office\12.0

?

HKEY_LOCAL_MACHINE\SOFTWARE\Microsoft\Office\Delivery\SourceEngine\Downloads\*0FF1CE}-*

?

HKEY_LOCAL_MACHINE\SOFTWARE\Microsoft\Windows\CurrentVersion\Uninstall\*0FF1CE*

?

HKEY_LOCAL_MACHINE\SOFTWARE\Microsoft\Windows\CurrentVersion\Installer\UpgradeCodes\*F01FEC

?

HKEY_LOCAL_MACHINE\SOFTWARE\Microsoft\Windows\CurrentVersion\Installer\UserData\S-1-5-18\Products\*F01FEC

?

HKEY_LOCAL_MACHINE\SYSTEM\CurrentControlSet\Services\ose

?

HKEY_CLASSES_ROOT\Installer\Features\*F01FEC

?

HKEY_CLASSES_ROOT\Installer\Products\*F01FEC

?

HKEY_CLASSES_ROOT\Installer\UpgradeCodes\*F01FEC

?

HKEY_CLASSES_ROOT\Installer\Win32Assemblies\*Office12*

Note If the computer is running a 64-bit version of Microsoft Windows, locate and then delete the following subkeys:

?

HKEY_CURRENT_USER\Software\Microsoft\Office\12.0

?

HKEY_LOCAL_MACHINE\SOFTWARE\Wow6432Node\Microsoft\Office\12.0

?

HKEY_LOCAL_MACHINE\SOFTWARE\Wow6432Node\Microsoft\Office\Delivery\SourceEngine\Downloads\*0FF1CE}-*

?

HKEY_LOCAL_MACHINE\SOFTWARE\Wow6432Node\Microsoft\Windows\CurrentVersion\Uninstall\*0FF1CE*

?

HKEY_LOCAL_MACHINE\SOFTWARE\Wow6432Node\Microsoft\Windows\CurrentVersion\Installer\UpgradeCodes\*F01FEC

?

HKEY_LOCAL_MACHINE\SOFTWARE\Wow6432Node\Microsoft\Windows\CurrentVersion\Installer\UserData\S-1-5-18\Products\*F01FEC

?

HKEY_LOCAL_MACHINE\SYSTEM\CurrentControlSet\Services\ose

?

HKEY_CLASSES_ROOT\Installer\Features\*F01FEC

?

HKEY_CLASSES_ROOT\Installer\Products\*F01FEC

?

HKEY_CLASSES_ROOT\Installer\UpgradeCodes\*F01FEC

?

HKEY_CLASSES_ROOT\Installer\Win32Assemblies\*Office12*

b.

Locate the following registry subkey:

HKEY_LOCAL_MACHINE\SOFTWARE\Microsoft\Windows\CurrentVersion\Uninstall

Note On a computer that is running a 64-bit version of Windows, locate the following registry subkey instead:

HKEY_LOCAL_MACHINE\SOFTWARE\Wow6432Node\Microsoft\Windows\CurrentVersion\Uninstall

c.

On the File menu, click Export, type UninstallKey01, and then click Save.

d.

Under the Uninstall subkey that you located in step 4b, click each subkey, and then determine whether the subkey has the following value assigned to it:

?

Name: UninstallString

?

Data: file_name path\Office Setup Controller\Setup.exe path

Note In this example, file_name is a placeholder for the name of an installation program, and path is a placeholder for the file path.

e.

If the subkey contains the name and the data that are described in step 4d, click Delete on the Edit menu. Otherwise, go to step 4f.

f.

Repeat steps 4d and 4e until you locate and then delete every subkey that matches the name and the data that are described in step 4d.

g.

Close Registry Editor.

5.

Restart the computer, and then reinstall the 2007 Office system.

Protect your computer:Beyond the basics

Viruses


Get a free PC safety scan Get a free PC safety scan

Windows Live OneCare safety scanner is a free service designed to help ensure the health of your PC.


Malicious Software Removal Tool Malicious Software Removal Tool

Download this free tool that checks computers running Windows Vista, Windows XP, Windows 2000, and Windows Server 2003.


What is a computer worm? What is a computer worm?

They copy themselves without any action from you, and spread quickly, wreaking havoc on networks and contacts lists.


How to help prevent computer worms How to help prevent computer worms

5 tips on how to prevent infection.


How to remove a computer worm How to remove a computer worm

Find out how to use recovery tools to help remove unwanted software.


Protect yourself from the Conficker computer worm Protect yourself from the Conficker computer worm

See details about Conficker, and how to use the Microsoft Malware Protection Center to keep informed about other worms or issues.


What is a computer virus? What is a computer virus?

Diminish the impact of computer viruses with a little knowledge and prevention.


Signs of viruses: Are you infected? Signs of viruses: Are you infected?

If something about your computer just isn't quite right, it might mean your computer is infected with a virus.


How to help prevent computer viruses How to help prevent computer viruses

5 tips on how to prevent infection.


How to remove a computer virus How to remove a computer virus

Find out how to use antivirus tools to help remove and prevent unwanted software.


Watch out for fake alerts Watch out for fake alerts

Rogue security software might infect your machine with a virus.


Help avoid computer viruses that spread through e-mail Help avoid computer viruses that spread through e-mail

Learn how to manage e-mail attachments in Outlook and Outlook Express to help prevent the spread of viruses.


Help avoid computer viruses that spread over mobile devices Help avoid computer viruses that spread over mobile devices

Protect yourself when you use Smartphones, cell phones, handheld PCs, and other portable technology.


5 steps to help avoid instant message viruses 5 steps to help avoid instant message viruses

Watch out for files sent in IM. They could be viruses in disguise.


How Trojans can take over your computer, and how to prevent them How Trojans can take over your computer, and how to prevent them

Protect your computer from malicious programs that criminals can use to control your computer through your Internet connection.


Don't let your computer become a zombie Don't let your computer become a zombie

When online criminals take control of many computers at once, the resulting "botnets" can wreak havoc on the Internet.


Video: Defend against viruses and worms Video: Defend against viruses and worms

Watch this video to find out how viruses and worms can infect your computer. Learn about the three main ways you can help to protect yourself from computer viruses.


Learn more about virus protection for your operating system Learn more about virus protection for your operating system

Find information specific to the version of Windows on your computer.

    Additional Information | | | |

   #Odisha.Club @everything is here!
   Registry Edits for Windows XP
   How to remove .net software and installation
   Computer Screenshot sites : gur.in ! screenshots.leeindy.com
   Home | Contact Us| RSS | About US | Mail Us | Bookmark this page

Copyright © 2015 ranjanmantri.blogspot.com. All Rights Reserved.