


Few words About Orissa
Calling from Gmail to phones
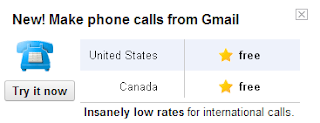
Now you can call landlines phones or mobile phones from Gmail. Google could be ready to turn Gmail into a communications hub by adding the ability to make phone calls from the Google Chat interface. All you need to do is ensure that the application that enables you to call is installed, and dial the number!

How to Call Phones from Gmail
1. Open your Gmail account.
2. Go to "Chat" on the left hand side of your Gmail screen. Look for the tab that says "Call phone". There will be a green phone symbol located next to this line.
3. Click on the "Call phone" tab. A box will appear, telling you about the service.
4. Click "Accept" once you have read the box. This means that you're acknowledging that you understand and agree to Google's terms of use.
5. Look for the call box on the page.
6. Press the blue "Call" button at the base of the dial box and your call will start dialing.
You are getting error message that "Your beta software has expired"
Error : When you try to start a Microsoft Office 2010 application, you receive the following message: "Your beta software has expired. Use Add or Remove Programs in Control Panel to remove the beta software from your computer."
Cause : This issue occurs because the beta version of the Office 2010 application that you are using has expired.
Solution for Windows XP, Vista, Win 7
For Windows 7, Windows Vista (with Service Pack 1) and Windows Server 2008:
1. Click Start, and type Programs and Features on the search bar.
2. In the Currently installed programs list, select Office 2010 beta version application, and then click uninstall.
3. When you are prompted, click Yes to remove the program.
4. Restart the computer if you are prompted.
For Windows XP (with Service Pack 3) and Windows Server 2003 R2:
1. Click Start, and then click Control Panel.
2. Double-click Add or Remove Programs.
3. In the Currently installed programs list, select Office 2010 beta version application, and then click uninstall.
4. When you are prompted, click Yes to remove the program.
5. Restart the computer if you are prompted.
Microsoft Surface is now available for sale!*
Microsoft Surface was all based on cameras and a projection device underneath the "display" surface: in fact, the table doesn't have a display in the traditional sense of the word. Here's a slick illustration to show how it's actually a projection device and a number of cameras that work in conjunction to "sense" touch and gestures:
 Microsoft Surface units are available for purchase today in the followwing countries:


To purchase a Microsoft Surface unit, please follow these simple steps:
1. Download the appropriate order form by clicking on your country above.

Download Software and Drivers for your computer
Use the information below to find the appropriate support page for installation guides, instruction manuals, and the latest updates and drivers for your product.
Laptops/Desktops Printers/Scanners Networking Storage Devices

Open many Gtalk on a single PC
1. Download Gtalk from Google.
2. Run setup and Install it.
3. Then Right click on the desktop and make a shortcut.
4. Then a window will appear and in the Browse set the path of Gtalk like
("C:\programfiles\google\Google Talk\gtalk.exe")
5. After the path in the Browse give a space and write /nomutex
("C:\programfiles\google\Google Talk\gtalk.exe" /nomutex)
6. Then click on the Next Button and give name googletalk.exe and click on finish.
7. Now whenever you will click on shortcut every time a new gtalk will open.
Hide Your important folder with command prompt
1. Create a text document and paste the following script in this file.
if EXIST "Control Panel.{21EC2020-3AEA-1069-A2DD-08002B30309D}" goto UNLOCK
if NOT EXIST Locker goto MDLOCKER
:CONFIRM
echo Are you sure u want to Lock the folder(Y/N)
set/p "cho=>"
if %cho%==Y goto LOCK
if %cho%==y goto LOCK
if %cho%==n goto END
if %cho%==N goto END
echo Invalid choice.
goto CONFIRM
:LOCK
ren Locker "Control Panel.{21EC2020-3AEA-1069-A2DD-08002B30309D}"
attrib +h +s "Control Panel.{21EC2020-3AEA-1069-A2DD-08002B30309D}"
echo Folder locked
goto End
:UNLOCK
echo Enter password to Unlock folder
set/p "pass=>"
if NOT %pass%==type your password here goto FAIL
attrib -h -s "Control Panel.{21EC2020-3AEA-1069-A2DD-08002B30309D}"
ren "Control Panel.{21EC2020-3AEA-1069-A2DD-08002B30309D}" Locker
echo Folder Unlocked successfully
goto End
:FAIL
echo Invalid password
goto end
:MDLOCKER
md Locker
echo Locker created successfully
goto End
:End
2. Save this file with .bat extension
3. Then you see a batch file. Double click on this batch file to create a folder locker.
4. New folder named 'Locker' would be formed at the same location.
5. Now bring all the files you want to hide in the 'Locker' folder. Double click on the batch file to lock the folder namely 'Locker'.
press "Y" to conform.
Ur folder will disappear.
6. 2 bring back folder double click bat file again
Microsoft Fixit! utility
 tool fix common software problems in an easy, intuitive way that is available when and where you need it. So whether you are looking for a solution in help or support content, or an error report, Fix it provides a way to apply automated fixes, workarounds, or configuration changes so you don’t have to perform a long list of manual steps yourself.
- Hardware, CD/DVD, Sound and Print
Printing problems and printing errors
Hardware devices not detected or not working
Your CD/DVD drive cannot read or write media
Diagnose and fix problems with sound and audio
- System and Security
Common system maintenance tasks
Problems with power usage and battery life
Problems with overall system speed and performance
Windows Search is not working or searches are slower
- Internet Explorer
Internet Explorer freezes or crashes
Troubleshoot MSN client and connection
Improve performance, safety and security in Internet Explorer
Video freezes or crashes in Internet Explorer or Windows programs
- Others Issue
Windows Photo and Slideshow Problems (Pictures and Video)
Windows Vista Aero Glass visual effects are not working (Appearance and Personalization)
Diagnose and repair Windows File and Folder Problems automatically (Files, Folders, and Search)
Diagnose and fix Windows Firewall service problems automatically (Networking, e-mail, and getting online)
Daylight Saving Time (DST) and Windows Time Zone problem solving (Performance and Maintenance)
Diagnose and fix Windows Firewall service problems automatically (Networking, e-mail, and getting online)
Daylight Saving Time (DST) and Windows Time Zone problem solving (Performance and Maintenance)
Common system maintenance tasks
- Automatically detect and fix common maintenance problems such as broken desktop shortcuts, unused icons, disk volume errors, and incorrect system time display.
Problems with overall system speed and performance
- Automatically diagnose and fix causes of poor system performance, such as the power saver setting, multiple anti-virus programs running, multiple startup programs running, and too many users logged on to the computer.
Prop bitmap dll not loaded when printing emails from Outlook
The error message is "prop bitmap dll not loaded"
Issue : Getting the above error message while trying to print from outlook 2007 using dell 924 printer.
Solution:
1. search for "*prpb.dll" file in computer (Do not forget the * in your search)
2. After getting that file copying into the "%windir%\system32" folder.
Issue : Getting the above error message while trying to print from outlook 2007 using dell 924 printer.
Solution:
1. search for "*prpb.dll" file in computer (Do not forget the * in your search)
2. After getting that file copying into the "%windir%\system32" folder.
How do I recover my Administrator Password! WIN XP
- Place your Windows XP CD in your cd-rom and start your computer (it’s assumed here that your XP CD is bootable – as it should be - and that you have your bios set to boot from CD)
- Keep your eye on the screen messages for booting to your cd Typically, it will be “Press any key to boot from cd”
- Once you get in, the first screen will indicate that Setup is inspecting your system and loading files.
- When you get to the Welcome to Setup screen, press ENTER to Setup Windows now
- The Licensing Agreement comes next - Press F8 to accept it.
- The next screen is the Setup screen which gives you the option to do a Repair.It should read something like “If one of the following Windows XP installations is damaged, Setup can try to repair it”Use the up and down arrow keys to select your XP installation (if you only have one, it should already be selected) and press R to begin the Repair process.
- Let the Repair run. Setup will now check your disks and then start copying files which can take several minutes.
- Shortly after the Copying Files stage, you will be required to reboot. (this will happen automatically – you will see a progress bar stating “Your computer will reboot in 15 seconds”
- During the reboot, do not make the mistake of “pressing any key” to boot from the CD again! Setup will resume automatically with the standard billboard screens and you will notice Installing Windows is highlighted.
- Keep your eye on the lower left hand side of the screen and when you see the Installing Devices progress bar, press SHIFT + F10. This is the security hole! A command console will now open up giving you the potential for wide access to your system.
- At the prompt, type NUSRMGR.CPL and press Enter. Voila! You have just gained graphical access to your User Accounts in the Control Panel.
- Now simply pick the account you need to change and remove or change your password as you prefer. If you want to log on without having to enter your new password, you can type control userpasswords2 at the prompt and choose to log on without being asked for password. After you’ve made your changes close the windows, exit the command box and continue on with the Repair (have your Product key handy).
- Once the Repair is done, you will be able to log on with your new password (or without a password if you chose not to use one or if you chose not to be asked for a password). Your programs and personalized settings should remain intact.
unable to add music files to window media player 11
Here is the solution for Windows XP Operating System:
1. Make sure that you have closed the Windows Media Player 11 window
2. Click on Start-->Run-->type in Services.msc and click on OK
3. Locate the "Windows Media Player Network Sharing" service
Note : The first thing you’ll need to do is go to Control Panel \ Administrative Tools \ Services for XP and look for the services that start with “Windows Media Player”. (Make sure Media Player is closed too)

4. Right click on it and click on Stop
5. Now click on Start-->Run-->type in %USERPROFILE%\Local Settings\Application Data\Microsoft\
6. Rename the folder "Media Player" to "Media Player.old" or something else that you wish.
7. Now open Services.msc from Start-->Run again and start the "Windows Media Player Network Sharing" service .
8. Open the Windows Media Player 11 and try to add music files to the Library.
Full Factory Recovery
This option completely erases the C: partition and reinstalls factory-shipped files from the recovery partition.
Note: All of your personal data files and applications will be lost. Be sure that you have your data files backed up before performing this option.
Note: Due to the large number of virus and Spyware threats on the Internet, it is recommended that you disconnect all Internet connections before reinstalling Windows®. After the Windows installation, antivirus and firewall software can be installed and then the Internet connection can be re-enabled to update the antivirus definitions and perform Windows Updates.
- Remove all CDs or DVDs from the optical drives.
- Turn off the computer, using the normal Windows shut down process.
- After the computer is turned off, disconnect all USB devices except the keyboard and mouse. This includes USB devices such as a printer, scanner, removable storage, or camera.
- Turn on the computer. After the Gateway BIOS logo appears, repeatedly press the F8 key. The Advanced Boot Options menu opens.
- On the Advanced Boot Options screen, use the arrow keys to select Repair your Computer, and then press the ENTER key.
- In the System Recovery Options dialog box, select the appropriate keyboard layout, and then click Next.
- In the System Recovery Options dialog box, click the down arrow to select a user account that has Administrator rights, then click OK.
Note: The Administrator account is disabled by default.
- In the System Recovery Options window, select Recovery Manager.
- In the Gateway Recovery Center window, click Next.
- In the Gateway system recovery window, select Full factory recovery.
- In the All data will be lost window, select Yes, and then click Next.
- The Windows partition is formatted and Windows is installed.
- In the Recovery is complete window, click Finish.
- In the System Recovery Options window, select Restart.
- The computer restarts.
- Windows prepares to start for the first time. This may take a few minutes.
- Drivers and applications are installed. This process will take several minutes. The more drivers and applications that need to be installed, the longer the process will take.
Note: The following Out of Box Experience (OOBE) screens may vary slightly between computer models.
- In the Set Up Windows screen, select the appropriate options and then click Next.
- In the Please read the license terms screen, check I accept the license terms, and then click Next.
- In the Choose a user name and picture screen, enter the appropriate information and then click Next.
- In the Type a computer name and choose a desktop background screen, enter the appropriate information, and then click Next.
- In the Help protect Windows automatically screen, select Use recommended settings.
- In the Review your time and date settings screen, enter the appropriate information and then click Next.
- In the Thank You screen, click Start.
- Windows checks the computer's performance. Depending on hardware, this process could take from 3 to 15 minutes to complete.
- Windows prepares the desktop.
- Installation is complete. Any application that shipped on a separate CD can now be installed. It is recommended to update the antivirus definitions and perform Windows Updates.
Unable to uninstall Windows Live Essentials
Unable to uninstall Windows Live Essentials from Add/remove programs or from Programs and Features.
You can use these steps when you experience one of the following symptoms :
- When you try to uninstall Windows Live Essentials from Control Panel, nothing happens.
- You would like to uninstall Windows Live Essentials from your computer but you don’t see it from the list of programs in Control Panel’s Add/Remove Programs list
 WINDOWS XP:
 - Click on Start then click on Run.
- Type C:\Program Files\Windows Live\installer\wlarp.exe then press Enter.
- A new window will open. Select Uninstall and click on Continue.
- Select the Windows Live Program that you want to remove and click on Continue.
- Follow the on-screen instructions.
WINDOWS VISTA: - Click on the Start button.
- Type C:\Program Files\Windows Live\installer\wlarp.exe on the Start Search box then press Enter.
- A new window will open. Select Uninstall and click on Continue.
- Select the Windows Live Program that you want to remove and click on Continue.
- Follow the on-screen instructions.
What types of backup does NT Backup support?
NT backup utility supports five methods of backing up data on your computer or network.
 Copy—Backs up the files you select, but doesn’t mark the files as backed up.
A copy backup copies all selected files but does not mark each file as having been backed up (in other words, the archive attribute is not cleared). Copying is useful if you want to back up files between normal and incremental backups because copying does not affect these other backup operations.
Daily—Backs up the files that changed that day, but doesn’t mark the files as backed up.
A daily backup copies all selected files that have been modified the day the daily backup is performed. The backed-up files are not marked as having been backed up (in other words, the archive attribute is not cleared).
Differential—Backs up the files that changed since the last backup, but doesn’t mark the files as backed up. A differential backup copies files created or changed since the last normal or incremental backup. It does not mark files as having been backed up (in other words, the archive attribute is not cleared). If you are performing a combination of normal and differential backups, restoring files and folders requires that you have the last normal as well as the last differential backup.
Incremental—Backs up the files that changed since the last backup, and marks the files as backed up.
An incremental backup backs up only those files created or changed since the last normal or incremental backup. It marks files as having been backed up (in other words, the archive attribute is cleared). If you use a combination of normal and incremental backups, you will need to have the last normal backup set as well as all incremental backup sets in order to restore your data.
Normal—Backs up the files you select, and marks the files as backed up.
A normal backup copies all selected files and marks each file as having been backed up (in other words, the archive attribute is cleared). With normal backups, you need only the most recent copy of the backup file or tape to restore all of the files. You usually perform a normal backup the first time you create a backup set.
Backing up your data using a combination of normal backups and incremental backups requires the least amount of storage space and is the quickest backup method. However, recovering files can be time-consuming and difficult because the backup set can be stored on several disks or tapes.
Backing up your data using a combination of normal backups and differential backups is more time-consuming, especially if your data changes frequently, but it is easier to restore the data because the backup set is usually stored on only a few disks or tapes.
Copy—Backs up the files you select, but doesn’t mark the files as backed up.A copy backup copies all selected files but does not mark each file as having been backed up (in other words, the archive attribute is not cleared). Copying is useful if you want to back up files between normal and incremental backups because copying does not affect these other backup operations.
Daily—Backs up the files that changed that day, but doesn’t mark the files as backed up.A daily backup copies all selected files that have been modified the day the daily backup is performed. The backed-up files are not marked as having been backed up (in other words, the archive attribute is not cleared).
Differential—Backs up the files that changed since the last backup, but doesn’t mark the files as backed up. A differential backup copies files created or changed since the last normal or incremental backup. It does not mark files as having been backed up (in other words, the archive attribute is not cleared). If you are performing a combination of normal and differential backups, restoring files and folders requires that you have the last normal as well as the last differential backup. Incremental—Backs up the files that changed since the last backup, and marks the files as backed up.An incremental backup backs up only those files created or changed since the last normal or incremental backup. It marks files as having been backed up (in other words, the archive attribute is cleared). If you use a combination of normal and incremental backups, you will need to have the last normal backup set as well as all incremental backup sets in order to restore your data.
Normal—Backs up the files you select, and marks the files as backed up.A normal backup copies all selected files and marks each file as having been backed up (in other words, the archive attribute is cleared). With normal backups, you need only the most recent copy of the backup file or tape to restore all of the files. You usually perform a normal backup the first time you create a backup set.
Backing up your data using a combination of normal backups and incremental backups requires the least amount of storage space and is the quickest backup method. However, recovering files can be time-consuming and difficult because the backup set can be stored on several disks or tapes.
Backing up your data using a combination of normal backups and differential backups is more time-consuming, especially if your data changes frequently, but it is easier to restore the data because the backup set is usually stored on only a few disks or tapes.
FAT vs NTFS
File allocation table (FAT)
A version of the file allocation table (FAT) available in Windows 95 OSR 2 and Windows 98. FAT32 increases the number of bits used to address clusters and also reduces the size of each cluster. The result is that it can support larger disks (up to 2 terabytes) and better storage efficiency (less slack space).
File allocation table (FAT32)
A version of the file allocation table (FAT) available in Windows 95 OSR 2 and Windows 98. FAT32 increases the number of bits used to address clusters and also reduces the size of each cluster. The result is that it can support larger disks (up to 2 terabytes) and better storage efficiency (less slack space).
New Technology File System (NTFS)
(pronounced as separate letters) Short for NT File System, one of the file system for the Windows NT operating system (Windows NT also supports the FAT file system). NTFS has features to improve reliability, such as transaction logs to help recover from disk failures. To control access to files, you can set permissions for directories and/or individual files. NTFS files are not accessible from other operating systems such as DOS.
For large applications, NTFS supports spanning volumes, which means files and directories can be spread out across several physical disks.
A version of the file allocation table (FAT) available in Windows 95 OSR 2 and Windows 98. FAT32 increases the number of bits used to address clusters and also reduces the size of each cluster. The result is that it can support larger disks (up to 2 terabytes) and better storage efficiency (less slack space).
File allocation table (FAT32)
A version of the file allocation table (FAT) available in Windows 95 OSR 2 and Windows 98. FAT32 increases the number of bits used to address clusters and also reduces the size of each cluster. The result is that it can support larger disks (up to 2 terabytes) and better storage efficiency (less slack space).
New Technology File System (NTFS)
(pronounced as separate letters) Short for NT File System, one of the file system for the Windows NT operating system (Windows NT also supports the FAT file system). NTFS has features to improve reliability, such as transaction logs to help recover from disk failures. To control access to files, you can set permissions for directories and/or individual files. NTFS files are not accessible from other operating systems such as DOS.
For large applications, NTFS supports spanning volumes, which means files and directories can be spread out across several physical disks.
Outlook Web Access – OWA in Exchange 2007:
The Outlook Web Access (OWA) is handy for many users in accessing their email when compared to the outlook client when they are out of their organization, probably when they are traveling different places. They will be able to access their email with ease even though they don’t have the laptop.
Key new Outlook Web Access features:
1.Web ready documents allow opening office docs.
2.Email headers view.
3.Customizable tool bars.
4.Out of Office configuration.
5.Deleted Item recovery.
6.Instant language options.
7.Cleaner Calendar reminders.
8.Multiple calendars and drag gable appointments.
9.Mobile device configuration options.
10.Change password interface.
11.Open other’s mailbox within OWA.
Light vs. Premium Client
Light Version:
1.For non-IE browsers.
2.For slow connections.
3.For older systems.
4.Most secure/best for kiosks
5.Contains basic access to all resource types.
Full Version:
1.More feature-rich.
2.Deeper interaction with mailbox content.
3.Drag and drop.
4.Access to file servers and Share Point.
Public folder in the exchange server 2007:
In Simple words, the Public folder is just like a general forum which is used for posting mails, documents and other common information. Actually, usage of public folder has been overcome by SharePoint portal services. Exchange server 2007 is de-emphasized i.e., there is no change or improvement in the public folder architecture in the 2007 version. Microsoft no more support public folders. This article explains the working of the public folders in the exchange 2007 server.
Public folder function:
- Public folder data is kept in the public folder database.
- Multiple replicas of a public folder can be maintained on separate servers.
- Any sort of folder data can be kept in a public folder.
- Public folders can be given their own email address.
- You can configure Send-as permission on a public folder.
Public folder Creation:
In the EMC, go to toolbox PFMC – Public folder management console.
#New-Publicfolder –name TESTPUBLICFOLDER –path ‘\’ –server ‘servername’
Assigning PF Permission and PF Email address:
2.There are two ways to give admin permission via EMS:
a.Add-PublicFolderadministratorPermission - Per-PF.
b.Add-ExchangeAdministrator - General Admin rights, including to PF root.
3.The easiest way is to use Add-PublicFolderClientPermission to assign ownership
#Add-PublicFolderClientPermission –Identity \TESTPUBLICFOLDER –User USERALIASNAME –AccessRights FolderOwner
4.Check permission of the PF using the Outlook or in EMS with
Get-PublicFolderClientPermission
Set perms with Add/Remove/Set-PublicFolderClientPermission
#Get-PublicFolderClientPermission \TESTPUBLICFOLDER list
5.You can use either the EMC or the EMS to mail-enable a public folder.
#Enable-MailPublicFolder \TESTPUBLICFOLDER
6.Check whether a PF is mail-enabled
#Get-PublicFolder list mailenabled
#Get-MailPublicFolder
7.Send-As Permission can be done in the console.
Hope the above is informative.
Please feel free to contact me for any questions.
The 7 Layers of the OSI Model (PDNTSPA)
The Open Systems Interconnection Reference Model (OSI Reference Model or OSI Model) is an abstract description for layered communications and computer network protocol design. It was developed as part of the Open Systems Interconnection (OSI) initiative. In its most basic form, it divides network architecture into seven layers which, from top to bottom, are the Application, Presentation, Session, Transport, Network, Data-Link, and Physical Layers. It is therefore often referred to as the OSI Seven Layer Model.
Description of OSI layers
The OSI Model is displayed from top-down (Meaning Layer 7-1) in order to show that the act of transmitting data is not a one-way trip. Once data reaches the Physical Layer (Layer 1) and reaches its destination, it must travel back up the OSI Model (1-7). The only exception to this is that on the way back up, it does not interact with the network layer.

Layer 6: Presentation Layer
This layer provides independence from differences in data representation (e.g., encryption) by translating from application to network format, and vice versa. The presentation layer works to transform data into the form that the application layer can accept. This layer formats and encrypts data to be sent across a network, providing freedom from compatibility problems. It is sometimes called the syntax layer.
Get more details about IPv4 subnetting reference (Source - wikipedia)
Layer 2: Data Link Layer
At this layer, data packets are encoded and decoded into bits. It furnishes transmission protocol knowledge and management and handles errors in the physical layer, flow control and frame synchronization. The data link layer is divided into two sub layers: The Media Access Control (MAC) layer and the Logical Link Control (LLC) layer. The MAC sub layer controls how a computer on the network gains access to the data and permission to transmit it. The LLC layer controls frame synchronization, flow control and error checking.

RECOMMENDED READING:
Description of OSI layers
The OSI Model is displayed from top-down (Meaning Layer 7-1) in order to show that the act of transmitting data is not a one-way trip. Once data reaches the Physical Layer (Layer 1) and reaches its destination, it must travel back up the OSI Model (1-7). The only exception to this is that on the way back up, it does not interact with the network layer.
Layer 7: Application Layer
This layer supports application and end-user processes. Communication partners are identified, quality of service is identified, user authentication and privacy are considered, and any constraints on data syntax are identified. Everything at this layer is application-specific. This layer provides application services for file transfers, e-mail, and other network software services. Telnet and FTP are applications that exist entirely in the application level. Tiered application architectures are part of this layer.
This layer supports application and end-user processes. Communication partners are identified, quality of service is identified, user authentication and privacy are considered, and any constraints on data syntax are identified. Everything at this layer is application-specific. This layer provides application services for file transfers, e-mail, and other network software services. Telnet and FTP are applications that exist entirely in the application level. Tiered application architectures are part of this layer.
Layer 6: Presentation Layer
This layer provides independence from differences in data representation (e.g., encryption) by translating from application to network format, and vice versa. The presentation layer works to transform data into the form that the application layer can accept. This layer formats and encrypts data to be sent across a network, providing freedom from compatibility problems. It is sometimes called the syntax layer.
Layer 5: Session Layer
This layer establishes, manages and terminates connections between applications. The session layer sets up, coordinates, and terminates conversations, exchanges, and dialogues between the applications at each end. It deals with session and connection coordination.
This layer establishes, manages and terminates connections between applications. The session layer sets up, coordinates, and terminates conversations, exchanges, and dialogues between the applications at each end. It deals with session and connection coordination.
Layer 4: Transport Layer
This layer provides transparent transfer of data between end systems, or hosts, and is responsible for end-to-end error recovery and flow control. It ensures complete data transfer.
This layer provides transparent transfer of data between end systems, or hosts, and is responsible for end-to-end error recovery and flow control. It ensures complete data transfer.
Layer 3: Network Layer
This layer provides switching and routing technologies, creating logical paths, known as virtual circuits, for transmitting data from node to node. Routing and forwarding are functions of this layer, as well as addressing, internetworking, error handling, congestion control and packet sequencing.

This layer provides switching and routing technologies, creating logical paths, known as virtual circuits, for transmitting data from node to node. Routing and forwarding are functions of this layer, as well as addressing, internetworking, error handling, congestion control and packet sequencing.
Get more details about IPv4 subnetting reference (Source - wikipedia)
Layer 2: Data Link Layer
At this layer, data packets are encoded and decoded into bits. It furnishes transmission protocol knowledge and management and handles errors in the physical layer, flow control and frame synchronization. The data link layer is divided into two sub layers: The Media Access Control (MAC) layer and the Logical Link Control (LLC) layer. The MAC sub layer controls how a computer on the network gains access to the data and permission to transmit it. The LLC layer controls frame synchronization, flow control and error checking.
Layer 1: Physical Layer
This layer conveys the bit stream - electrical impulse, light or radio signal -- through the network at the electrical and mechanical level. It provides the hardware means of sending and receiving data on a carrier, including defining cables, cards and physical aspects. Fast Ethernet, RS232, and ATM are protocols with physical layer components.
This layer conveys the bit stream - electrical impulse, light or radio signal -- through the network at the electrical and mechanical level. It provides the hardware means of sending and receiving data on a carrier, including defining cables, cards and physical aspects. Fast Ethernet, RS232, and ATM are protocols with physical layer components.
RECOMMENDED READING:
"The OSI Reference Model — Understanding Layers" in Webopedia's "Did You Know...?" section."Understanding The Data Link Layer" in Webopedia's "Did You Know...?" section.
Enable Telnet on Windows Server 2003
Windows Server 2003 has the Telnet disabled by default (and so good that it does!) To have the Telnet service running on Windows Server 2003 follow the next steps:
1. Go to the Services applet in Administrative Tools (or click Start, then Run, and type "services.msc" (without quotes) and click OK).
2. Find the "Telnet" service, right-click and select Properties, select "Automatic" instead of "Disabled" in the startup type box.
3. Click Apply.
4. Right-click the "Telnet" service and select Start.

5. Click OK.
You can also modify start state and start it from a Command Prompt console by using the following command: "sc config TlntSvr start= auto" and "sc start TlntSvr" or "net start TlntSvr"
Configuration for Pre-W2K/XP/2003 Clients:
The Telnet server requires NTLM authentication by default. To deactivate this and use only password authentication, use the tlntadmn command: "tlntadmn config sec=-NTLM"
Also, switching to streams mode may make display easier for Unix/Linux clients. Do this with the following command: "tlntadmn config mode=stream"
Enabling Telnet Client in Windows Server 2008
Enabling Telnet Client in Windows Vista
1. Go to the Services applet in Administrative Tools (or click Start, then Run, and type "services.msc" (without quotes) and click OK).
2. Find the "Telnet" service, right-click and select Properties, select "Automatic" instead of "Disabled" in the startup type box.
3. Click Apply.
4. Right-click the "Telnet" service and select Start.
5. Click OK.
You can also modify start state and start it from a Command Prompt console by using the following command: "sc config TlntSvr start= auto" and "sc start TlntSvr" or "net start TlntSvr"
Configuration for Pre-W2K/XP/2003 Clients:
The Telnet server requires NTLM authentication by default. To deactivate this and use only password authentication, use the tlntadmn command: "tlntadmn config sec=-NTLM"
Also, switching to streams mode may make display easier for Unix/Linux clients. Do this with the following command: "tlntadmn config mode=stream"
Enabling Telnet Client in Windows Server 2008
Enabling Telnet Client in Windows Vista
Enabling Telnet Client in Windows Server 2008
To install the Telnet client on Windows Server 2008 follow this procedure:
1. Open Server Manager by clicking Start > Server Manager, or by using the My Computer context menu.
2. From the left panel in Server Manager, click on Features.
3. Click on Add Features.
4. From the available list of features, scroll down and select Telnet Client, then click Next.
5. On the Confirmation page, click on Install.


Telnet is now recognized by Windows Server 2008 and you can start using it to connect to your telnet servers.
1. Open Server Manager by clicking Start > Server Manager, or by using the My Computer context menu.
2. From the left panel in Server Manager, click on Features.
3. Click on Add Features.
4. From the available list of features, scroll down and select Telnet Client, then click Next.
5. On the Confirmation page, click on Install.
6. Installation of the selected feature will be initialized and started. Once installation is completed, click on Close.
This can easily be done also by typing the following command in the command prompt: "Servermanagercmd –I Telnet-Client"
Telnet is now recognized by Windows Server 2008 and you can start using it to connect to your telnet servers.
How can I disable the Spell Checking option in OWA 2003?
OWA 2003 comes with a built-in spell checker that can help you spell check your outgoing mail in various languages like: English,French,German,Italian,Korean,Spanish. Service Pack 1 for Exchange Server 2003 adds even more language support, including the long-awaited Hebrew spell checking.

1. Open Regedit and navigate to
HKEY_LOCAL_MACHINE\System\CurrentControlSet\Services\MSExchangeWeb\OWA
Find or create a key called DisableSpellCheckOnSend with the type REG_DWORD.
a. If the value is set to 0x00000001 then users will not be able to select the option to automatically spell-check every e-mail that they send from OWA.
b. If the value is set to 0x00000000 then users will be able to select the option to automatically spell-check every e-mail that they send from OWA.
Note: As with many of the OWA registry parameters, setting this parameter takes immediate effect, no service restarts required.
Configure OWA 2003 Attachment Blocking
How do I configure attachment blocking in Outlook Web Access on Exchange Server 2003
There are 2 levels of file attachments for Outlook Web Access. Level1 attachments have file extensions that are prohibited from accessing by OWA. Level2 attachments have file extensions that can be accessed, but only if saved to the client's file system first.
OWA is installed with a default set of file extensions for the two levels as shown in the following registry keys:
Level 1 attachments
HKEY_LOCAL_MACHINE\System\CurrentControlSet\Services\MSExchangeWeb\OWA
Value: Level1FileTypes
Type: REG_SZ
Value Data:
Level 2 attachments HKEY_LOCAL_MACHINE\System\CurrentControlSet\Services\MSExchangeWeb\OWA
Value: Level2FileTypes
Type: REG_SZ
Value Data:
Attachments listed should be separated by a comma with no space.
There are 2 levels of file attachments for Outlook Web Access. Level1 attachments have file extensions that are prohibited from accessing by OWA. Level2 attachments have file extensions that can be accessed, but only if saved to the client's file system first.
OWA is installed with a default set of file extensions for the two levels as shown in the following registry keys:
Level 1 attachments
HKEY_LOCAL_MACHINE\System\CurrentControlSet\Services\MSExchangeWeb\OWA
Value: Level1FileTypes
Type: REG_SZ
Value Data:
ade,adp,app,asx,bas,bat,chm,cmd,com,cpl,crt,csh,exe,fxp,hlp,hta,inf,ins,isp,js,jse,ksh,lnk,mda,mdb,mde,mdt,mdw,mdz,msc,msi,msp,mst,ops,pcd,pif,prf,prg,reg,scf,scr,sct,shb,shs,url,vb,vbe,vbs,wsc,wsf,wsh
Value: Level2FileTypes
Type: REG_SZ
Value Data:
ade,adp,asx,bas,bat,chm,cmd,com,cpl,crt,exe,hlp,hta,htm,html,htc,inf,ins,isp,js,jse,lnk,mda,mdb,mde,mdz,mht,mhtml,msc,msi,msp,mst,pcd,pif,prf,reg,scf,scr,sct,shb,shs,shtm,shtml,stm,url,vb,vbe,vbs,wsc,wsf,wsh,xml,dir,dcr,plg,spl,swf
How to Restore .BKF Files Using NTBackup in Windows 7
Microsoft haven’t released the NT Backup Restore Utility for Windows 7 yet (should be out soon), as they released for Windows Vista. If you have critical data contained in a NTBackup image (.BKF) and want to restore it in Windows 7, then then followe the below steps.
2. Extract the files inside the cabinet file to a folder of your choice.
3. Run the file NTBackup.exe from the folder.
4. NTBackup will indicate that Removable Storage service (removed in Windows Vista & Windows 7). Never mind! This is only required for tape backups. Click OK.

5. In the Welcome to Backup or Restore Wizard page, click Next
 6. Select Restore files and settings, and click Next
 7. Click Browse. Locate the .BKF file that you want to restore, and click OK.
8. Expand the catalog, select the files/folders you want to restore, and click Next.
9. Click the Advanced button
10. Select Alternate location from the dropdown, and mention the destination path.
 Configure the restore options accordingly.Click Next, and then click Finish.
Restoring a .BKF File Using NTBackup
1. Download nt5backup.cab from Plugins by STSanford. ( or http://www.stsanford.com/pebuilder)2. Extract the files inside the cabinet file to a folder of your choice.
3. Run the file NTBackup.exe from the folder.
4. NTBackup will indicate that Removable Storage service (removed in Windows Vista & Windows 7). Never mind! This is only required for tape backups. Click OK.

5. In the Welcome to Backup or Restore Wizard page, click Next


8. Expand the catalog, select the files/folders you want to restore, and click Next.
9. Click the Advanced button
10. Select Alternate location from the dropdown, and mention the destination path.

Note : I have got this solution from winhelponline.com, posted by Mr. Ramesh Srinivasan. For more details please visit www.winhelponline.com.
How to remove "My Sharing Folders" from My Computer?
- Click Start, Run and type Regedit.exe
- Navigate to the following key:HKEY_LOCAL_MACHINE\SOFTWARE\Microsoft\Windows\CurrentVersion\Explorer\MyComputer\NameSpace\{FC9FB64A-1EB2-4CCF-AF5E-1A497A9B5C2D}
- On the File menu, click Export.
- In the Save in box, select a location where you want to save the Registration Entries (.reg)
- In the File name box, type a file name, and then click Save.
- Select the {FC9FB64A-1EB2-4CCF-AF5E-1A497A9B5C2D} key and delete it.
- Close Regedit.exe
Text appear blurry in Internet Explorer 7
This is because the ClearType feature is enabled by default in Internet Explorer 7. Enabling ClearType may result in blurry display in CRT monitors. Here is how you turn off ClearType:
- In Internet Explorer, click the Tools button, and then click Internet Options.
- Click the Advanced tab, scroll to the Multimedia section, clear the following option:
Always use Clear Type for HTML
- Click OK.
If your fonts are not displaying as clear as you'd like, you can try optimizing ClearType for your monitor. Go to the Microsoft Typography ClearType website, and then follow the instructions for tuning ClearType.
Note : Posted by Ramesh Srinivasan at winhelponline.com.
Subscribe to:
Posts (Atom)
