
Apple & IPOD 800-275-2273
IPhone technical support 1-800-694-7466 - U.S.
Dell 800-624-9896
Dell 888-560-8324
Hp 800-474-6836
Compaq 800-652-6672
Gateway 800-229-1103
Fujitsu 800-831-3183
McAfee US 866-622-3911
UK (0) 2079 490107
AU 800 998 887
Mcrosft US 800-936-5700
UK 870-601-0100
MDG Canada 877-466-3634 (Canada)
Medion 866-633-4660
Maxdata 626-935-0050
Sony 888-476-6972
Gateway 800-846-2301
Acer 800-816-2237
Averatec 877-462-3462
Toshiba 800-457-7777
E Mchines 408-273-0888
Compaq 800-652-6672
iYogi 1866-914-9839
iYogi 1866-242-4609
Comcast 1-866-284-6165
1-866-711-6603
Norton US 800-745-6054
Norton UK +44 (0)20 7616 5600
Linksys Technical Support 800-326-7114
IBM 800-426-7378
Lenovo 800-810-8888 (China)
Educomp 0124-4529000.
NEC Corp (800) 338-9549
Panasonic (800) 527-8675
Gateway (800) 846-2301
Sharp (800) 237-4277
HP (800) 474-6836
Sony (888) 476-6972
Toshiba (800) 457-7777
1-800-213-0992 PRODIGY
1-800-221-9681 ConnectUp
1-800-232-4944 DIRECT.CA
1-800-232-6895 SPRINT
1-800-243-2037 SPRYNET
1-800-267-5866 JUNO (advertising department)
1-800-291-7889 ACSI.NET
1-800-299-1288 Namesecure
1-800-339-4929 HWAY.NET Hiway Technologies, Inc.
1-800-348-8011 MCI
1-800-352-7420 FLASH.NET
1-800-352-7434 FLASH.NET
1-800-356-3638 CyberENET
1-800-368-9314 VIDEOTRON.NET
1-800-380-2447 AGIS
1-800-390-5945 STRUCTURED
1-800-395-8410 EARTHLINK
1-800-395-8425 EarthLink's Business Sales Department
1-800-400-1447 AT&T
1-800-424-3223 IAGNET.NET
1-800-436-4456 IgLou Internet Services
1-800-446-7322 INREACH.COM
1-800-451-1018 ALPHASOFTWARE.COM
1-800-456-6300 ANS.NET Advanced Network and Services, Inc.
1-800-459-4073 Spam Stopper (a commercialy available filtering program)
1-800-463-8123 UUNET.CA
1-800-463-8724 PBI.NET Pacific Bell
1-800-466-5463 AOL
1-800-474-3638 GRIDNET
1-800-475-7840 Bell Atlantic
1-800-539-3505 HALCYON.COM
1-800-555-5641 SPRINT-CANADA.NET (fax)
1-800-563-3271 Call America Internet Services
1-800-565-0567 BELLGLOBAL.COM
1-800-565-2141 ConnectUp
1-800-566-0056 IBM.NET
1-800-567-6789 Bell Atlantic
1-800-582-1253 MCI
1-800-609-1674 COMPUSERVE
1-800-632-7638 BBN
1-800-633-9970 PATHFINDER.COM
1-800-637-4424 IAGNET.NET
1-800-654-5866 JUNO
1-800-665-3633 SPRINT-CANADA.NET
1-800-672-8520 USWEST.NET
1-800-678-2632 Bank of America (a spammer urges you to call them to complain)
1-800-678-5758 MCI (East Coast)
1-800-695-4005 DELPHI
1-800-708-4638 PBI.NET Pacific Bell
1-800-711-5353 JPS.NET
1-800-719-4664 MINDSPRING
1-800-725-2161 U.S. Post Office (number often appears in chain letters)
1-800-728-8471 SAVVIS.COM
1-800-736-1130 SPRINT
1-800-745-2747 CONCENTRIC
1-800-757-8098 ConnectUp
1-800-776-3449 PRODIGY
1-800-784-6512 CLARKNET
1-800-785-6170 WIPC.NET
1-800-801-0118 US.NET
1-800-827-6364 AOL
1-800-841-5433 Life Extension Foundation
1-800-847-2911 VISA (credit card)
1-800-848-8199 COMPUSERVE
1-800-848-8990 COMPUSERVE
1-800-872-3595 @Home (fax)
1-800-873-1914 SPRYNET
1-800-876-9322 WWORLD
1-800-879-6882 PRIMEHOST.COM
1-800-888-6272 MCI (West Coast)
1-800-900-0241 UUNET
1-800-910-4369 AMERITECH.NET
1-800-929-0004 LOA.COM Log On America, Inc.
1-800-942-7726 WEBSPAN.NET
1-800-943-4439 DIGEX
1-800-958-2945 NAP.NET
1-800-967-5363 AT&T Worldnet
1-800-968-7638 IBM
1-800-969-9090 DIGEX
1-800-977-4662 MCI
1-800-992-8668 Los Altos Networks (number seen in a recent revenge spam)
1-800-993-4439 DIGEX
1-800-998-5520 GRIDNET
1-888-203-4439 DIGEX (Dial up Support Team)
1-888-252-7563 CLARKNET
1-888-265-1111 PRIMEHOST.COM
1-888-265-3733 AOL
1-888-266-4767 IPNS.COM
1-88-273-6227 New Age Consulting Service Inc.
1-888-276-9999 AHNET.NET
1-888-356-7726 EARTHLINK
1-888-376-5638 EROLS.COM
1-888-407-9200 @HOME
1-888-456-9675 @HOME
1-888-463-6168 SITEHOSTING.NET
1-888-622-5742 Digital Equipment Corporation
1-888-636-7638 NEOSOFT
1-888-658-8638 UUNET.CA
1-888-662-5274 Blarg! Online Services
1-888-698-4357 NETCOM
1-888-727-4326 RAPIDSITE.NET
1-888-860-3382 MCI
1-888-886-3865 UUNET.CA
1-888-889-0132 CLARKNET (TTY)
1-800-213-0992 PRODIGY
1-800-221-9681 ConnectUp
1-800-232-4944 DIRECT.CA
1-800-232-6895 SPRINT
1-800-243-2037 SPRYNET
1-800-267-5866 JUNO (advertising department)
1-800-291-7889 ACSI.NET
1-800-299-1288 Namesecure
1-800-339-4929 HWAY.NET Hiway Technologies, Inc.
1-800-348-8011 MCI
1-800-352-7420 FLASH.NET
1-800-352-7434 FLASH.NET
1-800-356-3638 CyberENET
1-800-368-9314 VIDEOTRON.NET
1-800-380-2447 AGIS
1-800-390-5945 STRUCTURED
1-800-395-8410 EARTHLINK
1-800-395-8425 EarthLink's Business Sales Department
1-800-400-1447 AT&T
1-800-424-3223 IAGNET.NET
1-800-436-4456 IgLou Internet Services
1-800-446-7322 INREACH.COM
1-800-451-1018 ALPHASOFTWARE.COM
1-800-456-6300 ANS.NET Advanced Network and Services, Inc.
1-800-459-4073 Spam Stopper (a commercialy available filtering program)
1-800-463-8123 UUNET.CA
1-800-463-8724 PBI.NET Pacific Bell
1-800-466-5463 AOL
1-800-474-3638 GRIDNET
1-800-475-7840 Bell Atlantic
1-800-539-3505 HALCYON.COM
1-800-555-5641 SPRINT-CANADA.NET (fax)
1-800-563-3271 Call America Internet Services
1-800-565-0567 BELLGLOBAL.COM
1-800-565-2141 ConnectUp
1-800-566-0056 IBM.NET
1-800-567-6789 Bell Atlantic
1-800-582-1253 MCI
1-800-609-1674 COMPUSERVE
1-800-632-7638 BBN
1-800-633-9970 PATHFINDER.COM
1-800-637-4424 IAGNET.NET
1-800-654-5866 JUNO
1-800-665-3633 SPRINT-CANADA.NET
1-800-672-8520 USWEST.NET
1-800-678-2632 Bank of America (a spammer urges you to call them to complain)
1-800-678-5758 MCI (East Coast)
1-800-695-4005 DELPHI
1-800-708-4638 PBI.NET Pacific Bell
1-800-711-5353 JPS.NET
1-800-719-4664 MINDSPRING
1-800-725-2161 U.S. Post Office (number often appears in chain letters)
1-800-728-8471 SAVVIS.COM
1-800-736-1130 SPRINT
1-800-745-2747 CONCENTRIC
1-800-757-8098 ConnectUp
1-800-776-3449 PRODIGY
1-800-784-6512 CLARKNET
1-800-785-6170 WIPC.NET
1-800-801-0118 US.NET
1-800-827-6364 AOL
1-800-841-5433 Life Extension Foundation
1-800-847-2911 VISA (credit card)
1-800-848-8199 COMPUSERVE
1-800-848-8990 COMPUSERVE
1-800-872-3595 @Home (fax)
1-800-873-1914 SPRYNET
1-800-876-9322 WWORLD
1-800-879-6882 PRIMEHOST.COM
1-800-888-6272 MCI (West Coast)
1-800-900-0241 UUNET
1-800-910-4369 AMERITECH.NET
1-800-929-0004 LOA.COM Log On America, Inc.
1-800-942-7726 WEBSPAN.NET
1-800-943-4439 DIGEX
1-800-958-2945 NAP.NET
1-800-967-5363 AT&T Worldnet
1-800-968-7638 IBM
1-800-969-9090 DIGEX
1-800-977-4662 MCI
1-800-992-8668 Los Altos Networks (number seen in a recent revenge spam)
1-800-993-4439 DIGEX
1-800-998-5520 GRIDNET
1-888-203-4439 DIGEX (Dial up Support Team)
1-888-252-7563 CLARKNET
1-888-265-1111 PRIMEHOST.COM
1-888-265-3733 AOL
1-888-266-4767 IPNS.COM
1-888-273-6227 New Age Consulting Service Inc.
1-888-276-9999 AHNET.NET
1-888-356-7726 EARTHLINK
1-888-376-5638 EROLS.COM
1-888-407-9200 @HOME
1-888-456-9675 @HOME
1-888-463-6168 SITEHOSTING.NET
1-888-622-5742 Digital Equipment Corporation
1-888-636-7638 NEOSOFT
1-888-658-8638 UUNET.CA
1-888-662-5274 Blarg! Online Services
1-888-698-4357 NETCOM
1-888-727-4326 RAPIDSITE.NET
1-888-860-3382 MCI
1-888-886-3865 UUNET.CA
1-888-889-0132 CLARKNET (TTY)
# Microsoft Customer Service and Support,
(800) MICROSOFT (642-7676). 1800-936-5700 (In Canada, call (877)568-2495.)
Microsoft Customer Service hours of operation: - Monday through Friday,
5:00 AM - 9:00 PM Pacific Time / Saturday and Sunday, 6:00 AM – 3:00 PM Pacific Time

Disable useless Vista Features
If you installed Vista yourself and have experience installing previous Windows OSes, you surely noticed that Vista hardly asks any questions about your computer—and what you plan to do with it—than did prior OSes. Windows Vista makes all kinds of assumptions about your computing habits and the features you may or may not need, and it inevitably installs some overhead that you simply don't need. You can get rid of it. Windows XP had the Add/Remove Windows Features button in the Control Panel Add/Remove Programs applet, and Vista has something like it.
- Open Control Panel and click Uninstall a Program to launch Vista's Uninstall or Change a Program Window. In the Tasks pane on the left, click Turn Windows Features On or Off.
- Check the list of features. Each feature is preceded by a checkbox which, if filled, indicates the feature is installed. If you hover the mouse over a feature, a help tooltip appears to tell you what it is.

Do you really need Windows Meeting Space or Tablet PC components? - Uncheck any feature you don't need. Some of the features are headings with a sub-list below them; just click the little + sign to expand.

For my gaming system, I've purged everything except:
- Some of the games
- XPS Viewer (under .NET Framework 3.0)
- Remote Differential Compression (a network optimizer)
- Windows Ultimate Extras
Fast Shutdown Faster Windows 2000, Windows XP, Windows 2003 and Vista
CODE
If you getting tired of everytime have to clicking Start menu, and then click on Turn Off Computer, and then still have to click on Turn Off or Restart or Log Off in order to log off, restart or shut down your computer, and feel that it’s time wasting, you can create a one-click shortcut that allows the user to shutdown or restart Windows, or go into standby or hibernate mode, with just a single click on the shortcut itself. Best of all, the shortcut can be put at any place – desktop, Quick Launch bar, or Start Menu, and can even launch the shutdown or restart process from command line or command prompt.
In order to shutdown or restart the Windows with just one click shortcut or from command prompt or command line, users can use shutdown command line utility/command that comes with Windows 2000 (with the Resource Kit installed) and Windows XP or Windows Vista (native). To access shutdown command, simply go to DOS command prompt by clicking on Start -> All Programs -> Accessories -> Command Prompt or Start -> Run and then type in Cmd to launch a command prompt window.
To create a one-click shortcut to shutdown the Windows computer, right click on your desktop or any folder (or click at File at toolbar), and then select New, and then click on Shortcut. A New Shortcut wizard will ask for location of this item. In the textbox, type “shutdown -s -t 01″ (without quotation marks). Click on Next when done. When ask for a name for the shortcut, give any descriptive name you prefer, such as Shutdown. Then click on Finish, and you can now use the shortcut created to shut down PC immediately after click.
If you want to create a shortcut that quick restart the Windows instead of shutting down the computer, follow the above instruction, but “shutdown -s -t 01″, key in “shutdown -r -t 01″ for location of this item. Again, give a proper descriptive name to the shortcut, such as Restart, and the shortcut is ready to be used to restart the Windows right after click.
As in the shutdown command above, -s parameter will shutdown the computer, while -r will shutdown and restart the computer
. -t 01 set the timeout or time to lapse in seconds for a shut down or restart to begin. By default, if no -t argument is specified, shutdown command will wait for 30 seconds countdown before shutdown or restart. The best part for shutdown command is that it can abort a system shutdown, by using -a as the option for shutdown, i.e. “shutdown -a”. There are other options or parameters that available, and users can view all of the flags with “shutdown /?” command at command prompt.
The options available for shutdown are:
No arguments : Display this message (same as -?)
-i : Display GUI interface, must be the first option
-l : Log off (cannot be used with -m option)
-s : Shutdown the computer
-r : Shutdown and restart the computer
-a : Abort a system shutdown
-m \\computername : Remote computer to shutdown/restart/abort
-t xx : Set timeout for shutdown to xx seconds
-c “comment” : Shutdown comment (maximum of 127 characters)
-f : Forces running applications to close without warning
-d [u][p]:xx:yy : The reason code for the shutdown
HKEY_USERS\.DEFAULT\Control Panel\Desktop\
REG_SZ WaitToKillAppTimeout = 10000
REG_SZ AutoEndTasks = 1
REG_SZ HungAppTimeout = 5000
HKEY_LOCAL_MACHINE\SYSTEM\CurrentControlSet\Control\
REG_SZ WaitToKillServiceTimeout = 10000
REG_SZ WaitToKillAppTimeout = 10000
REG_SZ AutoEndTasks = 1
REG_SZ HungAppTimeout = 5000
HKEY_LOCAL_MACHINE\SYSTEM\CurrentControlSet\Control\
REG_SZ WaitToKillServiceTimeout = 10000
If you getting tired of everytime have to clicking Start menu, and then click on Turn Off Computer, and then still have to click on Turn Off or Restart or Log Off in order to log off, restart or shut down your computer, and feel that it’s time wasting, you can create a one-click shortcut that allows the user to shutdown or restart Windows, or go into standby or hibernate mode, with just a single click on the shortcut itself. Best of all, the shortcut can be put at any place – desktop, Quick Launch bar, or Start Menu, and can even launch the shutdown or restart process from command line or command prompt.
In order to shutdown or restart the Windows with just one click shortcut or from command prompt or command line, users can use shutdown command line utility/command that comes with Windows 2000 (with the Resource Kit installed) and Windows XP or Windows Vista (native). To access shutdown command, simply go to DOS command prompt by clicking on Start -> All Programs -> Accessories -> Command Prompt or Start -> Run and then type in Cmd to launch a command prompt window.
To create a one-click shortcut to shutdown the Windows computer, right click on your desktop or any folder (or click at File at toolbar), and then select New, and then click on Shortcut. A New Shortcut wizard will ask for location of this item. In the textbox, type “shutdown -s -t 01″ (without quotation marks). Click on Next when done. When ask for a name for the shortcut, give any descriptive name you prefer, such as Shutdown. Then click on Finish, and you can now use the shortcut created to shut down PC immediately after click.
If you want to create a shortcut that quick restart the Windows instead of shutting down the computer, follow the above instruction, but “shutdown -s -t 01″, key in “shutdown -r -t 01″ for location of this item. Again, give a proper descriptive name to the shortcut, such as Restart, and the shortcut is ready to be used to restart the Windows right after click.
As in the shutdown command above, -s parameter will shutdown the computer, while -r will shutdown and restart the computer
. -t 01 set the timeout or time to lapse in seconds for a shut down or restart to begin. By default, if no -t argument is specified, shutdown command will wait for 30 seconds countdown before shutdown or restart. The best part for shutdown command is that it can abort a system shutdown, by using -a as the option for shutdown, i.e. “shutdown -a”. There are other options or parameters that available, and users can view all of the flags with “shutdown /?” command at command prompt.
The options available for shutdown are:
No arguments : Display this message (same as -?)
-i : Display GUI interface, must be the first option
-l : Log off (cannot be used with -m option)
-s : Shutdown the computer
-r : Shutdown and restart the computer
-a : Abort a system shutdown
-m \\computername : Remote computer to shutdown/restart/abort
-t xx : Set timeout for shutdown to xx seconds
-c “comment” : Shutdown comment (maximum of 127 characters)
-f : Forces running applications to close without warning
-d [u][p]:xx:yy : The reason code for the shutdown
An utility to unassociate file types in Windows Vista
Unassociate file types
- Download unassoc.zip from the Attachments section, and save to Desktop
- Extract the contents to a folder and run the file unassoc.exe
- Select the file type from the list
- Click Remove file association (User)
The user-specific association for the chosen file type is now removed from the registry. The system will now use the global file association settings.
Screenshot

More information
| Command | Description |
| Remove file association (User) | Removes the user-specific association (via the Open With dialog) for the chosen file type. Note that this button will remain dimmed if there is no user-specific association for the file type. |
| Delete file type | Deletes the file type completely from the registry. Both the user-specific and global associations for the chosen file type is removed. |
| Refresh list | Refreshes the list box contents. |
Detect and Repair Applications In Microsoft Office 2007
How many times have you had a Microsoft Office application crash or lock up your system? The worst culprits seem to be Outlook and Access for me.
At my workplace we are running Office 2003 and when a crash or problem occurs it means wasting time hunting down the problem, doing a repair installation, or doing a complete uninstall/reinstall of the office suite.
Windows Office 2007 has a new feature (which replaces detect and repair) which allows you to diagnose and repair problems when they occur in your daily tasks. The diagnostic utility will check the Windows system event log, hard drive, memory, application compatibility, updated service packs, and Self-Monitoring, Analysis and Reporting Technology (SMART) if your hard drive supports it. I know it sounds like a lot, but let me show you how easy this is to run.
Start \ Programs \ Microsoft Office \ Microsoft Office Tools \ Microsoft Office Diagnostics

The Microsoft Office Diagnostics splash screen will open. Click Continue.

Next you are presented with the Start Diagnostics Screen showing you what is going to be checked and the status of each diagnostic. When you are ready click Run Diagnostics.

While the Diagnostics run you will see the status bars as each tests completes. When it’s complete hit Continue.

You will get a limited detail of what was fixed. In this example all 5 diagnostic tests ran and one problem was identified and fixed. If you ok with that just close out and you are done. If you want to get additional information click on “Detailed results”.

When you look close at the detailed information in this example you can see there was a problem with the installation and this tool automatically fixed it.

Unfortunately for an administrator or power user this utility “as is” does not display specific results (you need to do more digging ). However when you are in a hurry and need your applications up and running to finish your work Microsoft Office Diagnostics works great!

.net installation
A. Download the latest installer for your Palo Alto software:
(You can use the downloaded installer file bppenu11.exe if you already have it -- if so, you can skip to Section B below.)
1. Go to this Web site:
http://www.paloalto.com/download_software
2. Enter your e-mail address and the serial number and click Go
3. Proceed to the Download your Software page, under "Download your Software", click the "Download Now" button.
4. When prompted to "Run" or "Save", choose "Save".
5. Save the file to the your computer's Desktop.
B. Download the latest .NET Update from Microsoft.com:
1. Go to this Microsoft site:
Windows XP, Windows 2000 SP4 and Windows Server 2003 (.NET 2.0): Download .NET 2.0
Alternate link: http://www.microsoft.com/downloads/details.aspx?FamilyID=0856eacb-4362-4b0d-8edd-aab15c5e04f5&DisplayLang=en&displaylang=en
2. Click the Download button to download the dotnetfx*.exe file.
3. When prompted, choose "Save" and save the file to the Desktop of your computer.
C. Download the .NET Clean-up Utility:
1. Click the link below to download the .NET Clean-up Utility:
ftp://help@ftp.bizplans.com/cleanup_tool.exe
2. When prompted to "Run" or "Save", choose "Save".
3. Save the file to your computer's Desktop.
4. Once the download has completed, close any open programs.
D. Remove the current .NET installation files:
1. Click the Start menu and select "Control Panel."
2. Double-click on "Add/Remove Programs."
3. This list is alphabetized. Scroll down to the Microsoft area.
4. Select anything that starts with Microsoft .NET (Note: If there are no listed items for the Microsoft .NET Framework listed to uninstall, please proceed with the next section below.)
5. Click the "Remove" button, and follow the steps to remove that component.
6. Repeat the steps, starting at Step 4, until all Microsoft .NET installations are removed from the computer. (Please uninstall the newest version first, proceeding to older versions as you go.)
7. Once all the Microsoft .NET components have been removed, close the Add/Remove Programs utility and restart the computer.
E. Use the .NET Cleanup Utility:
1. Double-click on the downloaded file cleanup_tool.exe and agree to the license agreement
2. Select the choice to "Clean up .NET Framework - All Versions".
3. Click the "Cleanup Now" button.
4. Once the cleanup is complete, close the utility.
F. Run the installer files (.NET and our software) with elevated administrative privileges (do the following first for the .NET framework (dotnetfx*.exe) and then again for our installer (bppenu11.exe)):
In Windows XP,
1. Right-click on the installer file and Select "Run as"
2. Choose "Run" (if this option appears) as "Other user" or "The following user".
3. Select the administrator account from the list of available users (if available in your system configuration) -- this could be "Administrator" or "Owner".
4. If a password is required, you may be able to use the default password (blank -- no password whatsoever), or else you may have to obtain and enter the administrative password.
5. If there is no option other than "Current User", you may have the option to remove a check mark from "Protect my computer and data from unauthorized program activity" -- if this is so, please remove the check mark.
Note: If the above options do not work, simply double-clicking on the installer file may work. Exploring the above options is often necessary, as well.
6. Once the installation as finished, repeat steps 2 through 5 for the Palo Alto Software program (bppenu11.exe)
Please let us know if you have additional questions or concerns.
Control Panel will not open in Vista
1) Launch services.msc from a run command
2) Find the SLUNotify service & stop it
3) Find the Software Licensing service & stop it
(it may say that ReadyBoost needs that service to run; stop it anyway)
4) Restart both services, starting with Software Licensing
5) If you have access to the Start button, just type regerit in the Start Search field and hit enter
If you don't have access to the Start button, then you will need to run the regedit.exe from the CMD window.
Once you have the Registry Editor open, click 'File' and select 'Export'.
Name it 'RegBackup' and save it to your desktop.
If there are any problems, you can double click this files and your Registry will reset back to how it is right now.
In the Rgistry Editor, expand 'HKEYLOCAL_MACHINE'
Then expand 'SYSTEM"
Then expand 'CurrentControlSet'
Then expand 'Services'
Now, find (and click on) 'slsvc'
You should see 13 entries. I would like you to look at the "Description", "DisplayName" and "ImagePath" entries and compare them to what I list below:
Name Type Data

Are all 3 of these Entries visable in your Registry?
If so, do they exactly match what I have listed?
If not, what is different?
6) Restart the computer in safe mode and create another user account.
7) Many of Vista’s Control Panel tools are found in CPL files in the Windows\System32 folder. Using the Control Panel command-line shortcuts, you can launch any of these CPL files using a command formatted as follows:
2) Find the SLUNotify service & stop it
3) Find the Software Licensing service & stop it
(it may say that ReadyBoost needs that service to run; stop it anyway)
4) Restart both services, starting with Software Licensing
5) If you have access to the Start button, just type regerit in the Start Search field and hit enter
If you don't have access to the Start button, then you will need to run the regedit.exe from the CMD window.
Once you have the Registry Editor open, click 'File' and select 'Export'.
Name it 'RegBackup' and save it to your desktop.
If there are any problems, you can double click this files and your Registry will reset back to how it is right now.
In the Rgistry Editor, expand 'HKEYLOCAL_MACHINE'
Then expand 'SYSTEM"
Then expand 'CurrentControlSet'
Then expand 'Services'
Now, find (and click on) 'slsvc'
You should see 13 entries. I would like you to look at the "Description", "DisplayName" and "ImagePath" entries and compare them to what I list below:
Name Type Data
Are all 3 of these Entries visable in your Registry?
If so, do they exactly match what I have listed?
If not, what is different?
6) Restart the computer in safe mode and create another user account.
7) Many of Vista’s Control Panel tools are found in CPL files in the Windows\System32 folder. Using the Control Panel command-line shortcuts, you can launch any of these CPL files using a command formatted as follows:
control tool.cpl
Where tool is any Control Panel tool on your system that still has a CPL file in the Windows\System32 folder.
8) cut all the cpl file and saved on desktop, then try to open control panel. If open then the issue is with the cpl file. Might be one of the cpl file has corrupted. Need to check which cpl file create problem. Ten more useful .CPL files-
Appwiz.cpl (Programs and Features replaces Add or Remove Programs)
Collab.cpl (People Near Me)
Firewall.cpl
Hdwwiz.cpl (Add Hardware Wizard)
Intl.cpl (Regional Settings)
Mmsys.cpl (Sound) Also Setasio.cpl. [NCPA.cpl] (Network Connections - see above)
Powercfg.cpl (Power Settings)
Sysdm.cpl (System Properties)
Telephon.cpl
Wscui.cpl (Windows Security Console)
Display the volume control icon in the taskbar
To add the volume control icon to your taskbar on vista
1. Right click the Start button.
2. Select Properties.
3. Go to Notification Area tab.
4. Select volume.
Note: You might need to click on the left-facing arrow button (<) on the taskbar to display the audio icon.
To add the volume control icon to your taskbar on XP


1. Right click the Start button.
2. Select Properties.
3. Go to Notification Area tab.
4. Select volume.
Note: You might need to click on the left-facing arrow button (<) on the taskbar to display the audio icon.
To add the volume control icon to your taskbar on XP

1. Click Start, and then click Control Panel.
2. Click Sounds, Speech, and Audio Devices.
3. Under Pick a task, click Change the speaker settings.
4. In the Sounds and Audio Devices Properties box, click the Volume tab, and select the Place volume icon in the taskbar check box. Then, click OK. Now when you want to adjust the volume, you can just click the speaker icon in the taskbar and move the slider.
Note: You might need to click on the left-facing arrow button (<) on the taskbar to display the audio icon.
Solution from Microsoft
Fix it for me
To run a workaround for this problem automatically, click the Fix this problem link (only work for Windows Vista).
Then, click Run in the File Download dialog box, and follow the steps in this wizard.
If you want to use a more manual solution, follow the three steps below.
1. Download this reg-file and merge it by double clicking on it.
Or you can just click on the link select Run and then Allow and in the UAC dialog box click continue, when the Registry Editor asks if you want to continue click on Yes and finally click on Ok.
This is the content of the reg file above.
Windows Registry Editor Version 5.00[-HKEY_CURRENT_USER\Software\Classes\Local Settings\Software\Microsoft\Windows\CurrentVersion\TrayNotify]
It simply deletes the TrayNotify key.
If you open up Regedit you can also locate this key and you will notice that there are two values; IconStreams and PastIconsStream. They can be deleted manually to achieve the same thing.
2. Now to be able to get this working you either need to log out and log in from Windows or restart the computer or you can just restart Explorer.
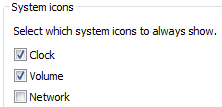
3. Go back to Taskbar>Properties>Notification Area>System icons and you will find that you can activate the Volume icon again.


It it still does not work you can start Regedit.exe and search for IconStreams and delete the value were it is found. If you are unsure take a backup.
There can also be another reason why they don't show up and that is if a policy have restricted them to be showed.
Run gpedit.msc (Group Policy Object Editor) and look at User Configuration>Administrative Templates>Start Menu And Taskbar and then the settings "Remove the networking icon" and "Remove the volume control icon". They must not be enabled. If you disable or do not configure these settings the icons will be displayed in the system notification area.
Reset icon or recover icon is now done.
Your CD drive or DVD drive is missing or is not recognized by Windows or other programs
Microsoft Windows Vista
- Click and then click All Programs.
- Click Accessories, and then click Run.
- Type regedit, and then click OK. If you are prompted for an administrator password or for a confirmation, type the password, or click Allow.
- In the navigation pane, locate and then click the following registry subkey:HKEY_LOCAL_MACHINE\SYSTEM\CurrentControlSet\Control\Class\{4D36E965-E325-11CE-BFC1-08002BE10318}
- In the right pane, click UpperFilters.
Note You may also see an UpperFilters.bak registry entry. You do not have to remove that entry. Click UpperFilters only. If you do not see the UpperFilters registry entry, you still might have to remove the LowerFilters registry entry. To do this, go to step 8. - On the Edit menu, click Delete.
- When you are prompted to confirm the deletion, click Yes.
- In the right pane, click LowerFilters.
- On the Edit menu, click Delete.
- When you are prompted to confirm the deletion, click Yes.
- Exit Registry Editor.
- Restart the computer.
Microsoft Windows XP
- Click Start, and then click Run.
- In the Open box, type regedit, and then click OK.
- In the navigation pane, locate and then click the following registry subkey:HKEY_LOCAL_MACHINE\SYSTEM\CurrentControlSet\Control\Class\{4D36E965-E325-11CE-BFC1-08002BE10318}
- In the right pane, click UpperFilters.
Note You may also see an UpperFilters.bak registry entry. You do not have to remove that entry. Click UpperFilters only. If you do not see the UpperFilters registry entry, you still might have to remove the LowerFilters registry entry. To do this, go to step 7. - On the Edit menu, click Delete.
- When you are prompted to confirm the deletion, click Yes.
- In the right pane, click LowerFilters.
- On the Edit menu, click Delete.
- When you are prompted to confirm the deletion, click Yes.
- Exit Registry Editor.
- Restart the computer।
No longer access the CD drive or the DVD drive
How to Enable / Disable Changing Themes, Wallpapers, Screen Savers and Other Desktop Settings?
In Windows you can change desktop wallpaper, screen saver, themes and other appearance settings by right-click on Desktop and select "Properties".
Disable Themes Tab in Desktop Properties:
HKEY_CURRENT_USER\Software\Microsoft\Windows\CurrentVersion\Policies\ Explorer
If "Explorer" key is not present, then create it. Now in right-side pane, create a new DWORD value NoThemesTab and set its value to 1 to disable it.
Disable Desktop Tab in Desktop Properties:
HKEY_CURRENT_USER\Software\Microsoft\Windows\CurrentVersion\Policies\ System
If "System" key is not present, then create it. Now in right-side pane, create a new DWORD value NoDispBackgroundPage and set its value to 1 to disable it.
Disable Screen Saver Tab in Desktop Properties:
HKEY_CURRENT_USER\Software\Microsoft\Windows\CurrentVersion\Policies\ System
If "System" key is not present, then create it. Now in right-side pane, create a new DWORD value NoDispScrSavPage and set its value to 1 to disable it.
Disable both Themes and Appearance Tabs in Desktop Properties:
HKEY_CURRENT_USER\Software\Microsoft\Windows\CurrentVersion\Policies\ System
If "System" key is not present, then create it. Now in right-side pane, create a new DWORD value NoDispAppearancePage and set its value to 1 to disable it.
Disable Settings Tab in Desktop Properties:
HKEY_CURRENT_USER\Software\Microsoft\Windows\CurrentVersion\Policies\ System
If "System" key is not present, then create it. Now in right-side pane, create a new DWORD value NoDispSettingsPage and set its value to 1 to disable it.
Start - Ran - Type the below command to open the TAB
1. desk.cpl = theme
2. desk.cpl @0,0 = desktop
3. desk.cpl @0,1 = screen saver
4. desk.cpl @0,2 = apearance
5. desk.cpl @0,3 = setting
Sometimes you might want to disable all or a few options in Desktop Properties to restrict users or you might want to enable those options in case they are disabled by your system administrator or a virus infection.
Following tutorial will help you in enabling or disabling all or a particular option in Desktop Properties:
NOTE: This tutorial will work for almost all Windows versions. Open regedit and goto:
Disable Themes Tab in Desktop Properties:
HKEY_CURRENT_USER\Software\Microsoft\Windows\CurrentVersion\Policies\ Explorer
If "Explorer" key is not present, then create it. Now in right-side pane, create a new DWORD value NoThemesTab and set its value to 1 to disable it.
Disable Desktop Tab in Desktop Properties:
HKEY_CURRENT_USER\Software\Microsoft\Windows\CurrentVersion\Policies\ System
If "System" key is not present, then create it. Now in right-side pane, create a new DWORD value NoDispBackgroundPage and set its value to 1 to disable it.
Disable Screen Saver Tab in Desktop Properties:
HKEY_CURRENT_USER\Software\Microsoft\Windows\CurrentVersion\Policies\ System
If "System" key is not present, then create it. Now in right-side pane, create a new DWORD value NoDispScrSavPage and set its value to 1 to disable it.
Disable both Themes and Appearance Tabs in Desktop Properties:
HKEY_CURRENT_USER\Software\Microsoft\Windows\CurrentVersion\Policies\ System
If "System" key is not present, then create it. Now in right-side pane, create a new DWORD value NoDispAppearancePage and set its value to 1 to disable it.
Disable Settings Tab in Desktop Properties:
HKEY_CURRENT_USER\Software\Microsoft\Windows\CurrentVersion\Policies\ System
If "System" key is not present, then create it. Now in right-side pane, create a new DWORD value NoDispSettingsPage and set its value to 1 to disable it.
Start - Ran - Type the below command to open the TAB
1. desk.cpl = theme
2. desk.cpl @0,0 = desktop
3. desk.cpl @0,1 = screen saver
4. desk.cpl @0,2 = apearance
5. desk.cpl @0,3 = setting
Download Mozilla from FTP
Please follow the instruction ....
1. Start >> Run > CMD

2. Type "ftp releases.mozilla.org" then Press Enter
Username "anonymous"
Password <Press Enter>
3. Type " CD /pub/mozilla.org/firefox/releases/3.0.9/win32/en-US/" then Press Enter
4. Type "mget*.exe" then Press Enter
5. Now go to c:\Documents and Settings\
Uninstalled Dell Printer
1. Uninstalled Dell Printer from the Add?Remove Programs
2. Go to the Control Panel->Printers and Faxes, File->Server Properties->Drivers, removed Dell drivers
REFERENCE: http://support.microsoft.com/kb/324757
5. Go to the Add/Remove Programs, uninstalled Dell printer driver software
6. Checked C:\Windows\System32\Spool\Printers
7.: Emptied C:\Windows\System32\Spool\Drivers\w32x86
8. Erased Dell Printer and other keys from the following keys and left the default keys
A. HKEY_LOCAL_MACHINE\SYSTEM\CurrentControlSet\Control\Print\Environments\Windows NT x86\Drivers\Version-3\
B. HKEY_LOCAL_MACHINE\SYSTEM\CurrentControlSet\Control\Print\Environments\Windows NT x86\Print Processors\
C. HKEY_LOCAL_MACHINE\SYSTEM\CurrentControlSet\Control\Print\Monitors
RESULT: Keys got deleted
2. Go to the Control Panel->Printers and Faxes, File->Server Properties->Drivers, removed Dell drivers
REFERENCE: http://en.community.dell.com/forums/t/19253898.aspx
3. Downloaded the DellCleanupUtility
4. Downloaded and on running, it removed the Dell Printer’s drivers from root and prompted to restart
3. Downloaded the DellCleanupUtility
4. Downloaded and on running, it removed the Dell Printer’s drivers from root and prompted to restart
REFERENCE: http://support.microsoft.com/kb/324757
5. Go to the Add/Remove Programs, uninstalled Dell printer driver software
6. Checked C:\Windows\System32\Spool\Printers
7.: Emptied C:\Windows\System32\Spool\Drivers\w32x86
8. Erased Dell Printer and other keys from the following keys and left the default keys
A. HKEY_LOCAL_MACHINE\SYSTEM\CurrentControlSet\Control\Print\Environments\Windows NT x86\Drivers\Version-3\
B. HKEY_LOCAL_MACHINE\SYSTEM\CurrentControlSet\Control\Print\Environments\Windows NT x86\Print Processors\
C. HKEY_LOCAL_MACHINE\SYSTEM\CurrentControlSet\Control\Print\Monitors
RESULT: Keys got deleted
After installed Office 2007 spelling check is stop work on outlook express.

To fix this error message follow these steps:
1) Open outlook express
2) Click on Tools
3) Click on Options
4) Click on the Spelling tab
5) Under the Language section, click on another language besides English
6) Click Apply
7) Choose English under the Language section
8) Click Apply
9) Click OK
10) Create a new message and try spell check, it should now work.
French Spell Check Fix
copy this folder into the "Microsoft Office" folder in "Programs" and run spell check
...it will self extract and ...your problem is solved...
Office XP Outlook Spell Checker (Proofing Tools).rar (1.62 MB)
Office_XP_Outlook_Spell_Checker__Proofing_Tools
(or)
Outlook express Spell_Checker__Proofing_Tools

Unable to receive mail error 0x800c0133
Error 0x800c0133 when you are retrieving email with your Outlook Express (OE) is because of currupted Inbox file.
To remedy please follow these steps:
1. Open OE, on the left pane, right click "Local Folders", select "New Folder...", specify a name for your new folder as "Temp".
2. If you are still able to access "Inbox", move all mails in "Inbox" to the new "Temp" folder.
3. Go to menu "Tools" -> "Options" -> "Maintenance" tab -> "Store Folder" button. It will show the location of your Inbox file, please remember this location.
4. Close OE, go to the location mentioned above, delete the file "inbox.dbx".
5. Restart OE, the "Inbox" folder should be auto recreated. Move back your mails to the new "Inbox", remove the "Temp" folder.
Error Message Mapi32.dll After You Upgrade to Windows XP
Error : A required component is missing: OMI9.DLL. Please install Microsoft Outlook again.
This issue may occur if either of the following conditions is true:
- Outlook is configured to run in compatibility mode.
-or- - Your user profile is corrupted.
After you upgrade to Microsoft Windows XP, you cannot start Outlook 2000.
To resolve this issue, follow these steps:
- Click Start, and then click Search.
- Click All files and folders.
- In the All or part of the file name box, type Outook.exe, and then click Search. By default, the Outlook.exe file is located in the following folder:
C:\Program Files\Microsoft Office\Office10\ - Right-click the Outlook.exe file, and then click Properties.
- Click the Compatibility tab, and then click to clear the Compatibility mode check box.
- Click to clear any check boxes that are selected under Display settings.
- Click Apply, and then click OK.
- Start Outlook.
If the previous steps do not resolve the issue, then you may have to create a new user profile. To do so, follow these steps:
- Restart the computer in Safe mode. To start the computer in Safe mode, follow these steps:
- Click Start, click Shut Down, and then click Shut down.
- In the Shut Down Windows dialog box, click Restart, and then click OK.
- When you are prompted to select the operating system to start, press F8.
- Use the ARROW keys to select the appropriate Safe mode option, and then press ENTER.
- If you have a dual-boot or multiple-boot system, use the ARROW keys to select the installation that you want, and then press ENTER.
- Log on to the computer as an administrator.
- Create a new user account with Administrator permissions. To do this, follow these steps:
- Open User Accounts in Control Panel.
- Click Create a new account.
- Type a name for the new user account, and then click Next.
- Click Computer administrator, and then click Create Account. Click OK.
- If you are using the NTFS file system, you have to modify the permissions on your old profile.
NOTE: If you are using the FAT file system, do not follow steps a through c. Continue with step 5.
To modify the permissions on your old profile, follow these steps:
- Using Windows Explorer, right-click your old user profile folder, and then click Properties. By default, this folder is Drive_letter:\Documents and Settings\User_name, where Drive_letter is the drive on which Windows XP is installed and User_name is your user name.
- On the Security tab, click your new user profile in the Name list, and then click to select Allow for the Full Control permission.
NOTE: If your user profile is not displayed in the Name list, add your profile: Click Add, click your user name in the list, and then click OK. - Click OK to close the dialog box.
- Log off the computer, and then log on with the new profile.
- In Windows Explorer, copy all of the documents from the original My Documents folder to your new My Documents folder.
The original My Documents folder is in the following location
Drive_letter:\Documents and Settings\User_name\My Documents
where Drive_letter is the drive on which Windows XP is installed and User_name is your old user name. - To retain the Internet favorites links, copy all of the Internet shortcut files from the original Favorites folder to the Favorites folder of the user profile that you created.
NOTE: Do not copy Desktop.ini file in the favorites folder.
The Favorites folder is in the following location:
Drive_letter:\Documents and Settings\User_name\Favorites - Restart Outlook, and then follow the steps in the wizard to re-create your user profile.
- If you want to, you can follow these steps to import your old personal folder (PST) file into Outlook:
- On the File menu, click Import And Export.
- Click Import from another program or file, and then click Next.
- In Select the file type to import from, click Personal Folder File (.pst), and then click Next.
- In File to Import, click Browse to locate the PST file you want to import, and then click Next. If you know the path, type it in the box.
- In Select the folder to import from, click the folder containing the data you want to import.
If the folder contains subfolders, and you want to include this data in the import process, click to select Include Subfolders. If the destination for importing is the currently selected folder, click Import items into the current folder; otherwise, click Import items into the same folder in. This will create matching items in the destination folder you select. - Click Finish.
- If you want to, you can remove the Administrator permissions from the new user account. To change a user's group or account type, follow these steps:
- Open User Accounts in Control Panel.
- Click the user's account name.
- Click Change the account type.
- Click the type of account you want, and then click Change Account Type.
Crypt32.dll is incompatible with Microsoft Office Outlook after upgrading to Outlook2007
Error : The file Crypt32.dll is incompatible with Microsoft Office Outlook. Install again
After upgrading to Office 2007 and attempting to open Outlook, You may receive an error stating the 'CRYPT32.dll is incompatible with MS Outlook. Install again.'
Note Re-installing will not help
Follow these steps to resolve the issue
- Open c:\program files\Microsoft Office\Office 12\
- Locate outlook.exe
- Right click on Outlook.exe and click on properties
- Click on Compatibility tab
- Uncheck the box run in compatibilty mode
- Click OK
- Restart Outlook.
Error: Windows Cannot Find Filename When Opening .DOC Files From Windows Explorer
When you double-click a .doc file to open it using Word 2003 or Word 2007, the following error may occur and the document does not open:
Windows cannot find ‘filename’. Make sure you type the name correctly, and then try again. To search for a file, click the Start button, and then click Search
However, you may be able to open the file using the File/Open… option within Microsoft Word.
The above symptom was observed in my client’s PC. The file association for .DOC appeared correct when inspected using FileExtInfo tool. The error sounds as if DDE is not working correctly or some program is interrupting it. Here is what which worked in my client’s PC running Windows Vista and Word 2003.
Instructions for Windows Vista (also applies to Windows 2000/XP)
1. Click Start, type regedit.exe and press ENTER:
2. Navigate to the following key and backup the key:
HKEY_CLASSES_ROOT \ Word.Document.8 \ shell \ Open \ ddeexec
3. Right-click the ddeexec key and choose Delete. Click Yes to confirm.
4. Navigate to the following key:
HKEY_CLASSES_ROOT \ Word.Document.8 \ shell \ Open \ command
5. Double-click (default) and set its value data to:
For Word 2003
"C:\Program Files\Microsoft Office\Office11\WINWORD.EXE" /n "%1"
For Word 2007
"C:\Program Files\Microsoft Office\Office12\WINWORD.EXE" /n "%1"
6. Exit the Registry Editor.
Instructions for Windows XP
In Windows XP, you can use the Folder Options applet to disable DDE for a file type action. Here are the instructions:
1. Open Windows Explorer
2. Click Tools, Folder Options, select the File Types tab.
3. Select .DOC file type from the list
4. Click Advanced
5. Select open and click Edit
6. Uncheck Use DDE checkbox and click OK.
7. Click OK, OK.
If that above does not help, check if one of the Office Add-ins is causing the error.
HP and Compaq Desktop PCs - Error: Low Disk Space. You are running out of disk space on Recovery (D:)
This document applies to HP and Compaq desktop computers with Windows Vista. 

Low disk space errors appear every time Windows opens or when you try to use the Recovery (D:) drive.
Figure 1: Low Disk Space message
Why do these errors occur?
The purpose of the Recovery (D:) drive is to store all the files needed to do an emergency recovery when the system become unstable. The Recovery (D:) drive is actually a partition on the main hard drive in your computer - not an actual physical drive. It has much less available space than Drive (C:). If you use the Recovery (D:) drive to store files (such as files from using MS Backup), the drive quickly becomes full and can cause serious problems when you need to use system recovery.
Do not store files on the Recovery drive. The only files on the Recovery drive should be related to a system recovery.
Figure 2: Space on drive D: as shown from Total Care Advisor

How can I fix these errors?
To stop Low Disk Space errors, remove files that are not related to recovery from the Recovery (D:) drive. Do so as follows:
| CAUTION: | Make sure you have created a set of recovery discs before using these steps. If the system stops responding, recovery discs can be used to perform a system recovery. |
- Click Start
and right-click Computer .
- Click System Protection from the left side of the Window.
- In the section "Automatic restore points", remove the selection next to the D: drive, and then click OK . If the D: drive was not selected, close this window.Figure 3: System Protection tab with D: drive unselected
- Right-click Start
- Before you can remove the backup files and folders, you need to be able to view hidden system files as follows:
- From the explorer window press the Alt key on the keyboard to make the menu bar appear in the window.
- From the file menu, click Tools , and then select Folder Options .Figure 4: Folder Options
- Select the View tab.
- Select Show hidden files and folders , remove the selection from Hide protected operating system files and then click OK .Figure 5: Folder Options: View Tab
-
- From the Folder Options window in explorer, double-click Recovery (D:) .
- If a Window opens stating "You don't currently have permission to access this folder" opens. Click Continue .Figure 6: Message window
- If you previously copied or created any files into Recovery (D:) and you want to keep them, copy them to another drive - such as the C: drive.
- Find and delete any files that you previously copied onto the Recovery (D:) drive.
CAUTION: Do not delete any files that are associated to recovery! Do not delete the items RECOVERY, $RECYCLE.BIN, boot, hp, PC-Doctor, pcdr, or PRELOAD! Doing so can prevent a future system recovery from the hard drive. If you are not sure, do not delete the file. Press Shift + Delete to permanently remove the files.To delete files created from MS Backup (MS Backup files are not recovery files), find and delete the folder with the same name as the computer name in the Recovery (D:) partition. For example if the computer name is BOB-PC, the folder containing the backup files would be named BOB-PC and would be deleted.Figure 7: Files stored in the Recovery partition. Your PC will look different.
- Several confirmation windows open. Click Continue , and Yes until the folder is deleted.
- To set Windows Folder Options back to their original setting as follows:
- From the explorer window press Alt to view the file menu.
- Click Tools , and then select Folder Options .
- Select do not show hidden files and folders and select Hide protected operating system files .
- Click OK .
-
- Close explorer. The Out of Disk Space errors should no longer appear. If you would like to use the Microsoft Backup Tool again, open it and select a different external backup device to store the backup files on.


You receive the error message "Word is unavailable, not installed, or is not the same version as Outlook" when you try to create, to edit, or to reply

This error message may appear if:
You have Word configured as your e-mail editor and Word is no longer present on the computer.
.The form is corrupt.
.Word has faulted.
.You are running a version of Word that does not support e-mail editing.
.This can also occur if Microsoft Office Outlook was started in Safe mode (achieved by pressing and holding the CTRL key while starting Outlook).
Method 1: Restart Outlook 2003
To resolve this issue if you are running Outlook 2003 in Safe Mode, restart Outlook 2003 so that it is not running in Safe Mode.
Method 2: Configure Outlook 2003 to use the Outlook editor as the e-mail editor
To resolve this issue if you do not have Word 2003 installed on the computer, follow these steps in Outlook 2003:
On the Tools menu, click Options.
Click the Mail Format tab.
Click to clear the Use Microsoft Office Word to edit e-mail messages check box.
Click OK to close the Options dialog box.
Method 3: Repair Word 2003
To resolve this issue if Word 2003 is damaged, repair Word 2003. To repair Word 2003, follow these steps:
Start Word 2003.
On the Help menu, click Detect and Repair.
In the Detect and Repair dialog box, click to select the Restore my shortcuts while repairing check box.
Click Start to start the Word 2003 repair process.
Rigister this file "regsvr32 ole32.dll"
-Or-
Delete regirt key after take backup
HKEY_CURRENT_USER\Software\Microsoft\Office\11.0\W ord\Data
HKEY_CURRENT_USER\Software\Microsoft\Office\11.0\W ord\Options
Method 4: Reinstall Word 2003
To resolve this issue, you may have to reinstall Word 2003. To reinstall Word 2003, follow these steps:
Quit all Office 2003 programs that may be running.
Click Start, click Control Panel, and then click Add or Remove Programs.
In the Currently installed programs list, click the version of Word 2003 or the version of Microsoft Office 2003 that you have installed.
Click Change.
Click Reinstall or Repair, and then click Next.
Click either Reinstall Word or Reinstall Office.
Click Install.
Solve Turn off Button Missing in Welcome Screen in Windows XP, Vista and 7
A common problem for most of the Windows XP home edition users is that Turn off Button is missing from their welcome screen or their log on page. Most of us do not notice this problem as we do not care about it. But speaking the truth Turn off button is really necessary in the log on screen as we should be able to shut down the computer without knowing the password. Otherwise you will not be able to shutdown the computer safely without knowing the password. This problem of missing shutdown button from the welcome screen or the log on page may be a result of some registry change by some of the software you install. But this problem has a very simple solution. You just need to change a registry value.

In Windows XP Home Edition or Vista Basic unlike the professional or ultimate editions which doesn’t support gpedit.msc or secpol.msc this problem can be solved by using only the registry.
I am presenting two methods here. Both the methods need your registry registry to be enabled. While performing the steps if you get an error message like Registry Editor has been disabled by your Administrator" then you have to enable the regedit command. To enable registry editor Click here.
Method 1: By using Command Prompt
Step 1: Open a command prompt (Press Start+R, Type cmd and Enter)
Step 2: Copy the command below and paste it in the command prompt. Note that for pasting in command prompt right click in the black screen and select paste.
REG ADD HKLM\Software\Microsoft\Windows\CurrentVersion\Policies\System /v ShutdownWithoutLogon /t REG_DWORD /d 1 /f

Step 3: After executing the command Press Start+L and see if you can see the Turn off button. If yes ok, else restart.
Method 2: By using Registry Editor
Step 1: Open a command prompt (Press Start+R, Type regedit and Enter)
Step 2: In the Left side of the Registry Editor Navigate to the key given below:
HKEY_LOCAL_MACHINE\SOFTWARE\Microsoft\Windows\CurrentVersion\Policies\System
It is shown in the image below:

Step 3: In the right side find the key ShutdownWithoutLogon. Double click on it and change the value to 1.


Note: If you are not able to find the key then you have to create it. Right click on the right side and select new DWORD 32 bit. Keep the Name as ShutdownWithoutLogon and set the value as 1.
Step 4: Now press Start+L and see if you can see the start button. If not Restart.

Important:
1. If your turn off button goes missing again after some time then some process is changing the value. You need to repeat the steps again.
2. If you cannot find the root key System under Policies then create a key with the same name in the left side pane of the registry editor and continue.
Subscribe to:
Posts (Atom)
