IP
Enter a long URL to make Tiny!

How to disable the "Test mode" message that is displayed in Windows 8

How to disable the "Test mode" message that is displayed in Windows

Cause

When you start your Windows 8-based or Windows 7-based computer, you receive the following message in the lower-right corner of the desktop, depending on your version of Windows. This message is displayed because your computer is running in test mode.
Windows 8 - Test mode Windows 8 build 9200
Windows 7 - Test mode Windows 7 build 7600
Note This message may also mention a more specific edition of Windows. For example, the message may be, “Test mode Windows 8 Pro build 9200.”

Solution

Windows 8

1.       Type cmd on the Start screen. Right-click on Command Prompt in the search results. Select Run as administrator on the menu that appears at the bottom of the screen.

Note If you are prompted by a User Account Control window, tap or click Yes.
2.       In the Command Prompt window, type the following command, and then press Enter:
bcdedit -set TESTSIGNING OFF
3.       After you see the confirmation, close the Command Prompt window then restart the computer.

Windows 7

Method 1

1.       Click Start, and then type cmd in the Search box.
2.       Under Programs, right-click cmd.exe, and then click Run as administrator.
3.      At the command prompt, type the following text, and then press Enter:
bcdedit /set TESTSIGNING OFF
4.       Close the Command Prompt window, and then restart your computer.
Note If this method does not resolve the issue, go to Method 2.

Method 2

1.       Click Start, and then type cmd in the Search box.
2.       Under Programs, right-click cmd.exe, and then click Run as administrator.
3.       At the command prompt, type the following commands, and press Enter after each command:
bcdedit.exe -set loadoptions ENABLE_INTEGRITY_CHECKSbcdedit.exe -set TESTSIGNING OFF
4.       Close the Command Prompt window, and then restart your computer.

Method 3 (Fix it for me (Windows 7 only)

To fix this problem automatically, click the Fix it button or link. Then click Run in the File Download dialog box, and follow the steps in the Fix it wizard.

Note : For more details please visit http://support.microsoft.com/kb/2509241

How to Set a Startup Password to Lock or Unlock Windows

keep your computer more secure and protected from theft by using SysKey - Set Startup Password to Lock or Unlock Windows

Information - SysKey (SAM Lock Tool) is an in-built Windows utility that can help you secure the Security AccountsManagement or SAM databaseThis tutorial will show you how to use SysKey to require a password to be entered by users during system startup in Vista, Windows 7, or Windows 8You must be logged in as an administrator to be able to do the steps in this tutorial.

Note Note
  • A startup password is only entered at system startup at boot.
  • A startup password is not the same as a user account's password entered in the log on screen.
  • After entering the startup password, Windows will then startup to allow a user to login.
Warning - Doing a system restore using a restore point dated before SysKey was set will undo it.

EXAMPLE: Windows Startup 
NOTE: This is an example of what you will see at Windows startup if you set a startup password. Windows will not startup until you have entered the startup password.


Here's How:

1. Press the Windows+R keys to open the Run dialog, type syskey, and click/tap on OK.
2. If prompted by UAC, then click/tap on Yes (Windows 7/8) or Continue (Vista).
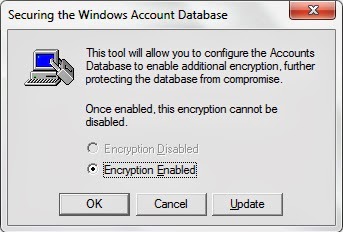
3. Click/tap on Update. (see screenshot below)

4. Do step 5 or 6 below for what you would like to do.
5. To Set a Startup Password

Select (dot) the Password Startup option, enter a password you want twice, and click/tap on OK. (see screenshot below) 
 
warning Warning - It is recommended that you write down this startup password and keep it somewhere safe. Windows will now require users to enter the startup password at every system startup before Windows will start and users allowed to login to their user accounts. Windows will not startup without it being entered.

6. To Remove Startup Password

Select (dot) System Generated Password, select (dot) the Store Startup Key Locally option, and click/tap on OK. (see screenshot below)
Enter the startup password from step 5A above, and click/tap on OK. (see screenshot below)
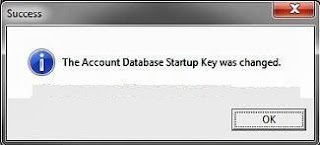
Click/tap on OK. (see screenshot below)

Windows will now no longer require users to enter the startup password at every system startup.


Note: This article got from sevenforums website, which was posted by Shawn.

How to combine multiple PDFs into one document

Joining multiple PDFs into one document is easy if you have Acrobat--but if you'd rather save the money, there's a free program for Windows that does the trick.

1. Install PDFBinder here. (Download PDFBinder from - https://code.google.com/p/pdfbinder/downloads/list)

2. Launch PDF Binder. 


3. Drag and drop PDF files into PDFBinder or click Add file& to select PDFs to join. 
4. Select a PDF file and click the up and down arrows to position it correctly. 


5. When they're in the right order, click Bind! to begin the joining process. You will need to select a name for the final PDF. 
    Additional Information | | | |

   #Odisha.Club @everything is here!
   Registry Edits for Windows XP
   How to remove .net software and installation
   Computer Screenshot sites : gur.in ! screenshots.leeindy.com
   Home | Contact Us| RSS | About US | Mail Us | Bookmark this page

Copyright © 2015 ranjanmantri.blogspot.com. All Rights Reserved.